

Saturday, August 4. 2018
Authenticating a JWT token in wildfly

Sometimes I get surprised with the lack of information and/or documentation around wildfly and JBoss. If you search over the security documentation for wildfly, it supports several authentication mechanisms, by default BASIC, FORM, SPNEGO and CLIENT-CERT. There is no mention to bearer tokens or JWT but, surprise, surprise, the support is there and it can be used out of the box. There is very scarce documentation but you can find some examples and a quickstart about this feature.
A JSON Web Token (JWT) is an access token than contains three parts: a header, a payload and a signature. The header is just a JSON with some fixed fields (like type -jwt in this case-, algorithm of the signature or the id of the key used). The payload is the interesting part and is just any JSON with the information that the token is going to interchange, it can be any information, but things like username, roles, groups, name and surname are common. Among those fields there are two typical keys: iss or issuer and aud or audience. The issuer is who is issuing the token. The audience is for what endpoint the token was created. Wildfly implementation can be configured to check these two fields. Finally a signature of the header and payload is added to ensure that the token is valid and has not been modified (non-repudiation and integrity). In current days these tokens are ubiquitous to authenticate and authorize web services applications.
I had no idea about this feature (even more, I thought that there was no bearer authentication by default in wildfly) and I had recommended custom developments several times for this use-case. That was a wrong advise or, at least, an incomplete one. So, once I have heard about this mechanism I thouhgt that it was fair to test it and know more about how it works. This entry is going to test the new BEARER_TOKEN mechanism introduced by elytron in a wildfly 13. The JWT token is going to be provided by the keycloak project but the server is going to consume it just using elytron (no agent provided by keycloak is going to be used, just plain wildfly BEARER_TOKEN mechanism).
The steps to setup the demo are the following.
First download and install wildfly 13.
unzip wildfly-13.0.0.Final.zip
cd wildfly-13.0.0.Final/bin/
./add-user.sh -u admin -p XXXXX
./standalone.sh
Configure with offset 10000 (keycloak will be running at default ports):
./jboss-cli.sh --connect
/socket-binding-group=standard-sockets:write-attribute(name=port-offset, value="${jboss.socket.binding.port-offset:10000}")
reload
Now just do the same for keycloak.
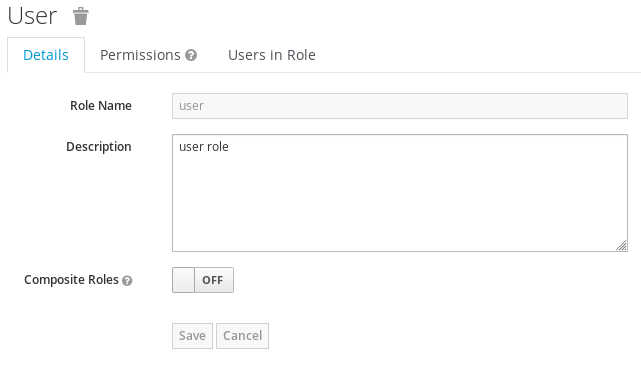
unzip keycloak-4.1.0.Final.zip
cd keycloak-4.1.0.Final/bin/
./add-user.sh -u admin -p XXXXX
./add-user-keycloak.sh -r master -u admin -p XXXXX
./standalone.sh
Using the keycloak administration several objects are created. First a role that will be assigned to our users. In Roles click Add Role and create a user role.
Then create the user to be used with that role. Go to Users and Add user.
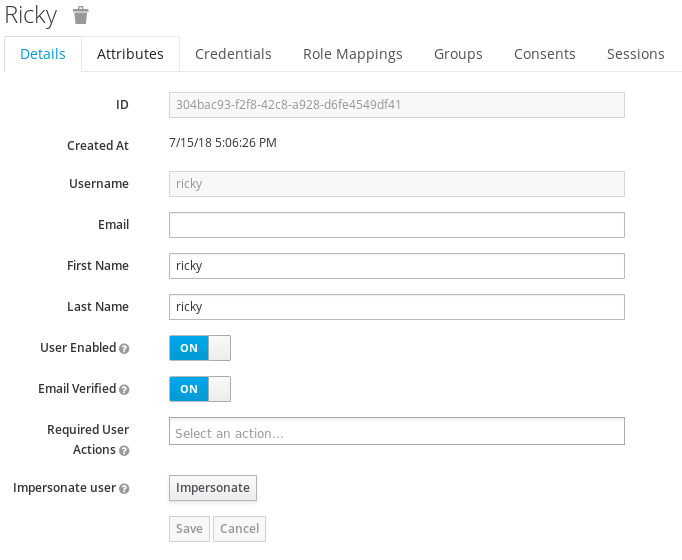
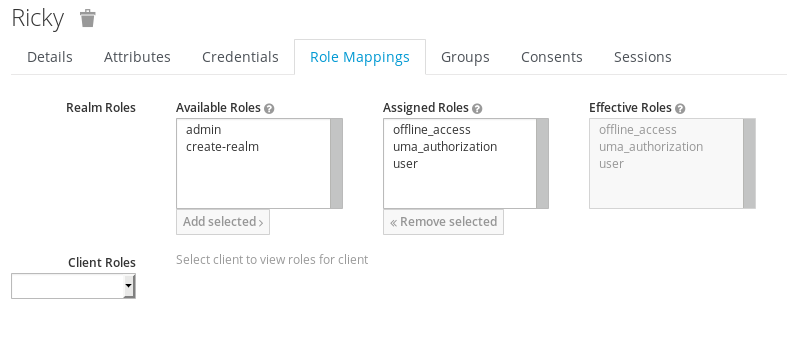
Assign a password in the Credentials tab (non-temporary) and finally assign the user role to it.
In Clients click Create and fill the wildlfy client information. This client will be used to get the token for the application (using direct login or direct grants) and with that token the wildfly endpoint will be called.
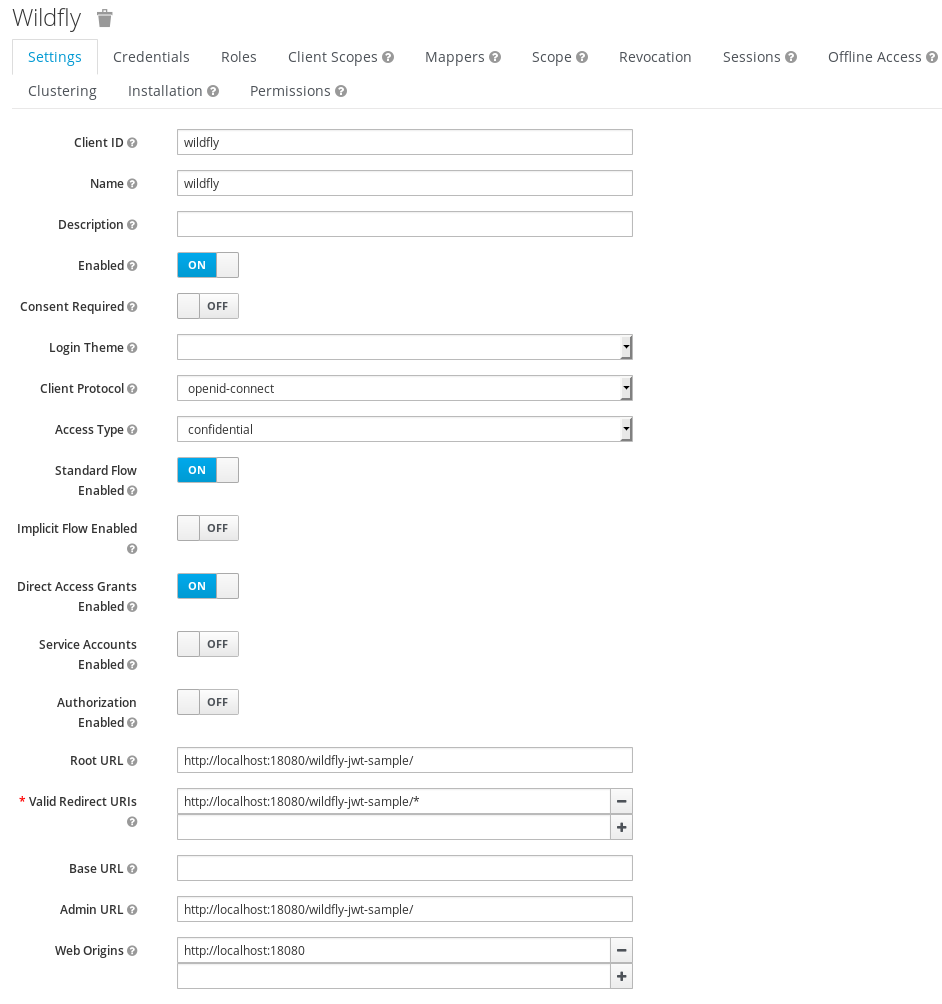
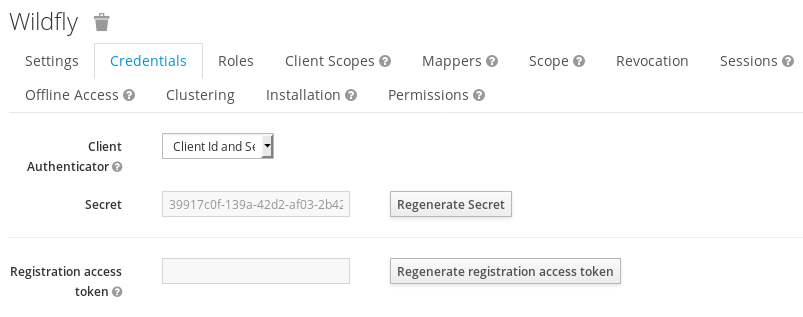
When you configure a client as confidential in the second tab, Credentials, you can set a secret for the client. This password will be needed for some operations later on (for login using client credentials and to configure introspection).
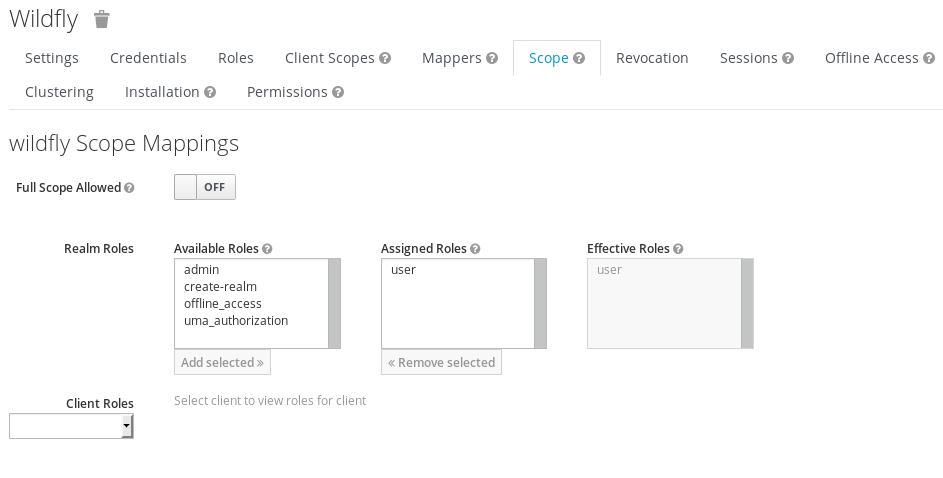
In the Scope tab full scope is removed and only the role user is assigned. This way the JWT token is restricted to contain only this role (if the user has it) and not all the user information.
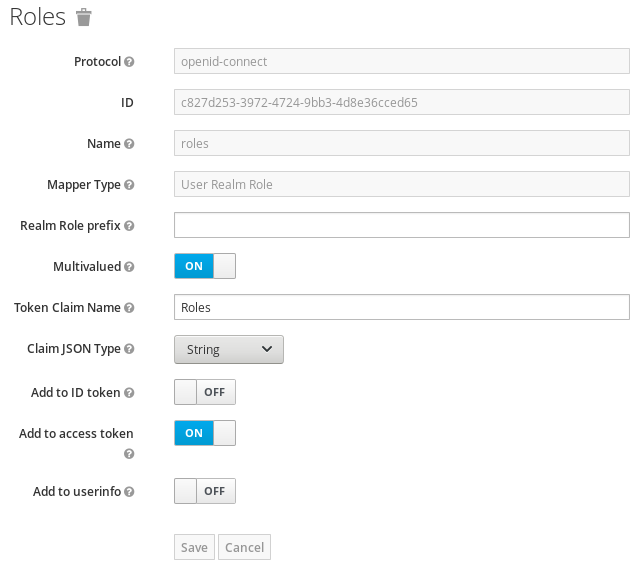
Finally a mapper is going to be configured. This part is the only tricky point of the demo. The wildfly authenticator expects the roles in a top-level field in the JWT token, but keycloak uses the claim realm_access.roles (two levels). For that reason the role list is going to be moved to a Roles field (in elytron this is the default attribute is for roles, although any another attribute can be configured using a role-decoder). Create protocol mapper in the Mappers tab.
Now that keycloak is configured, we need the certificate that is going to be used to sign the token. We can get it from keycloak in Realm Settings → Keys → RSA type → Click Certificate. Create a keystore with it. The base64 data should be enclosed with -----BEGIN CERTIFICATE----- and -----END CERTIFICATE----- lines to be in a PEM format (the file keycloak.pem was generated).
cd ${WILDFLY_HOME}/standalone/configuration
keytool -importcert -keystore keycloak.jks -storepass changeit -file keycloak.pem -alias keycloak -trustcacerts
Going back to wildfly, elytron should be configured now to create a new domain using a token-realm. In a first step the realm is going to be configured to check a jwt token.
/subsystem=elytron/key-store=jwt-key-store:add(type="JKS", relative-to=jboss.server.config.dir, path="keycloak.jks", credential-reference={clear-text="changeit"})
/subsystem=elytron/token-realm=jwt-realm:add(jwt={issuer=["http://localhost:8080/auth/realms/master"], audience=["wildfly"], key-store=jwt-key-store, certificate="keycloak"}, principal-claim="preferred_username")
/subsystem=elytron/security-domain=jwt-domain:add(realms=[{realm=jwt-realm}], permission-mapper=default-permission-mapper, default-realm=jwt-realm)
/subsystem=elytron/http-authentication-factory=jwt-http-authentication:add(security-domain=jwt-domain, http-server-mechanism-factory=global, mechanism-configurations=[{mechanism-name="BEARER_TOKEN", mechanism-realm-configurations=[{realm-name="jwt-realm"}]}])
/subsystem=undertow/application-security-domain=jwt-domain:add(http-authentication-factory=jwt-http-authentication)
As commented before the jwt is configured to only admit access tokens that are emitted by a set of issuers and to a specific audience (it seems those two fields are optional and can be omitted). The key-store is used to reference the certificate that keycloak is going to use to sign the tokens. This way elytron will validate that the signature is valid, being sure that the token was generated by keycloak and not modified by someone else. The attribute to identify the user will be preferred_username and nothing is specified for roles, so the default Roles attribute will be used.
Finally some debug levels are configured to check that everything is working.
/subsystem=logging/logger=org.wildfly.security:add(level=ALL)
/subsystem=logging/logger=org.wildfly.elytron:add(level=ALL)
A hello-world application is developed to use jaxrs and return the name of the logged user. The endpoint is as simple as this one.
package es.rickyepoderi.sample;

import javax.servlet.http.HttpServletRequest;
import javax.ws.rs.GET;
import javax.ws.rs.Path;
import javax.ws.rs.Produces;
import javax.ws.rs.core.Context;
import javax.ws.rs.core.MediaType;

@Path("hello")
public class HelloWorld {

    @Context
    private HttpServletRequest request;

    @GET
    @Produces(MediaType.TEXT_PLAIN)
    public String world() {
        return "Hello " + (request.getRemoteUser() != null? request.getRemoteUser() : "world") + "!!!";
    }
}
In order to use the previous configuration the web.xml should use a security-constraint and the authentication method should be set to BEARER_TOKEN. Besides the user role is configured to give access to the application (this way the application is ensuring that token roles are parsed correctly).
<?xml version="1.0" encoding="UTF-8"?>
<web-app xmlns="http://xmlns.jcp.org/xml/ns/javaee" xmlns:xsi="http://www.w3.org/2001/XMLSchema-instance"
         xsi:schemaLocation="http://xmlns.jcp.org/xml/ns/javaee http://xmlns.jcp.org/xml/ns/javaee/web-app_3_1.xsd"
         version="3.1">
    <security-constraint>
        <web-resource-collection>
            <web-resource-name>Protect all application</web-resource-name>
            <url-pattern>/*</url-pattern>
        </web-resource-collection>
        <auth-constraint>
            <role-name>user</role-name>
        </auth-constraint>
    </security-constraint>
    <login-config>
        <auth-method>BEARER_TOKEN>/auth-method>
        <realm-name>jwt-domain</realm-name>
    </login-config>
    <security-role>
        <description>Role required to log in to the Application>/description>
        <role-name>user</role-name>
    </security-role>
    <session-config>
        <session-timeout>30</session-timeout>
    </session-config>
</web-app>
In the jboss-web.xml just the domain added to undertow is configured.
<?xml version="1.0" encoding="UTF-8"?>
<jboss-web>
   <security-domain>jwt-domain</security-domain>
</jboss-web>
Now a little test.sh is created in order to test the endpoint (you can find it inside the maven project). A curl command is executed to login and get a token using direct grants over the keycloak client. That token is sent inside the Authorization header to call the wildfly endpoint. The script is very simple but it works.
bash test.sh
Hello ricky!!!
The hello endpoint is returning my username so the token is being correctly validated and the username and roles are obtained.
Now let's try the introspection. The introspect is an endpoint that an OAuth 2.0 server gives to validate access tokens. This way, instead of using wildfly internal code, the container will call this endpoint to validate the access token. This has some advantages, for example, that the token is not restricted to be a JWT one.
So now the configuration of the jwt-realm should be modified from jwt to oauth2-introspect. The elytron configuration just offers to use a username/password configuration using BASIC authentication, but, as I commented previously, this is the default authentication for a confidential keycloak client, so it should work. The username is the client name, wildfly, and the password the one generated in the Credentials tab when the client was configured.
/subsystem=elytron/token-realm=jwt-realm:undefine-attribute(name=jwt)
/subsystem=elytron/token-realm=jwt-realm:write-attribute(name=oauth2-introspection, value={introspection-url=http://localhost:8080/auth/realms/master/protocol/openid-connect/token/introspect, client-id=wildfly, client-secret=39917c0f-139a-42d2-af03-2b4207758242})
And my little script continues returning the same output, therefore the introspection endpoint is validating the ticket as expected.
So, it is working. Wildfly and the new elytron subsystem has a poor documented mechanism called BEARER_TOKEN, which lets you authenticate using JWT tokens (and, developing a custom realm, can be extended to more tokens, in general, to any token sent in the Authorization header with the BEARER prefix). In this entry the keycloak single sign-on product was installed to obtain the JWT token and then a token realm was configured inside elytron to validate it. First an internal validation was done (the wildfly code checks issuer, audience and signature) and then an OAuth introspection endpoint was configured to do the same (the server just calls the endpoint to validate the token). Both configuration work. Remember that the only trick was moving the roles to first level claim (Roles in this case), that is needed because wildfly just considers attributes at first level (and keycloak adds roles by default in a more complex JSON document). After my warning some documentation is starting to come to the project.
Tokenized regards!
Thursday, March 29. 2018
Configuring kerberos/spnego login in tomcat
Another quick entry this time. The past week I needed to configure kerberos/spnego login in tomcat. I have never done this setup before and it has some specific things, so I prefer to write an entry and do not lose time if I need this a second time. The kerberos/spnego login can be configured by default in tomcat, you do not need anything extra. The entry will comment step by step the configuration.
Install the last version of tomcat (9.0.6 right now).
unzip apache-tomcat-9.0.6.zip
cd apache-tomcat-9.0.6/bin
chmod u+x *.sh
Create the kerberos user for the service principal name (SPN), this is always the same and commented in all the previous entries about kerberos. I am going to use a machine called jboss.sample.com, so the user is created as follows.
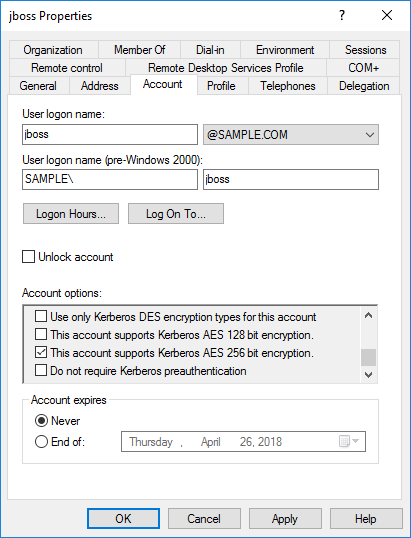
In the account tab the options Password never expires and This account supports Kerberos AES 256 bit encryption are selected.
Then the keytab is created with all the cartographic algorithms.
ktpass -princ HTTP/jboss.sample.com@SAMPLE.COM -mapuser jboss@SAMPLE.COM -pass XXXXX -crypto ALL -ptype KRB5_NT_PRINCIPAL -out jboss-all.keytabFollow the instructions in the tomcat site to configure kerberos in the continer. Some files need to be prepared in the conf directory of the installation. First the krb5.ini is configured (I reused a previous vm, my windows server is a 2016 essentials called sampleserver.sample.com).
[libdefaults]
  default_realm = SAMPLE.COM
  default_tkt_enctypes = aes256-cts-hmac-sha1-96 aes256-cts aes128-cts-hmac-sha1-96 aes128-cts rc4-hmac
  default_tgs_enctypes = aes256-cts-hmac-sha1-96 aes256-cts aes128-cts-hmac-sha1-96 aes128-cts rc4-hmac
  permitted_enctypes = aes256-cts-hmac-sha1-96 aes256-cts aes128-cts-hmac-sha1-96 caes128-cts rc4-hmac
  forwardable = true
  dns_lookup_realm = false
  dns_lookup_kdc = false

[realms]
  SAMPLE.COM  = {
    kdc = sampleserver.sample.com
    default_domain = SAMPLE.COM
}

[domain_realm]
  .SAMPLE.COM = SAMPLE.COM
  SAMPLE.COM = SAMPLE.COM
Then the jaas.conf is configured to use the previous keytab, which is also copied to the conf directory.
com.sun.security.jgss.krb5.initiate {
    com.sun.security.auth.module.Krb5LoginModule required
    doNotPrompt=true
    principal="HTTP/jboss.sample.com@SAMPLE.COM"
    useKeyTab=true
    keyTab="/opt/jboss/apache-tomcat-9.0.6/conf/jboss-all.keytab"
    storeKey=true
    debug=true;
};

com.sun.security.jgss.krb5.accept {
    com.sun.security.auth.module.Krb5LoginModule required
    doNotPrompt=true
    principal="HTTP/jboss.sample.com@SAMPLE.COM"
    useKeyTab=true
    keyTab="/opt/jboss/apache-tomcat-9.0.6/conf/jboss-all.keytab"
    storeKey=true
    debug=true;
};
Add some options to the tomcat startup, I added them to the beginning of the catalina.sh. Those options are to add debug and the configuration for the previous files.
# krb5 opts
JAVA_OPTS="$JAVA_OPTS -Djava.security.krb5.conf=/etc/tomcat/krb5.ini -Djava.security.auth.login.config=/etc/tomcat/jaas.conf -Dsun.security.krb5.debug=true -Dsun.security.spnego.debug=true -Djava.security.egd=file:/dev/./urandom"
Finally an AD realm should be added as the user repository for tomcat (the user will be authenticated using SPNEGO and then the user will be searched in the AD for groups). This point is the one that is very specific for tomcat (at least for me), until I understood that I needed to create a valid realm for the kerberos login I was a bit lost. A JNDI realm is added and configured to search the user and get the roles via the memberOf attribute in the user (no role search, roles will be the complete DN).
    <Realm className="org.apache.catalina.realm.JNDIRealm" resourceName="UserDatabase"
           debug="9"
           connectionName="cn=Admin,cn=users,dc=sample,dc=com"
           connectionPassword="XXXXX"
           connectionURL="ldap://sampleserver.sample.com:389"
           userRoleName="memberOf"
           userBase="cn=users,dc=sample,dc=com"
           userSearch="(&(objectClass=user)(sAMAccountName={0}))"
           userSubtree="true"
           useDelegatedCredential="false"
    />
And that is all. Now you just need to deploy the application that should be configured to use a SPNEGO login configuration. In my case the app is a simple JSP and the web.xml just protects all the application.
<?xml version="1.0" encoding="UTF-8"?>
<web-app xmlns="http://xmlns.jcp.org/xml/ns/javaee"
         xmlns:xsi="http://www.w3.org/2001/XMLSchema-instance"
         xsi:schemaLocation="http://xmlns.jcp.org/xml/ns/javaee http://xmlns.jcp.org/xml/ns/javaee/web-app_3_1.xsd"
         version="3.1">
    <display-name>hello-spnego-tomcat</display-name>
    <security-constraint>
        <display-name>Protect all app</display-name>
        <web-resource-collection>
            <web-resource-name>exampleWebApp</web-resource-name>
            <url-pattern>/*</url-pattern>
        </web-resource-collection>
        <auth-constraint>
            <role-name>*</role-name>
        </auth-constraint>
    </security-constraint>
    <login-config>
        <auth-method>SPNEGO</auth-method>
        <realm-name>SPNEGO</realm-name>
    </login-config>
    <security-role>
        <description>Role required to log in to the Application</description>
        <role-name>*</role-name>
    </security-role>
    <welcome-file-list>
        <welcome-file>index.jsp</welcome-file>
    </welcome-file-list>
</web-app>
And the JSP uses this idea to get the GSSCredential which could be used to delegate the token to another web service (calling another web service or, in general, reuse the kerberos token for delegation). In tomcat the credential is inside its specific principal implementation.
This is the video of the single sign-on using the kerberos token.
Today's entry is simple, just a kerberos application using tomcat and the default spnego authentication to provide SSO in a windows environment. I personally had never configured tomcat to use kerberos and it always takes some time to setup new things. A JNDI realm is needed, the user obtained via kerberos is searched in the AD and the principal is created (username, roles and GSS credential are stored inside the principal). The configuration for the web application has no special characteristics. My simple JSP to test in in this war file (I have not even created a maven to test this).
Regards!
Saturday, February 24. 2018
OCSP in the Apache web server

OCSP (Online Certificate Status Protocol) is a recurring topic of the blog. I am certainly not an expert, but I fear that there are very few people that really know about this protocol deeply so, sometimes, I am just the best suited around. There have been two or three times already that I needed to configure the Apache httpd server to deal with OCSP for verifying client certificates (TLS mutual authentication) and, in almost all of them, I have had issues with the setup. In all the occasions we were trying to remove the CRL (Certificate Revocation List) configuration for another one using OCSP. And it's usually not so easy.
The CRL configuration is mainly managed by the option SSLRevocationCheck since version 2.4 which controls how the openssl is called to perform the verification of the client certificate. This way you can configure to check the CRL only over the final client certificate (leaf) or over all the chain of certificates (root and intermediate CAs and the final certificate). Besides there is a very useful flag to let pass a certificate for which the CRL is not found (no_crl_for_cert_ok option). In general the option for configuring CRL is very complete and let you setup almost any situation.
Nevertheless the OCSP configuration is much less rich. The revocation is enabled with the option SSLOCSPEnable (only on or off values) and then there are more options to locate the URL of the responder to call (options SSLOCSPDefaultResponder and SSLOCSPOverrideResponder let you configure a default OCSP responder in case the certificate does not have the proper extension, you can even override that extension and always call the same responder no matter what the certificate says), dealing with signature responses and timeouts. But none of the options controls when the OCSP verification is done, if you enable it all the chain is always validated (no leaf of no_crl_for_cert_ok equivalents here).
This difference in configuration makes sometimes impossible to change from CRL to OCSP. The first time the issue was that the customer just wanted to validate the certificates that had the OCSP extension in it (it's not possible because if you enable OCSP you need a valid responder, if no one is found the certificate is not validated and that's an error). In the next times the problem was that the OCSP responder was only for final certificates, the intermediate CA has no extension to validate it (CRL or OCSP) and, therefore, the CRL was configured to only check leaf but the same cannot be configured using OCSP (the intermediate CA was validated, unknown returned and the certificate was not admitted). So, in summary, if the configuration for revocation is a bit complex (several CAs, intermediates, different responders, certificates with extensions and without them,...) the OCSP is a understatement.
The last weekend I decided to check how difficult was configuring OCSP exactly in the same way than CRL (none, leaf and chain with a flag no_ocsp_for_cert_ok to allow the certificates that has no responder associated to go in). The modifications finally resulted in just a few lines of code so I decided to submit a bugzilla just to know what the apache guys think about it. With the changes the CRL behavior can be more easily mapped to the OCSP one, at least I think that I would have configured all my failed previous attempts. I do not know how many people are interested in OCSP revocation for client certificates (maybe it's a minor issue) but, if somebody is using it, the changes can be interesting.
Let's see. Best regards!
Comments