

Thursday, September 15. 2022
Using jakartaee 10 security OIDC with wildfly 27 preview

Today a very quick entry about the jakarta security OpenID Connect is going to be presented. The new version 3.0 of the jakarta security spec allows as to configure an OpenID Connect authentication mechanism. The idea of this entry is testing the mechanism using keycloak as the authentication server and wildfly 27 preview (current alpha5 version) as the jakartaee 10 compatible server. This repository developed by hantsy will be used as the test application, specifically the folder called security-oidc which is a sample OIDC application.
The application defines a ProtectedServlet.java which has the OpenIdAuthenticationMechanismDefinition defined in it.
@OpenIdAuthenticationMechanismDefinition(
        providerURI = "${openIdConfig.issuerUri}",
        clientId = "${openIdConfig.clientId}",
        clientSecret = "${openIdConfig.clientSecret}",
        redirectURI = "${baseURL}/callback"
  )
The configuration is loaded from a CDI Named (openIdConfig) bean which is defined in the class Auth0OpenIdConfig.java. This class in turn loads the final data from a file openid.properties located in the classpath. The file should be configured to specify the OpenID Connect server information (which will be the local keycloak installation).
Once the demo app has been explained (thanks hantsy!) all the detailed steps to make it run in the commented setup are presented.
Install keycloak and start it in dev mode.
wget https://github.com/keycloak/keycloak/releases/download/19.0.2/keycloak-19.0.2.zip
unzip keycloak-19.0.2.zip
cd keycloak-19.0.2/bin/
./kc.sh start-dev
Go to the console (http://localhost:8080) and create the initial admin user. Then login with that user to the console.
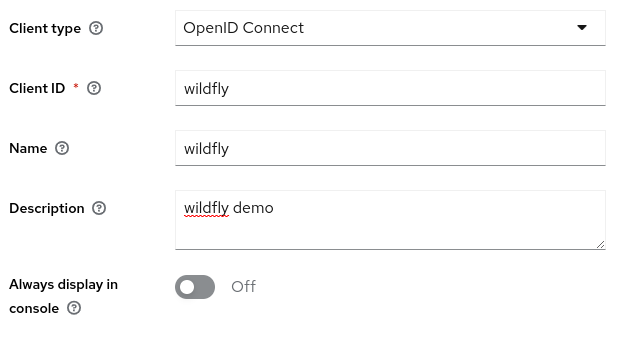
Create a client in keycloak called wildfly in the master realm. Go to the Clients menu option and click Create client. Fill first form in the following way.
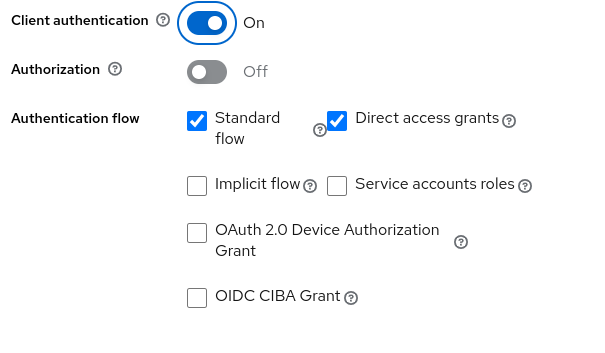
Click next and continue with the second form.
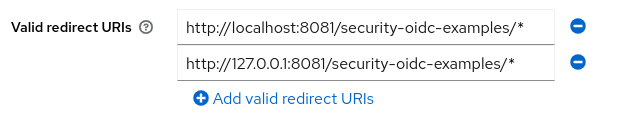
Click Save. In the Settings tab add the valid redirect URIs for the client (the wildfly server will run in port 8081 to not collide with keycloak).
And take note of the client secret which is displayed in the Credentials tab (this information will be needed to configure the openid.properties file in the application). 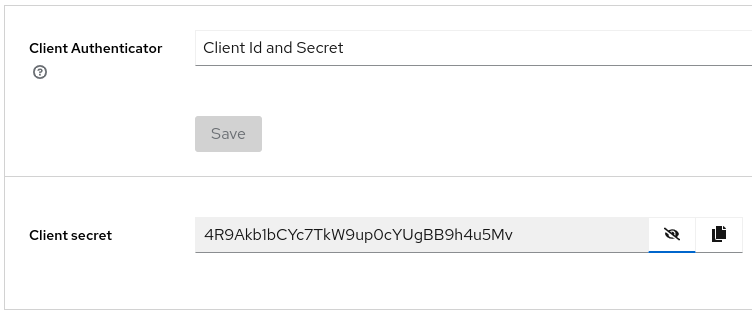
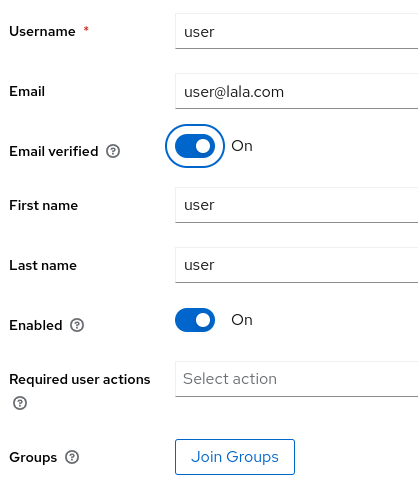
The sample app requires a user called user. So let's create it. In the Users menu click the Add User button and fill the information.
Time to install the wildfly server. As previously commented it is started with an offset of 1 to use port 8081 (and avoid collision with keycloak).
wget https://github.com/wildfly/wildfly/releases/download/27.0.0.Alpha5/wildfly-preview-27.0.0.Alpha5.zip
unzip wildfly-preview-27.0.0.Alpha5.zip
cd wildfly-preview-27.0.0.Alpha5/bin/
./add-user.sh -u admin -p admin
./standalone.sh -Djboss.socket.binding.port-offset=1
In order to build the application clone the repository and go to the security-oidc project.
git clone https://github.com/hantsy/jakartaee10-sandbox.git
cd jakartaee10-sandbox/security-oidc
At this point we need to configure the file src/main/resources/openid.properties with our keycloak information. Note the secret was taken from a previous step.
domain=localhost:8080/realms/master
clientId=wildfly
clientSecret=4R9Akb1bCYc7TkW9up0cYUgBB9h4u5Mv
And finally I did some little modifications to fully set my environment for the application. Check this diff.
git diff
diff --git a/pom.xml b/pom.xml
index 2c53f21..28940ac 100644
--- a/pom.xml
+++ b/pom.xml
@@ -13,7 +13,7 @@
     <properties>
         <project.build.sourceEncoding>UTF-8</project.build.sourceEncoding>
         <project.reporting.outputEncoding>UTF-8</project.reporting.outputEncoding>
-        <maven.compiler.release>17</maven.compiler.release>
+        <maven.compiler.release>11</maven.compiler.release>

         <!-- Official Maven Plugins -->
         vmaven-compiler-plugin.version>3.10.1</maven-compiler-plugin.version>
diff --git a/security-oidc/src/main/java/com/example/Auth0OpenIdConfig.java b/security-oidc/src/main/java/com/example/Auth0OpenIdConfig.java
index 3326125..2c1da58 100644
--- a/security-oidc/src/main/java/com/example/Auth0OpenIdConfig.java
+++ b/security-oidc/src/main/java/com/example/Auth0OpenIdConfig.java
@@ -28,7 +28,7 @@ public class Auth0OpenIdConfig {
             domain = properties.getProperty("domain");
             clientId = properties.getProperty("clientId");
             clientSecret = properties.getProperty("clientSecret");
-            issuerUri = "https://" + this.domain + "/";
+            issuerUri = "http://" + this.domain + "/";
             LOGGER.log(
                     Level.INFO,
                     "domain: {0}, clientId: {1}, clientSecret:{2}, issuerUri: {3}",
diff --git a/security-oidc/src/main/java/com/example/CallbackServlet.java b/security-oidc/src/main/java/com/example/CallbackServlet.java
index c739173..57dd4a2 100644
--- a/security-oidc/src/main/java/com/example/CallbackServlet.java
+++ b/security-oidc/src/main/java/com/example/CallbackServlet.java
@@ -23,7 +23,7 @@ public class CallbackServlet extends HttpServlet {
         LOGGER.log(Level.FINEST, "Enter callback servlet");
         // response.getWriter().println(context.getAccessToken());
         String referer = (String) request.getSession().getAttribute("Referer");
-        String redirectTo = referer != null ? referer : "/protected";
+        String redirectTo = referer != null ? referer : "/security-oidc-examples/protected";
         LOGGER.log(Level.FINEST, "In /callback, redirect to: {0}", redirectTo);

         response.sendRedirect(redirectTo);
Java 11 (which is my default java) is used instead of 17, the issuerUri is http and not https (because keycloak was started in dev mode to not complicate the demo with certificates) and finally the application will be deployed normally from the war, so the context will be /security-oidc-examples (not deployed as the ROOT app).
One tricky point is that by default the elytron subsystem enforces the logged user to be in the default other domain (by default application users are placed in the application-users.properties file in wildfly). The integrated-jaspi option was set to false to avoid that. Now the logged users via jakartaee security will not be mapped to local elytron users.
./jboss-cli.sh --connect --controller=remote+http://localhost:9991
/subsystem=undertow/application-security-domain=other:write-attribute(name=integrated-jaspi, value=false)
reload
Everything is OK to compile the sample app and deploy it to the server.
cd jakartaee10-sandbox/security-oidc
mvn clean package
cd ${JBOSS_HOME}/bin
./jboss-cli.sh --connect --controller=remote+http://localhost:9991
deploy /path/to/jakartaee10-sandbox/security-oidc/target/security-oidc-examples.war
You can now go the protected servlet http://localhost:8081/security-oidc-examples/protected and check performing a login into the app. The browser will be redirected to the keycloak login screen and, after a successful login with user, it will be redirected back to the app. The token information is displayed by the protected page in this application. I was about to record a video but it seems that my fedora laptop is not in the mood. So no video this time.
Click Create. In the Credentials tab set a password using Set password.
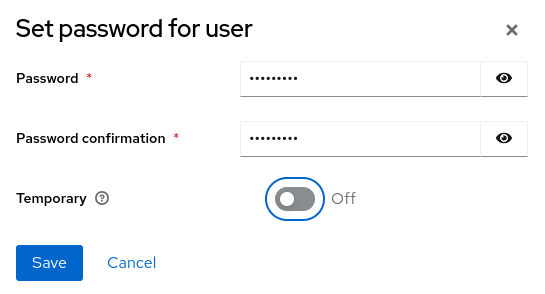
Click Save and Set password.
That's all folks! Today's entry is a quick review of the steps needed to configure jakartaee 10 OIDC security with keycloak and wildfly 27 preview. All these specs are very new so there will be issues for sure (note wildfly is a preview in alpha state, beta will be reached soon) but seeing it working is nice.
Brest regards!
Saturday, July 23. 2022
Creating a custom credential store for wildfly

The first step is downloading, installing and starting the last wildfly server.
wget https://github.com/wildfly/wildfly/releases/download/26.1.1.Final/wildfly-26.1.1.Final.zip
unzip wildfly-26.1.1.Final.zip
cd wildfly-26.1.1.Final/bin
./add-user.sh -u admin -p admin
./standalone.sh
The credential stores are just provided by a standard JavaSE Provider. So in order to create a custom implementation two classes should be developed.
The one that extends the CredentialStoreSpi. This class is the real implementation of the store, with methods like store, retrieve or getAliases to manage the secret values. The standard implementations are placed in this folder and, for example, the MapCredentialStore is a simple Map implementation which is a useful starting point.
But the Provider is also needed to register the previous implementation. Inside elytron the provider class is WildFlyElytronCredentialStoreProvider. It adds the services for the standard stores with the correct types, algorithms and implementation classes.
For the entry a simple credential store that saves the secrets in a properties file is going to be developed. But to make it a bit more interesting the values in the file are going to be encrypted using a PBE algorithm. The PBE key will be derived from the password passed to the credential store. This point is a bit weak and maybe it was better to use a hardcoded key, but I think that this way the entry is more educational. As always, the implementation is just an example you can extend, improve and adapt to your needs. The full maven project can be downloaded from here and it is also in my personal github account.
For details in the implementation just check the store class but let's show the provider constructor.
public CustomCredentialStoreProvider() { super("CustomCredentialStoreProvider", "0.1", "Custom CredentialStore Provider"); putService(new Service(this, "CredentialStore", "CustomCredentialStoreProvider", "es.rickyepoderi.ccs.CustomCredentialStore", Collections.emptyList(), Collections. The class registers the implementation putting the service with type CredentialStore (it should be this value), algorithm is CustomCredentialStoreProvider (this name will be used later to configure the store inside wildfly) and the implementation class is es.rickyepoderi.ccs.CustomCredentialStore. No aliases or attributes are defined.
The final part of the coding process is adding a META-INF/services/java.security.Provider file that will make the JDK automatically detect the provider (ServiceLoader technique).
cat src/main/resources/META-INF/services/java.security.Provider
es.rickyepoderi.ccs.CustomCredentialStoreProvider
So we have our custom credential store implementation ready. Just compile it and create the jar.
cd custom-credential-store
mvn clean package
The final file will be place in the target directory.
Now the interesting part, using CLI add the library as a module inside wildfly.
module add --name=es.rickyepoderi.ccs --resources=/path/to/custom-credential-store/target/custom-credential-store-0.0.1.jar --dependencies=org.wildfly.security.elytronThe provider should be loaded into elytron to make it available to the server (if you remember I did the same with the Bouncy Castle FIPS jars in a previous entry).
/subsystem=elytron/provider-loader=ccs:add(module=es.rickyepoderi.ccs)As the provider was defined in the service file no more arguments are needed. The provider class will be located automatically.
The custom credential can be configured at this point.
/subsystem=elytron/credential-store=ccs:add(providers=ccs, credential-reference={clear-text=XXXXXX}, location=custom.properties, relative-to=jboss.server.config.dir, type=CustomCredentialStoreProvider, create=true)The type should be CustomCredentialStoreProvider (the algorithm registered inside the provider). The store will use the provided password (please here it is provided in plain which is a nonsense, as I commented this is just an example) to create a PBE key and the values will be encrypted with it. The underlying file is specified using location and relative-to options and placed inside the configuration folder of the server. By default the implementation encrypts values using PBEWithHmacSHA512AndAES_256 algorithm but it can be changed using the implementation-properties option. In general that option can pass custom attributes to the implementation and the example manages several of them you can try and play with.
Finally a secret is created inside the store ready to be used.
/subsystem=elytron/credential-store=ccs:add-alias(alias=alias1, secret-value=sa)And if you check the properties file the alias will be there with the value encrypted.
grep alias1 ../standalone/configuration/custom.properties
alias1=oDaesxvoSWLkiwWo89sjzA\=\=\:MFkwOAYJKoZIhvcNAQUMMCsEFGTaNHH+6TJiT6PrGPC/tByEaGIWAgIQAAIBIDAMBggqhkiG9w0CCwUAMB0GCWCGSAFlAwQBKgQQDzqM6mftjvjqCg49J2td7Q\=\=
That secret will be used to connect to the default H2 datasource that is defined in the wildfly server (that is why the secret value was sa).
batch
/subsystem=datasources/data-source=ExampleDS:undefine-attribute(name=password)
/subsystem=datasources/data-source=ExampleDS:write-attribute(name=credential-reference, value={store=ccs, alias=alias1})
run-batch
reload
The server should be reloaded OK and the datasource should be able to connect to the H2 database.
/subsystem=datasources/data-source=ExampleDS:test-connection-in-pool
{
    "outcome" => "success",
    "result" => [true]
}
It works successfully!
That is all. The entry is a simple example to develop your own credential store. This is usually not needed and standard stores provided by wildfly should be enough for you. But, if for whatever reason, there is a specific requirement that forces you to implement a custom credential store, here you have an example. Remember my implementation uses the password provided to the store to derive a PBE key and encrypt values with it (it was done to show how to recover that password but maybe using a hadcoded key was a better idea). It is just a proof of concept. The entry details the implementation and the configuration of the store inside the server. Links to the maven project were available before, please use it with care.
Best regards!
Sunday, May 15. 2022
Installing magisk in my lineage phone


A very quick personal entry to summarize how to install magisk in my lineage device. It seems that now every time the OS is upgraded magisk should also be re-installed on it. The procedure is described in the project documentation but I prefer my usual detailed steps.
Download and install/upgrade the latest magisk app on the phone once it is upgraded.
Magisk need to patch the boot.img of the lineage distribution. Download the used lineage bundle for your phone.
Install python and the protobuf package on your laptop in order to extract the zip.
dnf install python python-protobufDownload extract_android_ota_payload tool and execute it over the zip file.
wget https://raw.githubusercontent.com/cyxx/extract_android_ota_payload/master/extract_android_ota_payload.py
wget https://raw.githubusercontent.com/cyxx/extract_android_ota_payload/master/update_metadata_pb2.py
python extract_android_ota_payload.py lineage-18.1-YYYYMMDD-nightly-XXX-signed.zip .
Extracting 'payload.bin' from OTA file...
Extracting 'boot.img'
Extracting 'system.img'
Use adb to push the image to the phone:
adb push boot.img /sdcard/Download/Open the application on the phone, click install, Select and patch File and locate the image. Click Let's go. A patched magisk_patched-XXXXX_XXXXX.img is generated. Copy it to your laptop.
adb pull /sdcard/Download/magisk_patched-XXXXX_XXXXX.imgNow just flash the new boot image to your phone.
adb reboot-bootloader
fastboot devices
fastboot flash boot magisk_patched-XXXXX_XXXXX.img
And that is all. Magisk is installed and now my firewall can be configured again.
Regards!
Comments