

Saturday, September 15. 2018
Using custom URLs to perform SSO in an android application


Today's entry presents a keycloak integration for an android application. Keycloak is an open-source project that offers Single Sign-On and access management for modern applications and services, and it has been used before in the blog. It is based on standards (like OpenID Connect and SAML) and provides some adapters for different programming languages and application platforms. Previously any integration between a mobile application and keycloak used an embedded browser to perform the login, but now that solution is a no-go. Google started to avoid this technique and recommend custom URLs long time ago. I have almost zero experience in mobile development (sorry for that) but I wanted to test this solution by myself anyway.
The idea is simple, as a mobile program is a client-side application I decided to use a public profile (similar situation to the one in browser-side JavaScript). I think that having a password in the client is almost the same than using none, it gives no extra security. The application is going to be a java one (it is just a PoC, so using kotlin was an extra effort for me).
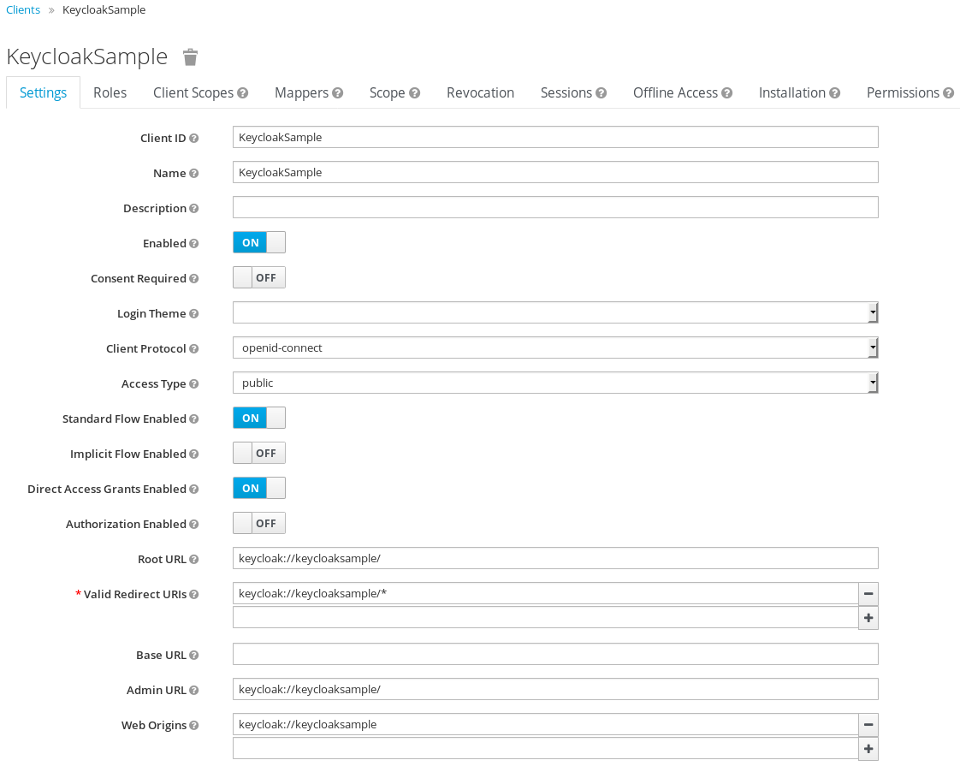
First creating the public keycloak client for the application is needed. The application will use a weird URL keycloak://keycloaksample/.
Starting with the android application, the custom URL should be defined in the AndroidManifest.xml, in my case for the .MainActivity.
<activity android:name=".MainActivity">
    <intent-filter>
        <action android:name="android.intent.action.MAIN" />
        <action android:name="android.intent.action.VIEW" />
        <category android:name="android.intent.category.LAUNCHER" />
        <category android:name="android.intent.category.DEFAULT" />
        <category android:name="android.intent.category.BROWSABLE" />
        <data android:scheme="keycloak"
            android:host="keycloaksample"
            android:pathPrefix="/"/>
    </intent-filter>
</activity>
With this configuration the .MainActivity will be called when the browser receives the keycloak://keycloaksample/ URL from the SSO server. That feature will be used to use the external browser to do the login and the logout. So a button will initiate the browser which will go to the authentication URL.
    public void login(View view) {
        // "http://192.168.100.1:8080/auth/realms/master/protocol/openid-connect/auth?client_id=KeycloakSample&scope=openid&response_type=code&redirect_uri=app%3A%2F%2Fkeycloaksample%2F";
        Uri uri = new Uri.Builder().scheme(configuration.getProperty("keycloak.scheme"))
                .encodedAuthority(configuration.getProperty("keycloak.authority"))
                .appendEncodedPath("auth/realms")
                .appendPath(configuration.getProperty("keycloak.realm"))
                .appendEncodedPath("protocol/openid-connect/auth")
                .appendQueryParameter("client_id", getString(R.string.app_name))
                .appendQueryParameter("scope", "openid")
                .appendQueryParameter("response_type", "code")
                .appendQueryParameter("redirect_uri", configuration.getProperty("app.url"))
                .build();
        Intent intent = new Intent(Intent.ACTION_VIEW, uri);
        startActivity(intent);
    }
If you see, the URL is created with the application URL as the redirect_uri. The idea is the login button starts the default browser with the keycloak authentication URL (android starts the app associated to an http(s) scheme), the user performs the login with it, and after that the server redirects the browser to the application URL, which starts the activity inside our app.
Now it's the time to follow the OIDC specification an get the code returned from the server and, with it, obtain the access and refresh token. In the onCreate of the activity a LoginTask starts a thread that executes the call to the token endpoint.
    if (Intent.ACTION_VIEW.equals(intent.getAction())) {
            // check if we have to login
            Uri uri = intent.getData();
            if (uri != null) {
                String code = uri.getQueryParameter("code");
                if (code != null) {
                    new LoginTask(this,
                            new Callback() {
                                @Override
                                public void onPostExecute(MainActivity activity, TokenResponse tokenResponse) {
                                    activity.setToken(tokenResponse);
                                }
                            }
                    ).execute(code);
                }
            }
        }
The LoginTask performs the authorization_code call to convert the code into the real tokens (remember this is just plain OIDC standard).
    @Override
    protected TokenResponse doInBackground(String... strings) {
        HttpURLConnection conn = null;
        try {
            String code = strings[0];
            URL keycloak = activity.createTokenURL();
            String urlParameters = activity.createAuthorizationCodePostData(code);
            byte[] postData = urlParameters.getBytes(StandardCharsets.UTF_8);
            conn = (HttpURLConnection) keycloak.openConnection();
            conn.setDoOutput(true);
            conn.setInstanceFollowRedirects(false);
            conn.setRequestMethod("POST");
            conn.setRequestProperty("Content-Type", "application/x-www-form-urlencoded");
            conn.setRequestProperty("charset", "utf-8");
            conn.setRequestProperty("Content-Length", Integer.toString(postData.length));
            conn.setUseCaches(false);
            try (DataOutputStream wr = new DataOutputStream(conn.getOutputStream())) {
                wr.write(postData);
            }
            if (conn.getResponseCode() == 200) {
                return new TokenResponse(conn.getInputStream(), activity.getSignatureKey());
            } else {
                return new TokenResponse(conn.getResponseCode() + ": " + conn.getResponseMessage());
            }
        } catch (IOException|InvalidKeySpecException|NoSuchAlgorithmException e) {
            Log.d(TAG, "Error calling keycloak", e);
            return new TokenResponse(e.getMessage());
        } finally {
            if (conn != null) {
                conn.disconnect();
            }
        }
    }
The createTokenURL and createAuthorizationCodePostData methods assign the URL and the post data that will be sent to the server to obtain the tokens.
    public URL createTokenURL() throws MalformedURLException {
        // "http://192.168.100.1:8080/auth/realms/master/protocol/openid-connect/token"
        return new URL(new Uri.Builder().scheme(configuration.getProperty("keycloak.scheme"))
                .encodedAuthority(configuration.getProperty("keycloak.authority"))
                .appendEncodedPath("auth/realms")
                .appendPath(configuration.getProperty("keycloak.realm"))
                .appendEncodedPath("protocol/openid-connect/token")
                .build().toString());
    }

    public String createAuthorizationCodePostData(String code) {
        // "grant_type=authorization_code&client_id=KeycloakSample&redirect_uri=app%3A%2F%2Fkeycloaksample%2F&code=" + code
        return new Uri.Builder()
                .appendQueryParameter("grant_type", "authorization_code")
                .appendQueryParameter("client_id", getString(R.string.app_name))
                .appendQueryParameter("redirect_uri", configuration.getProperty("app.url"))
                .appendQueryParameter("code", code)
                .build().getEncodedQuery();
    }
And finally, with the JSON data returned by the server, a TokenResponse object is created. For that I used the jjwt project which can parse the different JWT tokens returned by the server. This way the application can obtain the token information and present the user info.
    public TokenResponse(InputStream is, Key key) throws IOException {
        this.creationTime = System.currentTimeMillis() / 1000L;
        this.key = key;
        JsonReader jsonReader = new JsonReader(new InputStreamReader(is, "UTF-8"));
        jsonReader.beginObject();
        while(jsonReader.hasNext()) {
            String name = jsonReader.nextName();
            switch (name) {
                case "expires_in":
                    this.setExpiresIn(jsonReader.nextInt());
                    break;
                case "refresh_expires_in":
                    this.setRefreshExpiresIn(jsonReader.nextInt());
                    break;
                case "access_token":
                    this.setAccessToken(jsonReader.nextString());
                    break;
                case "refresh_token":
                    this.setRefreshToken(jsonReader.nextString());
                    break;
                default:
                    jsonReader.skipValue();
            }
        }
    }

    public Jws getAccessTokenClaims() {
        return accessTokenClaims;
    }

    public String getAccessToken() {
        return accessToken;
    }

    public void setAccessToken(String accessToken) {
        this.accessToken = accessToken;
        this.accessTokenClaims = Jwts.parser()
                .setSigningKey(this.key)
                .parseClaimsJws(accessToken);
    }
To fully understand the code presented, the properties file used in the app is the following (information about keycloak: url, realm key,...).
keycloak.key=MIIBIjANBgkqhkiG9w0BAQEFAAOCAQ8...
keycloak.scheme=http
keycloak.authority=192.168.100.1:8080
keycloak.realm=master
app.url=keycloak://keycloaksample/
Mainly this is the idea about the custom URL technique, android can associate a weird URL with the application and normal browser login is used to perform the SSO login. After that the OIDC calls are used to get the tokens and use them. My application also exemplifies how to do the logout, refresh the token and call another web service (userinfo) using the access token. But that is just development that uses the TokenResponse object initially created in the login.
Here I present a video, first I log into the application, thanks to custom URLs the browser is used to do that. Then the token information is shown and it is used to call the OIDC userinfo endpoint (information of the user). As you see the SSO is in place and I can reach the keycloak console without login again. Then I wait the access token to expire (60 seconds) and I refresh it (refresh_token action in the OIDC token endpoint). Finally I perform the logout which is a global logout too.
And that is all. I wanted to test the custom URL technique in an mobile application and I decided to use android (iOS is a complete unknown for me, but I suppose the same idea can be used for that platform). The application is very simple and just uses the jjwt project out of the default android API. This is just a PoC so it can be extended and/or improved a lot (for example not using fixed URLs and keys, calling the well-known OIDC address and the JWKs certificate endpoints is a better solution). Please also take in mind that I never develop for mobile, so just use the app as an example, surely things can be done much better. The KeycloakSample application can be download from here, hope it helps to someone else.
Regards!
Thanks for this post. This works for us. The only thing we are struggling with is the e-mail verification, as the user is not re-directed back to the app after clicking the e-mail verification link. I know this post is a little bit old, but in the current version of Keycloak we cannot enter a custom URL scheme as the root-url for the client app.
Did you get the registration of users to work with the e-mail verification?
Gr, Erwin
Comments