

Thursday, September 15. 2022
Using jakartaee 10 security OIDC with wildfly 27 preview

Today a very quick entry about the jakarta security OpenID Connect is going to be presented. The new version 3.0 of the jakarta security spec allows as to configure an OpenID Connect authentication mechanism. The idea of this entry is testing the mechanism using keycloak as the authentication server and wildfly 27 preview (current alpha5 version) as the jakartaee 10 compatible server. This repository developed by hantsy will be used as the test application, specifically the folder called security-oidc which is a sample OIDC application.
The application defines a ProtectedServlet.java which has the OpenIdAuthenticationMechanismDefinition defined in it.
@OpenIdAuthenticationMechanismDefinition(
        providerURI = "${openIdConfig.issuerUri}",
        clientId = "${openIdConfig.clientId}",
        clientSecret = "${openIdConfig.clientSecret}",
        redirectURI = "${baseURL}/callback"
  )
The configuration is loaded from a CDI Named (openIdConfig) bean which is defined in the class Auth0OpenIdConfig.java. This class in turn loads the final data from a file openid.properties located in the classpath. The file should be configured to specify the OpenID Connect server information (which will be the local keycloak installation).
Once the demo app has been explained (thanks hantsy!) all the detailed steps to make it run in the commented setup are presented.
Install keycloak and start it in dev mode.
wget https://github.com/keycloak/keycloak/releases/download/19.0.2/keycloak-19.0.2.zip
unzip keycloak-19.0.2.zip
cd keycloak-19.0.2/bin/
./kc.sh start-dev
Go to the console (http://localhost:8080) and create the initial admin user. Then login with that user to the console.
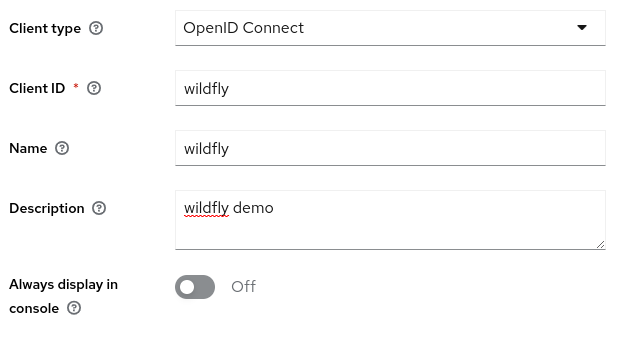
Create a client in keycloak called wildfly in the master realm. Go to the Clients menu option and click Create client. Fill first form in the following way.
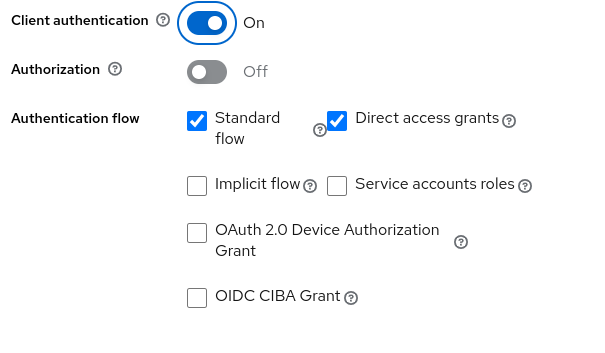
Click next and continue with the second form.
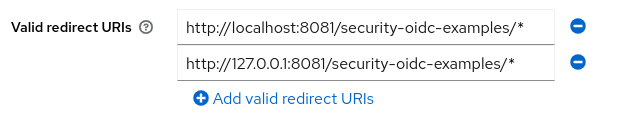
Click Save. In the Settings tab add the valid redirect URIs for the client (the wildfly server will run in port 8081 to not collide with keycloak).
And take note of the client secret which is displayed in the Credentials tab (this information will be needed to configure the openid.properties file in the application). 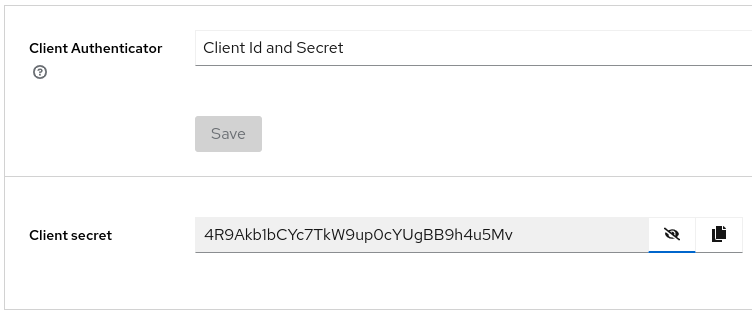
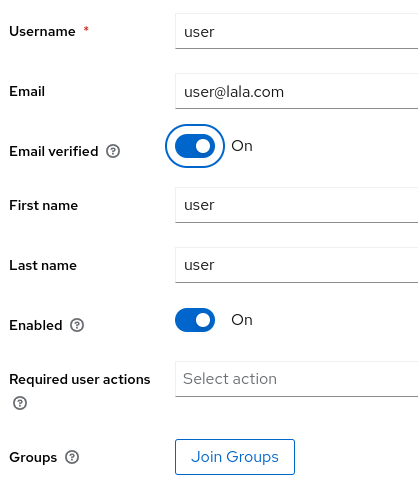
The sample app requires a user called user. So let's create it. In the Users menu click the Add User button and fill the information.
Time to install the wildfly server. As previously commented it is started with an offset of 1 to use port 8081 (and avoid collision with keycloak).
wget https://github.com/wildfly/wildfly/releases/download/27.0.0.Alpha5/wildfly-preview-27.0.0.Alpha5.zip
unzip wildfly-preview-27.0.0.Alpha5.zip
cd wildfly-preview-27.0.0.Alpha5/bin/
./add-user.sh -u admin -p admin
./standalone.sh -Djboss.socket.binding.port-offset=1
In order to build the application clone the repository and go to the security-oidc project.
git clone https://github.com/hantsy/jakartaee10-sandbox.git
cd jakartaee10-sandbox/security-oidc
At this point we need to configure the file src/main/resources/openid.properties with our keycloak information. Note the secret was taken from a previous step.
domain=localhost:8080/realms/master
clientId=wildfly
clientSecret=4R9Akb1bCYc7TkW9up0cYUgBB9h4u5Mv
And finally I did some little modifications to fully set my environment for the application. Check this diff.
git diff
diff --git a/pom.xml b/pom.xml
index 2c53f21..28940ac 100644
--- a/pom.xml
+++ b/pom.xml
@@ -13,7 +13,7 @@
     <properties>
         <project.build.sourceEncoding>UTF-8</project.build.sourceEncoding>
         <project.reporting.outputEncoding>UTF-8</project.reporting.outputEncoding>
-        <maven.compiler.release>17</maven.compiler.release>
+        <maven.compiler.release>11</maven.compiler.release>

         <!-- Official Maven Plugins -->
         vmaven-compiler-plugin.version>3.10.1</maven-compiler-plugin.version>
diff --git a/security-oidc/src/main/java/com/example/Auth0OpenIdConfig.java b/security-oidc/src/main/java/com/example/Auth0OpenIdConfig.java
index 3326125..2c1da58 100644
--- a/security-oidc/src/main/java/com/example/Auth0OpenIdConfig.java
+++ b/security-oidc/src/main/java/com/example/Auth0OpenIdConfig.java
@@ -28,7 +28,7 @@ public class Auth0OpenIdConfig {
             domain = properties.getProperty("domain");
             clientId = properties.getProperty("clientId");
             clientSecret = properties.getProperty("clientSecret");
-            issuerUri = "https://" + this.domain + "/";
+            issuerUri = "http://" + this.domain + "/";
             LOGGER.log(
                     Level.INFO,
                     "domain: {0}, clientId: {1}, clientSecret:{2}, issuerUri: {3}",
diff --git a/security-oidc/src/main/java/com/example/CallbackServlet.java b/security-oidc/src/main/java/com/example/CallbackServlet.java
index c739173..57dd4a2 100644
--- a/security-oidc/src/main/java/com/example/CallbackServlet.java
+++ b/security-oidc/src/main/java/com/example/CallbackServlet.java
@@ -23,7 +23,7 @@ public class CallbackServlet extends HttpServlet {
         LOGGER.log(Level.FINEST, "Enter callback servlet");
         // response.getWriter().println(context.getAccessToken());
         String referer = (String) request.getSession().getAttribute("Referer");
-        String redirectTo = referer != null ? referer : "/protected";
+        String redirectTo = referer != null ? referer : "/security-oidc-examples/protected";
         LOGGER.log(Level.FINEST, "In /callback, redirect to: {0}", redirectTo);

         response.sendRedirect(redirectTo);
Java 11 (which is my default java) is used instead of 17, the issuerUri is http and not https (because keycloak was started in dev mode to not complicate the demo with certificates) and finally the application will be deployed normally from the war, so the context will be /security-oidc-examples (not deployed as the ROOT app).
One tricky point is that by default the elytron subsystem enforces the logged user to be in the default other domain (by default application users are placed in the application-users.properties file in wildfly). The integrated-jaspi option was set to false to avoid that. Now the logged users via jakartaee security will not be mapped to local elytron users.
./jboss-cli.sh --connect --controller=remote+http://localhost:9991
/subsystem=undertow/application-security-domain=other:write-attribute(name=integrated-jaspi, value=false)
reload
Everything is OK to compile the sample app and deploy it to the server.
cd jakartaee10-sandbox/security-oidc
mvn clean package
cd ${JBOSS_HOME}/bin
./jboss-cli.sh --connect --controller=remote+http://localhost:9991
deploy /path/to/jakartaee10-sandbox/security-oidc/target/security-oidc-examples.war
You can now go the protected servlet http://localhost:8081/security-oidc-examples/protected and check performing a login into the app. The browser will be redirected to the keycloak login screen and, after a successful login with user, it will be redirected back to the app. The token information is displayed by the protected page in this application. I was about to record a video but it seems that my fedora laptop is not in the mood. So no video this time.
Click Create. In the Credentials tab set a password using Set password.
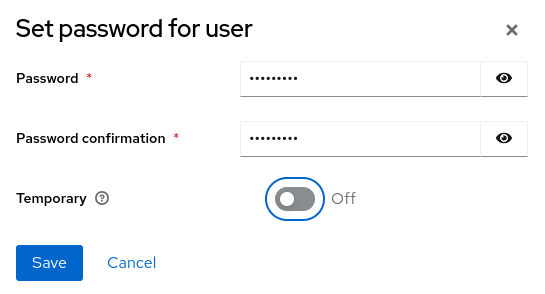
Click Save and Set password.
That's all folks! Today's entry is a quick review of the steps needed to configure jakartaee 10 OIDC security with keycloak and wildfly 27 preview. All these specs are very new so there will be issues for sure (note wildfly is a preview in alpha state, beta will be reached soon) but seeing it working is nice.
Brest regards!
Saturday, October 16. 2021
OpenSSL3 FIPS for wildfly?
Today's entry is going to continue with wildfly and the security standard FIPS. The previous entry was about configuring the application server with the bouncy castle FIPS implementation. But this time the (in)famous openssl library will be used instead. Until now the openssl FIPS was a separate module that only worked with version 1.0.2, but the recent release of version 3.0.0 introduces the idea of crypto providers, and a new FIPS provider is now included by default. On the other side wildfly can be configured to use openssl instead of the native JSSE implementation. The projects wildfly-openssl and wildfly-openssl-natives wrap the C library in order to transform it into a Java SSL engine. So, with both ideas in place, there is a new easy option to configure FIPS inside wildfly.
Nevertheless the previous statement is not right or, better said, it is not right yet. There are mainly two snags:
The wildfly projects should be modified to make the server work with the new openssl version 3. Hopefully the enhancement will be managed by issues WFSSL-80 and SSLNTV-13.
The new openssl3 FIPS implementation is still not validated by the NIST. Currently the request is submitted for review and it is expected to take several months.
So today's entry is going to configure a FIPS setup for wildfly which is still not ready. But, once the previous two points are fixed, the combination of openssl and wildfly will be FIPS compliant. In my humble opinion that setup can be very useful. The rest of the entry is going to describe step by step how to perform that configuration.
Download, compile and install the openssl. Nowadays the last version 3.0.0 is still not included by default in any common linux distribution. So the bundle will be compiled manually with the FIPS provider enabled.
wget https://www.openssl.org/source/openssl-3.0.0.tar.gz
tar zxvf openssl-3.0.0.tar.gz
cd openssl-3.0.0/
./Configure enable-fips --prefix=/path/to/openssl-3.0.0
make
make test
make install
Modify the configuration file openssl.cnf following the FIPS documentation presented before.
diff -Naur openssl.cnf.ORIG openssl.cnf
--- openssl.cnf.ORIG	2021-10-09 19:32:01.537655962 +0200
+++ openssl.cnf	2021-10-09 19:44:20.252969136 +0200
@@ -48,17 +48,18 @@
 # fips provider. It contains a named section e.g. [fips_sect] which is
 # referenced from the [provider_sect] below.
 # Refer to the OpenSSL security policy for more information.
-# .include fipsmodule.cnf
+.include /path/to/openssl-3.0.0/ssl/fipsmodule.cnf

 [openssl_init]
 providers = provider_sect

 # List of providers to load
 [provider_sect]
-default = default_sect
+#default = default_sect
 # The fips section name should match the section name inside the
 # included fipsmodule.cnf.
-# fips = fips_sect
+fips = fips_sect
+base = base_sect

 # If no providers are activated explicitly, the default one is activated implicitly.
 # See man 7 OSSL_PROVIDER-default for more details.
@@ -71,6 +72,8 @@
 [default_sect]
 # activate = 1

+[base_sect]
+activate = 1

 ####################################################################
 [ ca ]
FIPS is enabled globally for the library. The idea is that the default provider is commented out and the new FIPS one is added as the only activated algorithm provider (from now on all the applications will use FIPS compulsorily). For example if the ciphers command is executed for TLSv1.3 only the two FIPS compliant ciphers are displayed (TLS_CHACHA20_POLY1305_SHA256 is also available in the out of the box configuration but not listed when FIPS is enforced).
./openssl ciphers -s -v -tls1_3
TLS_AES_256_GCM_SHA384         TLSv1.3 Kx=any      Au=any   Enc=AESGCM(256)            Mac=AEAD
TLS_AES_128_GCM_SHA256         TLSv1.3 Kx=any      Au=any   Enc=AESGCM(128)            Mac=AEAD
Time for the wildfly installation. Today this point is not going to be detailed because a development version of the project is necessary. As commented before both wildfly-openssl projects need modifications in order to work with openssl version 3. So for the entry a compiled version of wildfly is used with both modules upgraded with the fixes incorporated.
unzip wildfly-26.0.0.Beta1-SNAPSHOT.zip
cd wildfly-26.0.0.Beta1-SNAPSHOT/bin/
./add-user.sh -u admin -p admin
Generate a RSA key to be used by the server.
keytool -genkeypair -alias localhost -keyalg RSA -keysize 2048 -validity 365 -keystore ../standalone/configuration/keystore.p12 -storetype pkcs12 -dname "CN=localhost" -storepass password -ext san=dns:localhost,ip:127.0.0.1Start the server using a JDK version 11 and pointing to the compiled openssl3 libraries to not use the default system ones.
export JAVA_HOME=/usr/lib/jvm/java-11
./standalone.sh -Dorg.wildfly.openssl.path.ssl=/path/to/openssl-3.0.0/lib64/libssl.so -Dorg.wildfly.openssl.path.crypto=/path/to/openssl-3.0.0/lib64/libcrypto.so
Finally configure the security subsystem to use openssl and the RSA certificate just created. Note that in order to make TLSv1.3 available the option cipher-suite-names should be set with the wanted values (in our case the two complaint ciphers listed before).
/subsystem=elytron/key-store=sslKS:add(path=keystore.p12, type=PKCS12, relative-to=jboss.server.config.dir, credential-reference={clear-text=password})
/subsystem=elytron/key-manager=sslKM:add(key-store=sslKS, algorithm="PKIX", credential-reference={clear-text=password})
/subsystem=elytron/server-ssl-context=sslSSC:add(providers=openssl, key-manager=sslKM, protocols=[TLSv1.2, TLSv1.3], cipher-suite-names=TLS_AES_256_GCM_SHA384:TLS_AES_128_GCM_SHA256)
/subsystem=undertow/server=default-server/https-listener=https:write-attribute(name=ssl-context, value=sslSSC)
reload
And that is all. Now the boot messages should contain the following line saying that the version 3.0.0 of openssl is used.
17:19:09,633 INFO [org.wildfly.openssl.SSL] (MSC service thread 1-5) WFOPENSSL0002 OpenSSL Version OpenSSL 3.0.0 7 sep 2021Using curl the TLS_AES_256_GCM_SHA384 cipher is selected for TLSv1.3:
curl -k -v -I https://localhost:8443/
*   Trying 127.0.0.1:8443...
* Connected to localhost (127.0.0.1) port 8443 (#0)
* ALPN, offering h2
* ALPN, offering http/1.1
* successfully set certificate verify locations:
*  CAfile: /etc/pki/tls/certs/ca-bundle.crt
*  CApath: none
* TLSv1.3 (OUT), TLS handshake, Client hello (1):
* TLSv1.3 (IN), TLS handshake, Server hello (2):
* TLSv1.3 (IN), TLS handshake, Encrypted Extensions (8):
* TLSv1.3 (IN), TLS handshake, Certificate (11):
* TLSv1.3 (IN), TLS handshake, CERT verify (15):
* TLSv1.3 (IN), TLS handshake, Finished (20):
* TLSv1.3 (OUT), TLS change cipher, Change cipher spec (1):
* TLSv1.3 (OUT), TLS handshake, Finished (20):
* SSL connection using TLSv1.3 / TLS_AES_256_GCM_SHA384
* ALPN, server accepted to use h2
* Server certificate:
*  subject: CN=localhost
*  start date: Oct 10 11:08:18 2021 GMT
*  expire date: Oct 10 11:08:18 2022 GMT
*  issuer: CN=localhost
*  SSL certificate verify result: self signed certificate (18), continuing anyway.
* Using HTTP2, server supports multi-use
* Connection state changed (HTTP/2 confirmed)
* Copying HTTP/2 data in stream buffer to connection buffer after upgrade: len=0
* Using Stream ID: 1 (easy handle 0x55b4e9f48c30)
> HEAD / HTTP/2
> Host: localhost:8443
> user-agent: curl/7.76.1
> accept: */*
>
* TLSv1.3 (IN), TLS handshake, Newsession Ticket (4):
* TLSv1.3 (IN), TLS handshake, Newsession Ticket (4):
* old SSL session ID is stale, removing
* Connection state changed (MAX_CONCURRENT_STREAMS == 4294967295)!
< HTTP/2 200
HTTP/2 200
< last-modified: Sun, 10 Oct 2021 10:32:16 GMT
last-modified: Sun, 10 Oct 2021 10:32:16 GMT
< content-length: 1504
content-length: 1504
< content-type: text/html
content-type: text/html
< accept-ranges: bytes
accept-ranges: bytes
< date: Wed, 13 Oct 2021 15:21:27 GMT
date: Wed, 13 Oct 2021 15:21:27 GMT
And forcing TLSv1.2 the cipher ECDHE-RSA-AES256-GCM-SHA384 is used:
curl -k -v -I --tls-max 1.2 https://localhost:8443/
*   Trying 127.0.0.1:8443...
* Connected to localhost (127.0.0.1) port 8443 (#0)
* ALPN, offering h2
* ALPN, offering http/1.1
* successfully set certificate verify locations:
*  CAfile: /etc/pki/tls/certs/ca-bundle.crt
*  CApath: none
* TLSv1.2 (OUT), TLS handshake, Client hello (1):
* TLSv1.2 (IN), TLS handshake, Server hello (2):
* TLSv1.2 (IN), TLS handshake, Certificate (11):
* TLSv1.2 (IN), TLS handshake, Server key exchange (12):
* TLSv1.2 (IN), TLS handshake, Server finished (14):
* TLSv1.2 (OUT), TLS handshake, Client key exchange (16):
* TLSv1.2 (OUT), TLS change cipher, Change cipher spec (1):
* TLSv1.2 (OUT), TLS handshake, Finished (20):
* TLSv1.2 (IN), TLS handshake, Finished (20):
* SSL connection using TLSv1.2 / ECDHE-RSA-AES256-GCM-SHA384
* ALPN, server accepted to use h2
* Server certificate:
*  subject: CN=localhost
*  start date: Oct 10 11:08:18 2021 GMT
*  expire date: Oct 10 11:08:18 2022 GMT
*  issuer: CN=localhost
*  SSL certificate verify result: self signed certificate (18), continuing anyway.
* Using HTTP2, server supports multi-use
* Connection state changed (HTTP/2 confirmed)
* Copying HTTP/2 data in stream buffer to connection buffer after upgrade: len=0
* Using Stream ID: 1 (easy handle 0x558282f4dc30)
> HEAD / HTTP/2
> Host: localhost:8443
> user-agent: curl/7.76.1
> accept: */*
>
* Connection state changed (MAX_CONCURRENT_STREAMS == 4294967295)!
< HTTP/2 200
HTTP/2 200
< last-modified: Sun, 10 Oct 2021 10:32:16 GMT
last-modified: Sun, 10 Oct 2021 10:32:16 GMT
< content-length: 1504
content-length: 1504
< content-type: text/html
content-type: text/html
< accept-ranges: bytes
accept-ranges: bytes
< date: Wed, 13 Oct 2021 15:22:55 GMT
date: Wed, 13 Oct 2021 15:22:55 GMT
The current entry is just an advance of a new SSL FIPS configuration that will be available in wildfly. The idea is using the new openssl3 configured in FIPS mode as the provider for the elytron context. The setup is not ready at this moment, some PRs should be merged for wildfly and the openssl3 is not a certified FIPS implementation yet. If everything goes as expected the setup will be ready in some months.
FIPS regards!
Sunday, August 1. 2021
Configuring BCFIPS in wildfly via elytron
More or less one year ago an unsuccessful try to configure Bouncy Castle FIPS in wildfly and openjdk 11 was presented in the blog. At that time only the direct JVM setup was performed (adding the BCFIPS at java.security file level). I already knew that the elytron subsystem also had the ability of loading and enabling JCE providers for applications (registering the providers in the Security class). But I did not realize that, using this feature, a new option was at our disposal for adding the BCFIPS to the application server. Recently I discovered this elytron bug and it gave me this idea. So today's entry is going to configure again the BCFIPS inside a wildfly and openjdk 11 server, but this time, via elytron.
As always the steps followed to perform the full configuration are presented one by one.
The last openjdk 11 is installed in the system. The path for the java installation will be ${JAVA_HOME} from now on.
wget https://github.com/AdoptOpenJDK/openjdk11-binaries/releases/download/jdk-11.0.11%2B9/OpenJDK11U-jdk_x64_linux_hotspot_11.0.11_9.tar.gz
tar zxvf OpenJDK11U-jdk_x64_linux_hotspot_11.0.11_9.tar.gz
Next wildfly 24.0.1 is installed. The directory where the server is unzipped will be called ${WILDFLY_HOME}.
wget https://download.jboss.org/wildfly/24.0.1.Final/wildfly-24.0.1.Final.zip
unzip wildfly-24.0.1.Final.zip
cd wildfly-24.0.1.Final/bin/
./add-user.sh -u admin -p admin
export JAVA_HOME=/path/to/jdk-11.0.11+9
./standalone
Now from the Bouncy Castle page download the FIPS (bc-fips-1.0.2.1.jar) and the JSSE (bctls-fips-1.0.12.1.jar) provider files. This try the BCJSSE implementation from Bouncy Castle will be used instead of the default SunJSSE used in the previous entry. The jars are downloaded to ${FIPS_HOME} folder.
Time to create the stores with the server certificate and the trusted CAs. The BCFKS custom format is used to show that the BCFIPS provider is really in place.
cd ${WILDFLY_HOME}/standalone/configuration/
${JAVA_HOME}/bin/keytool -providername BCFIPS -providerpath ${FIPS_HOME}/bc-fips-1.0.2.1.jar -providerclass org.bouncycastle.jcajce.provider.BouncyCastleFipsProvider -genkeypair -alias localhost -keyalg RSA -keysize 2048 -validity 365 -keystore localhost.bcfks -storetype bcfks -dname "CN=localhost" -storepass secret -keypass secret -ext "SAN=DNS:localhost,IP:127.0.0.1"
cp ${JAVA_HOME}/lib/security/cacerts .
${JAVA_HOME}/bin/keytool -providername BCFIPS -providerpath ${FIPS_HOME}/bc-fips-1.0.2.1.jar -providerclass org.bouncycastle.jcajce.provider.BouncyCastleFipsProvider -importkeystore -srckeystore cacerts -destkeystore cacerts.bcfks -srcstoretype JKS -deststoretype bcfks -srcstorepass changeit -deststorepass changeit
The elytron magic starts here. Both jar files are registered as modules inside the server using CLI. Please note that the JSSE module has the main one as a dependency.
module add --name=org.bouncycastle.fips --resources=${FIPS_HOME}/bc-fips-1.0.2.1.jar
module add --name=org.bouncycastle.tls.fips --resources=${FIPS_HOME}/bctls-fips-1.0.12.1.jar --dependencies=org.bouncycastle.fips
The BC documentation (which only explains direct JVM configuration using the java.security file) says that the providers should be configured like this:
security.provider.1=org.bouncycastle.jcajce.provider.BouncyCastleFipsProvider
security.provider.2=org.bouncycastle.jsse.provider.BouncyCastleJsseProvider fips:BCFIPS
So the main FIPS provider is defined first and then the JSSE one needs the argument fips:BCFIPS. This means that the latter is in fips mode and it will use the main BCFIPS provider defined previously to perform the security operations. But, how do we do this inside elytron? This is the only tricky point needed for the configuration. Passing one provider to another provider cannot be configured in wildfly. But the BCJSSE also understands a fully qualified class name. Therefore this setup works:
/subsystem=elytron/provider-loader=bc-fips:add(module=org.bouncycastle.fips)
/subsystem=elytron/provider-loader=bc-fips-tls:add(module=org.bouncycastle.tls.fips, class-names=[org.bouncycastle.jsse.provider.BouncyCastleJsseProvider], argument="fips:org.bouncycastle.jcajce.provider.BouncyCastleFipsProvider")
It is extremely important that the BCJSSE provider is registered passing the argument parameter. The value should be fips:org.bouncycastle.jcajce.provider.BouncyCastleFipsProvider, fips mode and the BCFIPS provider but using the class name.
The common configuration for stores and ssl context is performed now, but using the appropriate provider for each step. First the key store and manager:
/subsystem=elytron/key-store=fipsKS:add(path=localhost.bcfks, relative-to=jboss.server.config.dir, credential-reference={clear-text=secret}, type=bcfks, providers=bc-fips)
/subsystem=elytron/key-manager=fipsKM:add(key-store=fipsKS, algorithm="PKIX", credential-reference={clear-text=secret}, providers=bc-fips-tls)
Then the same thing for the trust store and manager:
/subsystem=elytron/key-store=fipsCAKS:add(type=bcfks, relative-to=jboss.server.config.dir, path=cacerts.bcfks, credential-reference={clear-text=changeit}, providers=bc-fips)
/subsystem=elytron/trust-manager=fipsTM:add(key-store=fipsCAKS, providers=bc-fips-tls)
The server ssl context is created with the previous elements. Please note that only TLSv1.2 is configured. TLSv1.3 was tried first but it seems that currently the BCFIPS implementation has no ciphers for this version.
/subsystem=elytron/server-ssl-context=fipsSSC:add(key-manager=fipsKM, trust-manager=fipsTM, protocols=["TLSv1.2"], providers=bc-fips-tls)Finally the ssl context is assigned to the https listener.
batch
/subsystem=undertow/server=default-server/https-listener=https:undefine-attribute(name=security-realm)
/subsystem=undertow/server=default-server/https-listener=https:write-attribute(name=ssl-context, value=fipsSSC)
run-batch
And that is all. The Bouncy Castle FIPS is configured and used for the default 8443 secure port. Using for example curl you can see that the server is working and our certificate is displayed.
curl -k -v -I https://localhost:8443/
   Trying 127.0.0.1:8443...
 Connected to localhost (127.0.0.1) port 8443 (#0)
 ALPN, offering h2
 ALPN, offering http/1.1
 successfully set certificate verify locations:
   CAfile: /etc/pki/tls/certs/ca-bundle.crt
  CApath: none
 TLSv1.3 (OUT), TLS handshake, Client hello (1):
 TLSv1.3 (IN), TLS handshake, Server hello (2):
 TLSv1.2 (IN), TLS handshake, Certificate (11):
 TLSv1.2 (IN), TLS handshake, Server key exchange (12):
 TLSv1.2 (IN), TLS handshake, Server finished (14):
 TLSv1.2 (OUT), TLS handshake, Client key exchange (16):
 TLSv1.2 (OUT), TLS change cipher, Change cipher spec (1):
 TLSv1.2 (OUT), TLS handshake, Finished (20):
 TLSv1.2 (IN), TLS handshake, Finished (20):
 SSL connection using TLSv1.2 / ECDHE-RSA-AES128-GCM-SHA256
 ALPN, server accepted to use h2
 Server certificate:
  subject: CN=localhost
  start date: Jul 31 10:30:19 2021 GMT
  expire date: Jul 31 10:30:19 2022 GMT
  issuer: CN=localhost
  SSL certificate verify result: self signed certificate (18), continuing anyway.
 Using HTTP2, server supports multi-use
 Connection state changed (HTTP/2 confirmed)
 Copying HTTP/2 data in stream buffer to connection buffer after upgrade: len=0
 Using Stream ID: 1 (easy handle 0x55e78bb10aa0)
> HEAD / HTTP/2
> Host: localhost:8443
> user-agent: curl/7.71.1
> accept: /
>
 Connection state changed (MAX_CONCURRENT_STREAMS == 4294967295)!
< HTTP/2 200
HTTP/2 200
< last-modified: Tue, 27 Jul 2021 08:03:32 GMT
last-modified: Tue, 27 Jul 2021 08:03:32 GMT
< content-length: 1504
content-length: 1504
< content-type: text/html
content-type: text/html
< accept-ranges: bytes
accept-ranges: bytes
< date: Sat, 31 Jul 2021 11:13:42 GMT
date: Sat, 31 Jul 2021 11:13:42 GMT
At this point there are more options you can be interested in configuring. For example elytron allows to include the JCE providers into the JVM. This way the applications can use the provider as usual (getProvider("BCFIPS") for example). Check the final-providers and the default combined-providers to see how elytron and openssl providers are exposed by default. Another interesting feature is setting the default-ssl-context at JVM level, allowing to configure a BCFIPS ssl context as the default one for applications.
So today's entry finally shows a working BCFIPS configuration for wildfly and openjdk 11. The removal of the extension mechanism in java complicated a lot the installation of custom JCE providers inside the wildfly server (a thing that was very easy with version 8). But finally elytron was the right component for the goal. The new security system allows the installation of JCE providers and let us configure the different security elements with them (key and trust stores, managers, ssl contexts,...). The only trick in the setup was passing the BCFIPS provider to the BCJSSE provider, but luckily it accepts a class name and that can be configured inside elytron. Note that in this entry the BCJSSE implementation was used instead of the default SunJSSE, elytron is used and not the java.security file, so using an external JSSE implementation is much easier.
Best regards!
Comments