

Saturday, October 22. 2011
Certificate Security in JavaEE - Custom Solution

This entry is the second chapter of the JavaEE certificate security series. The previous post explained how all the environment was configured (OpenSSL demo CA and glassfish application server). Now it is time to deploy an application in the container and start using the certificates. This entry will deal with custom security, custom means that the application will use a repository for users and groups by its own, implementing the login classes and not JavaEE standard.
Before commenting the application let's explain how a web application usually works with certificates. If you remember the first entry, the client certificate is validated by the application server (or the web server in general) before any code of the application is executed (in the video the certificate validation is performed even no application was already deployed in glassfish). Therefore it is concluded that when the request reaches the application the certificate is valid. Here the only problem that remains is who is the user which corresponds to this valid certificate. You have to think that usually a company is going to trust in some CA certs (for example, the national eID, DNIe in case of Spain), but the registered users will be stored in a company repository (LDAP, DDBB or whatever). At this point the application needs someway to map certificates and users, usually some data in the issued certificate is used to match the user: some part of the certificate subject (usually the CN or the Email part), an attribute extension (some extra data included in the cert),... It does not matter what field, but the idea is some information stored in the cert will be used to find the real user in the repository (in the previous example of Spainsh eID the ID number, DNI number, would be a good candidate for matching users, obviously the DNI should be a compulsory field at customer/user registration process).
The other question is when to perform this match between the certificate and the real user in the store, but this problem is solved as in any other login. In a web application with custom security any request should be intercepted to check if the user is logged in, if the request has no user information the user is redirected to the login page. In Java the user information is always stored in a session attribute (the application checks that the username and any other relevant information are inside the session) and the interceptor technique depends on the framework used (a typical servlet filter can be the simplest one). If our application is going to use certificates, the interceptor code will also be responsible of matching the user, in case of a successful match the user will be automatically logged in without password prompting.
In summary custom security needs to map the certificate against a real user inside the typical login interceptor code. My sample application uses an OpenLDAP repository (LDAP is the most common repository for users and groups) and it is implemented using JSF (Java Server Faces) and CDI (Context Dependency Injection). Instead of a filter it will use a JSF phase listener, if there is a solution in the chosen framework for a specified problem it will always be the recommended way to go (do not mix technologies). The main files in the solution are the following.
The LoginBean is a JSF session bean which is used to store the logged user information. As I said Java applications usually use the session to save the information associated with the logged user, in case of JSF, a session Bean is the direct solution.
This bean has some important methods:
login: The login action method performs typical login. The user introduces username and password in a login page and this page calls this method which finds and binds the user against the LDAP repository (the user is found and then the password is checked). This is the method executed in normal (non-certificate) login. I have used the ldapbp library (typical Sun, now Oracle, LDAP library) in order to get the user and the groups easily. All the LDAP stuff is executed inside a Singleton annotated EJB (Enterprise JavaBean) but forget this, it is just a way to acess the sample repository.
public String login() { userEntry = ldap.findUser(username, password.toCharArray()); groupsCache.clear(); if (userEntry != null) { return "index"; } else { FacesUtils.errorMessage("loginForm:username", "login_invalid_username_or_password"); return "login"; } }trustedLogin: Other method of the bean which performs the match between certificates and users. It receives the X509 certificate of the client and with the CN part of the Subject (I have implemented a very simple match condition) it searches the LDAP repository for a matching user. If a valid user is found the method automatically fulfills all the variables in the session bean. This method only executes the login process if the user is not previously logged in (avoiding useless searches and validations).
public String trustedLogin(X509Certificate cert) { try { // only check if user not logged in if (!isLoggedIn()) { // get CN part => it's the last one LdapName name = new LdapName(cert.getSubjectDN().getName()); String certName = name.getRdn(name.size() - 1).getValue().toString(); // validate via PKIX if configured boolean certOK = !validatePKIX || validatePKIX(cert); if (certOK) { // login without password LdapEntry entry = ldap.findUser(certName, null); if (entry != null) { username = certName; userEntry = entry; groupsCache.clear(); } } } } catch (Exception e) { logger.error("Error performing the login", e); } return username; }isLoggedIn: Method that returns if there is an active session of some user. It only checks that the username and userEntry variables are filled (both vars are initialized by the two previous methods).
public boolean isLoggedIn() { return username != null && userEntry != null; }validatePKIX: This method validates the certificate using OCSP and/or CRL programmatically. You know that in my demo environment this is already done by the container, but I decided to include this code here just in case of an hypothetical container which does not support these validations. The bean can be configured to perform this extra validation in previous trustedLogin method, this way the container would do normal validation (trusted CA and valid dates) and the Java application would perform OCSP or CRL (this method uses exactly the same APIs than JSSE/glassfish).
isUserInGroup: The bean performs custom security, this is an equivalent method to standard isUserInRole. It returns true if the user belongs to the specified LDAP group (static and dynamic groups can be passed because ldapbp is used). Group membership is cached inside the LoginBean.
public boolean isUserInGroup(String groupname) { // check cache String key = groupname.toLowerCase(); if (groupsCache.containsKey(key)) { return groupsCache.get(key); } else { // read from ldap and set into cache boolean res = ldap.isUserInGroup(this.userEntry.getDn(), groupname); groupsCache.put(key, res); return res; } }logout: Simple method to delete the session associated to this user.
public String logout() {
    HttpSession session = (HttpSession) FacesContext.getCurrentInstance(
        ).getExternalContext().getSession(false);
    if (session != null) {
        session.invalidate();
    }
    return "logout";
}
When using CDI for JSF Beans the @ManagedProperty annotation cannot be used (and I used it a lot to initialize the beans before). In this sample application I tried to figure out how to initialize beans with Injection but I realized there is no direct solution, finally I used a properties file as it is commented in this post.
The CertLoginPhaseListener interceptor. As I commented previously, using JSF the recommended solution for the login interceptor stuff is a JSF Phase Listener (see the link I presented before for further information). These listeners are always executed associated with a JSF request/response phase and therefore can be used as filters. The listener performs the following steps:
It recovers the certificate from the request (this is the normal way of getting the associated certificate in a Java container):
X509Certificate[] certs = (X509Certificate[])
    req.getAttribute("javax.servlet.request.X509Certificate");
If there is at least one certificate (the client is accessing via the secure https port) the listener calls trustedLogin to automatically log the user in if it is the case. To do that programmatic EL (Expression Language) is used.
if (certs != null && certs.length > 0) {
    try {
        // login silently without password via certificate, the trustedLogin
        // performs the login if there is no previous session, certificate is valid
        // and the user is mapped against the ldap
        ExpressionFactory ef = facesContext.getApplication().getExpressionFactory();
        MethodExpression me = ef.createMethodExpression(facesContext.getELContext(),
                "#{loginBean.trustedLogin}", null, new Class[]{X509Certificate.class});
        me.invoke(facesContext.getELContext(), new Object[]{certs[0]});
    } catch (Exception e) {
        logger.error("Error checking certificate", e);
    }
}
After that the listener calls isUserLoggedIn just to check if there is an active session, again EL is used.
ExpressionFactory ef = facesContext.getApplication().getExpressionFactory();
ValueExpression ve = ef.createValueExpression(facesContext.getELContext(),
    "#{loginBean.loggedIn}", Boolean.class);
boolean isLoggedIn = (Boolean) ve.getValue(facesContext.getELContext());
Finally this boolean variable can be true (the user previously logged in or he has been automatically logged in by the certificate method) or false (the user has never logged in and there is no certificate or it matched no user). Based on this variable the listener permits the user to continue or redirects him to the login page. It is quite interesting the case of a registered user who tries to access the login page, if this case happens the user is also redirected, but this time to main application page (avoiding any login). Besides if the client has a valid certificate but it did not match any user login page will be presented through the secure port.
if (!loginPage && !isLoggedIn) {
    // drive the user to the login page
    facesContext.getApplication().getNavigationHandler(
        ).handleNavigation(facesContext, null, "login");
} else if (loginPage && isLoggedIn) {
    // already login => go to main page
    facesContext.getApplication().getNavigationHandler(
        ).handleNavigation(facesContext, null, "index");
}
The login.xhtml and index.xhtml are the facelets pages for the login and the main page. Login is the typical username and password page and the main one simply shows the user logged in and if it belongs to an LDAP static and a dynamic group. These groups were previously loaded into the OpenLDAP repo (SampleClient1 belongs to both groups and SampleClient2 to none of them).
So today the video exemplifies all possible login methods. If the user accesses the application using non-secure port (8080) the listener detects no certificate and no logged user and it presents a common login page. In this page I log in using SampleClient2 (although his certificate is revoked he is a valid user in the LDAP repository, so he can access the application using normal login and password way). But if I access the https port (8181) and I use the revoked certificate glassfish denies the access. The second time I try with SampleClient1, now the listener detects my certificate, matches it against the LDAP user (the Subject of this cert is CN=SampleClient1,O=demo.kvm,C=ES and the CN part is used to find the associated user) and it fulfills the LoginBean data to silently log me in. Finally the listener redirects the request to the index main page, SampleClient1 user and his groups are shown in the page. As I am using certificate login I cannot logout (the certificate is always detected and the user is logged when he has not an active session). In order to delete my login I clean my cookies and active logins in the browser and I try with another certificate, I created a new certificate for SampleClient3 but this user does not exists in the LDAP repository, this time the listener does not match any user to this new Subject CN and, therefore, login page is presented in the secure port. I enter again as SampleClient2.
In summary using certificates as a login method in a custom security application is not very complicated. Mapping the certificate to a real application user is the main part, and, in a custom security application, it is done in the same place in which login interception is done. My sample application NetBeans project can be downloaded and it just performs all of this with JSF and a phase listener, the users and groups are placed in an OpenLDAP server and the ldapbp library is used to retrieve group membership easily, the application maps the certificate via the CN part of the subject. Although the application is very simple I think it exemplifies perfectly a certificate login using custom security. Some days ago (when I had already implemented this demo application but not published the entry) I faced a customer who had tried to do the same in a very very weird way (I better do not comment this), that reassured me in publishing this series. Take into account that, although the entry implements the certificate security in Java, it rules in any web application (PHP, Rails, Python or whatever).
Remember to be smart!
Saturday, October 8. 2011
Certificate Security in JavaEE - Demo Setup
Some days ago I was discussing with a colleague what would be the best way to get certificate security in a JavaEE application. We did not reach any final conclusion so I decided to start a demo environment to test some simple cases. In this post the environment is going to be setup, the CA and the Application Server.
In order to get a complete infrastructure a CA (Certificate Authority) with CRL (Certificate Revokation List) publication and/or OCSP (Online Certificate Status Protocol) checking is needed. As I explained in the first post of the signing applet series a CA is a trusted company which issues certificates. The other two concepts are mechanisms for validating certificates or, more precisely, to know if a certificate has been revoked. A CRL is a list of revoked certificates and this list is usually accessed via internet. OCSP is a standard protocol to check certificates online. It is clear if some application is going to trust in user certificates, there should be someway to deal with revocations.
I decided to use openssl as a simple but complete CA infrastructure. The famous security library also has some CA capabilities which are perfect for a demo environment. As the JavaEE container I setup Glassfish 3.1.1 (but I think the concepts are valid for any other app server). Of course Debian Squeeze is the chosen OS (installed as a KVM virtual box). The steps for creating the complete infrastructure are the following.
-
Creation and configuration of the OpenSSL CA. For this point I followed this helpful web page.
First of all, openssl package is installed:
# apt-get install openssl
After that the file /etc/ssl/openssl.cnf has to be modified. Here it is my modified file but basically only two options were added to [usr_cert] section:
authorityInfoAccess = OCSP;URI:http://debian.demo.kvm:3456/
crlDistributionPoints = URI:http://debian.demo.kvm/my.crl
This options add the OCSP and CRL information to the certificate. Both techniques have to be explicitly added to the generated certificates, this way, when something (a browser, app server or whatever) reads the certificate it can check its validity against the specified URLs. As you see my debian demo box is called debian.demo.kvm.
Some directories needed by the CA configuration are created now (CA was located inside /etc/ssl/demoCA directory which is also specified in openssl.cnf):
# cd /etc/ssl
# mkdir -p demoCA/newcerts
Some files are also initialized:
# touch /etc/ssl/demoCA/index.txt
# echo 01 > /etc/ssl/demoCA/serial
# echo 01 > /etc/ssl/demoCA/crlnumber
-
Creation of the CA certificate. In this second step the CA certificate is generated (directory is always /etc/ssl if not specified). The certificate is requested:
# cd /etc/ssl
# openssl req -subj "/C=ES/O=demo.kvm/CN=ca.demo.kvm" -new -newkey rsa:2048 \
  -keyout private/cakey.pem -out careq.pem
Generating a 2048 bit RSA private key
...............................................................+++
.........................+++
writing new private key to 'private/cakey.pem'
Enter PEM pass phrase:
Verifying - Enter PEM pass phrase:
Now the certificate is self-signed against the CA. Please check the extensions v3_ca option, this is the CA cert and it should not contain OCSP or CRL info (this option makes the command to use the other v3_ca section which does not contain OCSP or CRL info).
# openssl ca -out cacert.pem -days 365 -keyfile private/cakey.pem -selfsign \
  -extensions v3_ca -infiles careq.pem
Using configuration from /usr/lib/ssl/openssl.cnf
Enter pass phrase for private/cakey.pem:
Check that the request matches the signature
Signature ok
Certificate Details:
        Serial Number: 1 (0x1)
        Validity
            Not Before: Sep 16 16:38:41 2011 GMT
            Not After : Sep 15 16:38:41 2012 GMT
        Subject:
            countryName               = ES
            organizationName          = demo.kvm
            commonName                = ca.demo.kvm
        X509v3 extensions:
            X509v3 Subject Key Identifier:
                BC:39:85:FF:DB:6E:46:FF:08:52:32:6F:97:65:91:F6:F4:A9:24:E7
            X509v3 Authority Key Identifier:
                keyid:BC:39:85:FF:DB:6E:46:FF:08:52:32:6F:97:65:91:F6:F4:A9:24:E7
                DirName:/C=ES/O=demo.kvm/CN=ca.demo.kvm
                serial:01

            X509v3 Basic Constraints:
                CA:TRUE
Certificate is to be certified until Sep 15 16:38:41 2012 GMT (365 days)
Sign the certificate? [y/n]:y

1 out of 1 certificate requests certified, commit? [y/n]y
Write out database with 1 new entries
Data Base Updated
Finally the CA cert is exported in DER format (DER format will be better for JKS stores in glassfish) and in PKCS#12 format (a p12 file contains the keys and the certificate, so it can be considered as a backup).
# openssl x509 -in cacert.pem -outform DER -out cacert.der
# openssl pkcs12 -export -out cacert.p12 -in cacert.pem -inkey private/cakey.pem
Enter pass phrase for private/cakey.pem:
Enter Export Password:
Verifying - Enter Export Password:
The first certificate (the CA one) is ready. This certificate will be used to sign all the others (users and glassfish server).
-
Creation of two client certificates. Once the CA cert is generated two client certs are going to be issued, the procedure is very similar but, when signed, the CA certificate is used (instead of self-signing) and now no extensions option is specified (now user_cert section will be used, with OCSP and CRL info). Again in this point I followed another tutorial, in this case the rsa keys were generated first and then the certificate was requested, created and transformed to DER and PKCS#12.
# openssl genrsa -out private/client1.key 1024
# openssl req -subj "/C=ES/O=demo.kvm/CN=SampleClient1" -key private/client1.key \
  -new -out client1.req
# openssl ca -in client1.req -cert cacert.pem -keyfile private/cakey.pem -out client1.pem
Using configuration from /usr/lib/ssl/openssl.cnf
Enter pass phrase for private/cakey.pem:
Check that the request matches the signature
Signature ok
Certificate Details:
        Serial Number: 2 (0x2)
        Validity
            Not Before: Sep 16 16:42:31 2011 GMT
            Not After : Sep 15 16:42:31 2012 GMT
        Subject:
            countryName               = ES
            organizationName          = demo.kvm
            commonName                = SampleClient1
        X509v3 extensions:
            X509v3 Basic Constraints:
                CA:FALSE
            Netscape Comment:
                OpenSSL Generated Certificate
            X509v3 Subject Key Identifier:
                36:24:6E:0E:9B:A4:30:FA:85:7B:59:0D:35:DE:09:F0:C1:89:4B:D6
            X509v3 Authority Key Identifier:
                keyid:BC:39:85:FF:DB:6E:46:FF:08:52:32:6F:97:65:91:F6:F4:A9:24:E7

            Authority Information Access:
                OCSP - URI:http://debian.demo.kvm:3456/

            X509v3 CRL Distribution Points:
                URI:http://debian.demo.kvm/my.crl

Certificate is to be certified until Sep 15 16:42:31 2012 GMT (365 days)
Sign the certificate? [y/n]:y

1 out of 1 certificate requests certified, commit? [y/n]y
Write out database with 1 new entries
Data Base Updated

# openssl x509 -in client1.pem -outform DER -out client1.der
# openssl pkcs12 -export -out client1.p12 -in client1.pem -inkey private/client1.key
Enter pass phrase for private/client1.pem:
Enter Export Password:
Verifying - Enter Export Password:
Doing the same steps a second certificate (client2) was generated. But, in this case, the certificate was then revoked (this way we have a valid and an invalid user certificate for testing).
# openssl ca -revoke client2.pem -keyfile private/cakey.pem -cert cacert.pem
Using configuration from /usr/lib/ssl/openssl.cnf
Enter pass phrase for private/cakey.pem:
Revoking Certificate 3.
Data Base Updated
-
Installing a certificate for glassfish. Another necessary certificate is the one for the application server ssl socket, working with user certificates always needs a server-side https connection. New version v3 of glassfish only uses JKS java store (so forget about the NSS certificate store which I commented in a previous entry about 2.1.1 version).
The first thing to do is installing java JDK. In debian you need to add the non-free debian repository in the /etc/apt/sources.list and install the oracle (closed-source) package:
# apt-get install sun-java6-jdk
If you prefer OpenJDK (open-source) implementation you need to install another package instead (I did not test it but I am sure it would also work smoothly):
# apt-get install openjdk-6-jdk
Glassfish 3.1.1 was downloaded, the full platform ZIP file, and installed (uncompressing the file is the only step). In the virtual debian box glassfish was installed in /opt directory:
# cd /opt
# unzip ${DOWNLOAD_DIR}/glassfish-3.1.1.zip
# cd /opt/glassfish3/bin
# ./asadmin start-domain
As you see ZIP installation contains a local domain1 domain already configured. The certificate stores are placed in the glassfish/domains/domain1/config directory. The keystore.jks file is the store for server certificates and cacerts.jks the store for trusted CA certificates. Now it is the time to request a new certificate for the https port (glassfish always configures a secure port, port 8181 by default, with a self-signed s1as certificate, which is going to be replaced).
The certificate (called server) is created without password (RETURN was pressed):
# keytool -genkey -alias server -keyalg RSA -keysize 1024 -keystore keystore.jks \
  -dname "CN=debian.demo.kvm,OU=GlassFish,O=demo.kvm,C=ES"
Enter keystore password:
Enter key password for <server>
	(RETURN if same as keystore password):
Then the request file is generated:
# keytool -certreq -alias server -keyalg RSA -file /etc/ssl/server.req -keystore keystore.jks
Enter keystore password:
Enter key password for <server>
Now it is time to sign the request with our CA. Again user_cert section is used, so OCSP and CRL information will be also added to this certificate (this is not necessary but it is quite nice). The server has to be transformed to DER format to be used in JKS.
# cd /etc/ssl
# openssl ca -in server.req -cert cacert.pem -keyfile private/cakey.pem -out server.pem
Using configuration from /usr/lib/ssl/openssl.cnf
Enter pass phrase for private/cakey.pem:
Check that the request matches the signature
Signature ok
Certificate Details:
        Serial Number: 4 (0x4)
        Validity
            Not Before: Sep 16 16:56:14 2011 GMT
            Not After : Sep 15 16:56:14 2012 GMT
        Subject:
            countryName               = ES
            organizationName          = demo.kvm
            organizationalUnitName    = GlassFish
            commonName                = debian.demo.kvm
        X509v3 extensions:
            X509v3 Basic Constraints:
                CA:FALSE
            Netscape Comment:
                OpenSSL Generated Certificate
            X509v3 Subject Key Identifier:
                36:33:F0:39:B6:3C:71:29:E3:0D:25:76:6F:70:46:EE:E5:73:97:C6
            X509v3 Authority Key Identifier:
                keyid:BC:39:85:FF:DB:6E:46:FF:08:52:32:6F:97:65:91:F6:F4:A9:24:E7

            Authority Information Access:
                OCSP - URI:http://debian.demo.kvm:3456/

            X509v3 CRL Distribution Points:
                URI:http://debian.demo.kvm/my.crl

Certificate is to be certified until Sep 15 16:56:14 2012 GMT (365 days)
Sign the certificate? [y/n]:y

1 out of 1 certificate requests certified, commit? [y/n]y
Write out database with 1 new entries
Data Base Updated

# openssl x509 -in server.pem -outform DER -out server.der
And finally the certificate is imported into the keystore.jks glassfish store. Cos the certificate is signed by an unknown CA the cacert is also imported in both (user and trusted CA files). So now three commands are executed: import CA file in cacerts.jks, import CA file into keystore.jks and finally import the new server certificate in keystore.jks.
# cd /opt/glassfish3/glassfish/domains/domain1/config
# keytool -import -trustcacerts -alias myca -file /etc/ssl/cacert.der -keystore cacerts.jks
Enter keystore password:
Owner: CN=ca.demo.kvm,O=demo.kvm,C=ES
Issuer: CN=ca.demo.kvm,O=demo.kvm,C=ES
...
Trust this certificate? [no]:  yes
Certificate was added to keystore

# keytool -import -trustcacerts -alias myca -file /etc/ssl/cacert.der -keystore keystore.jks
Enter keystore password:
Owner: CN=ca.demo.kvm,O=demo.kvm,C=ES
Issuer: CN=ca.demo.kvm,O=demo.kvm,C=ES
...
Trust this certificate? [no]:  yes
Certificate was added to keystore

# keytool -import -alias server -file /etc/ssl/server.der -keystore keystore.jks
Enter keystore password:
Certificate reply was installed in keystore
At this point we have a valid certificate with the alias server ready to be used in the https listener. In the glassfish console (http://debian.demo.kvm:4848) we select Configuration → server config → Network Config → http-listener-2. Here we see that security is enable in this listener, clicking the SSL tab the Client Authentication checkbox is selected and in the Certificate Nickname current auto-generated certificate s1as is changed for the new server alias.
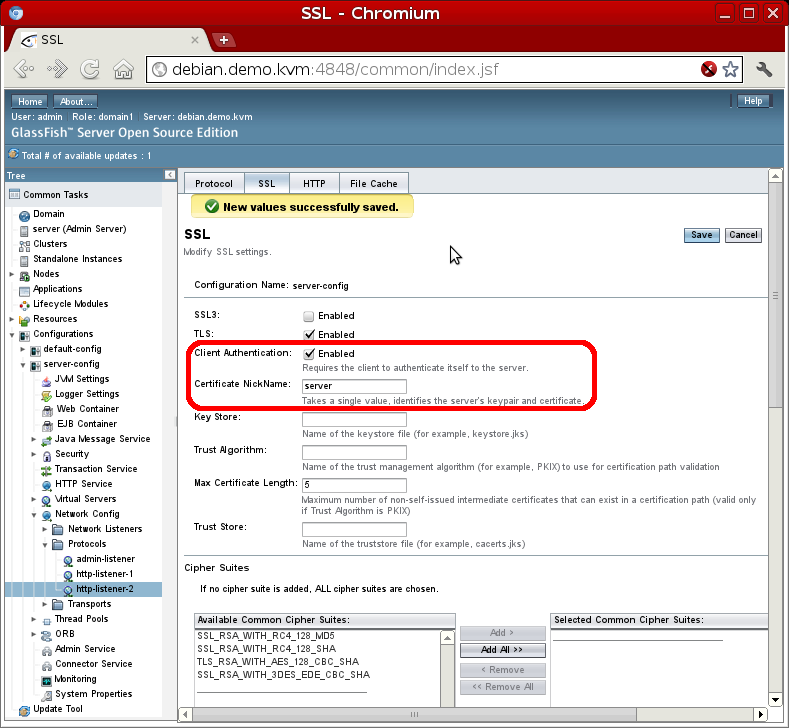
This change does not need a reboot of the server. At this moment the 8181 port is using the new certificate (server alias) but it is also demanding a user certificate (so you only access the welcome page if a user certificate is installed in the browser, it will be done in the last step).
-
Publication of the CRL and setup of the OCSP server. The main idea of this demo is that the Application Server (glassfish) was able to validate user certficates. To do that both OCSP and CRL techniques are going to be available.
Openssl has a minimal (only recommended for testing) OCSP server, we can start the process directly from the command line. As we have specified port 3456 in the certificate URI the daemon is started as follows (the -text option dumps communication to the terminal):
# cd /etc/ssl
# openssl ocsp -index demoCA/index.txt -CA cacert.pem -rsigner cacert.pem \
  -rkey private/cakey.pem -port 3456 -text
Enter pass phrase for private/cakey.pem:
Waiting for OCSP client connections...
This way the client certificates can now be checked. The validation process uses the serial number of the certificate (a kind of identifier the CA assigns for every certificate). In the first step a serial file was initialized to 0x1, this way the CA has been assigning a consecutive number to each generated certificate (0x1 for cacert, 0x2 for client1, 0x3 for client2 and 0x4 for server). The client1 certificate (0x2) is a good one:
# openssl ocsp -issuer cacert.pem -nonce -CAfile cacert.pem \
  -url http://localhost:3456 -serial "0x2"
Response verify OK
0x2: good
	This Update: Sep 16 16:51:49 2011 GMT
But the client2 certificate (0x3) is revoked:
# openssl ocsp -issuer cacert.pem -nonce -CAfile cacert.pem \
  -url http://localhost:3456 -serial "0x3"
Response verify OK
0x3: revoked
	This Update: Sep 16 16:51:51 2011 GMT
	Revocation Time: Sep 16 16:50:19 2011 GMT
CRL is a complementary way of validating certificates, it can be intended as a secondary method to use in case of an OCSP error. The CRL (revocation certificate list) is downloaded using standard http by the checkers (app server, browser,...). This way I decided to install an apache server in the box and then copy the generated file inside document root directory.
# apt-get install apache2
After that the CRL list is generated using openssl:
# cd /etc/ssl
# openssl ca -gencrl -keyfile private/cakey.pem -cert cacert.pem -out my.crl
And it is copied to the apache2 root directory in debian:
# cp /etc/ssl/my.crl /var/www/my.crl
If you check the previous URL set in the certificate was http://debian.demo.kvm/my.crl which is exactly where my CRL is now.

-
CRL and OCSP checking in the glassfish server. By default glassfish server only checks the CA, it must be a trusted one (that is why cacert was imported to cacerts.jks store) and dates, but it does not validate revocations (neither OCSP nor CRL). This entry explains how to do it in glassfish v2 but it also works in v3 (the solution consists in activating the checking in JSSE implementation which I suppose works in any server that uses this ssl socket layer).
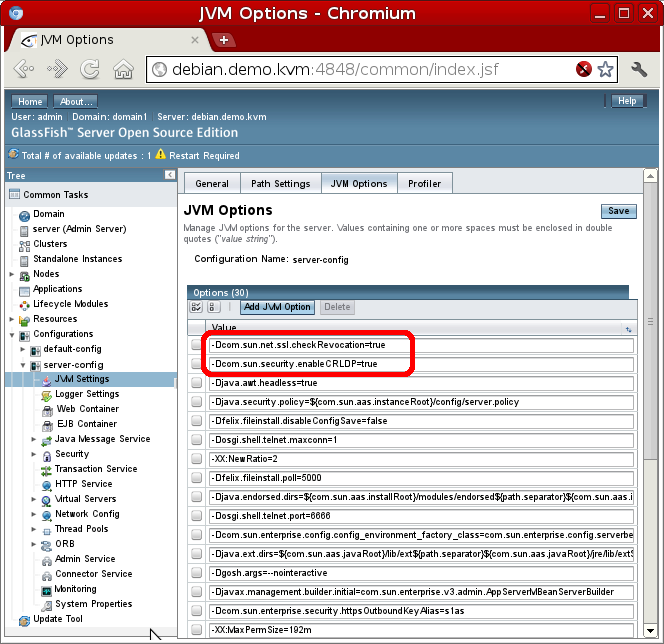
In the glassfish console Configurations → server-config → JVM Settings → JVM Options tab two new options have to be set (-Dcom.sun.net.ssl.checkRevocation=true and -Dcom.sun.security.enableCRLDP=true). Restart is required when JVM options are modified.
But this options only activate CRL checking and not OCSP. In order to finally have all the validation methods the /usr/lib/jvm/java-6-sun/jre/lib/security/java.security has to be modified uncommenting the following line (please think that this path varies depending where your JDK is installed, this is the default path for debian Oracle JDK):
ocsp.enable=true
If you check in this file there are more options to customize ocsp validation (I did not spend more time on this).
Finally glassfish is ready to receive and validate client certificates using both techniques. Java implementation first tries OCSP protocol and, if it fails, the CRL is downloaded (check commented post for further info).
-
Setting up client certificates. Now all the server side is ready but our browser needs some certificates, client1 and client2. If you remember both were exported in PKCS#12 format and both p12 files can be directly imported to firefox. Of course remember to also import the cacert.der as a trusted CA.
In firefox (iceweasel) 5.0 Edit → Preferences → Advanced Tab → Encryption subtab → View Certificates. In Your Certificates tab click the Import button and select client1.p12 and client2.p12 (the password that you inserted when the certificates were exported is requested at this point).
The cacert.der is imported in the same window but in Authorities tab. There click again Import. Check all the trust settings (web sites, email users and software) when requested.
Finally all the environment (server and client) is ready to access the glassfish secure port. In the following video I first show that my two certificates are imported and the CA is trusted. Then I access the 8181 port of my debian box, as client certificate was configured the browser asks me which one to use, but I select the revoked certificate (see it has the 03 serial). So the glassfish server does not permit the access (it is revoked!). Trying again I select the other certificate (02 serial) and, this time, welcome glassfish page is shown.
If you recheck this entry I have not done anything yet. Only the environment is ready and no application is deployed inside glassfish. At first moment I was not going to post the setup but it needed so many steps and particular options that I finally decided to publish this entry. Entries in this blog are many times posted just for me, because I want to have a clear guide of what I did. This is one of these times, but of course it is also here for anyone who finds it useful. I have two more entries in mind. In the first one I will try to deploy a custom security application (not using JavaEE security but programmatic). And in the second JavaEE security will be incorporated. But you know, it will depend on my mood and my time.
Don't change the channel!
Comments