

Saturday, August 10. 2019
Configuring mod-auth-openidc with keycloak

The mod-auth-openidc is a module to provide OIDC authentication to the apache web server. In this entry I will try to configure the apache module in order to work with a keycloak server. The idea is that two clients will be configured: the first one will be a normal client (confidential) that will provide normal code-to-token redirect flow; the second one will be a bearer-only endpoint client (the application just validates the token that should be sent using a bearer authentication). The blog entry is just a summary of the steps I did to configure it. I hope that it helps to someone else. A debian box (called debian.sample.com) was used to perform the tests and configuration.
First the jdk and keycloak is installed and started.
apt-get install openjdk-11-jdk
wget https://downloads.jboss.org/keycloak/6.0.1/keycloak-6.0.1.zip
unzip keycloak-6.0.1.zip
cd keycloak-6.0.1/bin/
./standalone.sh
The admin users are created for the EAP and the keycloak itself.
./add-user.sh -u admin -p XXXXX
./add-user-keycloak.sh -u admin -p XXXXX
And finally the interfaces are changed to serve through the correct IPs (not only localhost).
./jboss-cli.sh --connect
/interface=public:write-attribute(name=inet-address, value="${jboss.bind.address:192.168.100.20}")
/interface=management:write-attribute(name=inet-address, value="${jboss.bind.address:0.0.0.0}")
Any OIDC installation uses certificates so I created a CA and a certificate for the host (same one is valid for both keycloak and the apache server because they are placed in the same host).
First the CA certificate is created:
cd /etc/ssl
mkdir -p demoCA/newcerts
touch /etc/ssl/demoCA/index.txt
echo 01 > /etc/ssl/demoCA/serial
echo 01 > /etc/ssl/demoCA/crlnumber
openssl req -subj "/C=ES/O=sample.com/CN=ca.sample.com" -new -newkey rsa:2048 -keyout private/cakey.pem -out careq.pem
openssl ca -out cacert.pem -days 10000 -keyfile private/cakey.pem -selfsign -extensions v3_ca -infiles careq.pem
openssl x509 -in cacert.pem -outform DER -out cacert.der
openssl pkcs12 -export -out cacert.p12 -in cacert.pem -inkey private/cakey.pem
And then the certificate for the server:
openssl genrsa -out private/debian.sample.com.key 2048
openssl req -subj "/C=ES/O=sample.com/CN=debian.sample.com" -key private/debian.sample.com.key -new -out debian.sample.com.csr
The alternate names for my host are added in the /etc/ssl/openssl.cnf to have a correct certificate:
[ v3_req ]
# Extensions to add to a certificate request
basicConstraints = CA:FALSE
keyUsage = nonRepudiation, digitalSignature, keyEncipherment
subjectAltName = @alt_names

[alt_names]
DNS.1 = debian.sample.com
IP.1 = 192.168.100.20
Then the CA is used to sign the certificate and it is generated:
openssl ca -in debian.sample.com.csr -cert cacert.pem -keyfile private/cakey.pem -out debian.sample.com.crt -extensions v3_req
openssl pkcs12 -export -out debian.sample.com.p12 -in debian.sample.com.crt -inkey private/debian.sample.com.key
keytool -importkeystore -srckeystore debian.sample.com.p12 -srcstoretype pkcs12  -srcalias 1 -destkeystore debian.sample.com.jks -deststoretype jks -destalias debian.sample.com
cat debian.sample.com.crt cacert.pem >debian.sample.com.all.pem
keytool -import -alias debian.sample.com -file debian.sample.com.all.pem -keystore debian.sample.com.jks
Finally copy the CA certificate to the trusted ones and update the debian certificates.
cp cacert.pem /usr/share/ca-certificates/cacert.crt
echo "cacert.crt" >> /etc/ca-certificates.conf
update-ca-certificates
Now the certificate is added to the keycloak. It is copied to the configuration directory:
cp debian.sample.com.jks /home/java/keycloak-6.0.1/standalone/configuration/And the elytron subsystem is configured to use it:
/subsystem=elytron/key-store=debian:add(type=jks, relative-to=jboss.server.config.dir, path=debian.sample.com.jks, credential-reference={clear-text=XXXXX})
/subsystem=elytron/key-manager=debian-manager:add(key-store=debian, credential-reference={clear-text=XXXXX})
/subsystem=elytron/server-ssl-context=debian-context:add(key-manager=debian-manager, protocols=["TLSv1.2"])
batch
/subsystem=undertow/server=default-server/https-listener=https:undefine-attribute(name=security-realm)
/subsystem=undertow/server=default-server/https-listener=https:write-attribute(name=ssl-context, value=debian-context)
run-batch
One client mod-auth-openidc is created with confidential type.

Remember to take note of the client's secret (in the Credentials tab) to later configure the module.
And now the bearer only client mod-auth-oauth20 is created, the access type is changed to bearer-only:

The credential will be also needed because the token will be verified using the introspect endpoint.
Now the apache and all the needed modules are installed into the debian box:
apt-get install apache2 libapache2-mod-php libapache2-mod-auth-openidcThe certificates are configured, so first they are copied into the directories:
cp debian.sample.com.crt  /etc/ssl/
cp debian.sample.com.key /etc/ssl/private/
Then the /etc/apache2/sites-available/default-ssl.conf file is modified to use those certificates:
        <VirtualHost *:443>
                SSLCertificateFile      /etc/ssl/debian.sample.com.crt
                SSLCertificateKeyFile /etc/ssl/private/debian.sample.com.key
                SSLCertificateChainFile /etc/ssl/certs/cacert.pem
                SSLCACertificatePath /etc/ssl/certs/
Enable all the needed modules, the ssl site and restart the apache service:
a2enmod ssl
a2enmod php7.3
a2enmod auth_openidc
a2ensite default-ssl
systemctl restart apache2
Now the openidc module is configured inside one location of the previous ssl host configuration file:
OIDCProviderMetadataURL https://debian.sample.com:8443/auth/realms/master/.well-known/openid-configuration
OIDCRedirectURI https://debian.sample.com/mod-auth-openidc/oauth2callback
OIDCCryptoPassphrase 0123456789
OIDCClientID mod-auth-openidc
OIDCClientSecret 950225ad-3980-4a22-a14c-5ceebd366328
OIDCProviderTokenEndpointAuth client_secret_basic
OIDCSessionInactivityTimeout 1800
OIDCSessionMaxDuration 28800
#OIDCUserInfoRefreshInterval 60
OIDCRefreshAccessTokenBeforeExpiry 10
OIDCRemoteUserClaim preferred_username
OIDCScope openid
OIDCPassIDTokenAs claims payload
OIDCProviderCheckSessionIFrame "https://debian.sample.com:8443/auth/realms/master/protocol/openid-connect/login-status-iframe.html"
OIDCDefaultLoggedOutURL "https://debian.sample.com"

<Location /mod-auth-openidc>
    AuthType openid-connect
    Require valid-user
    LogLevel debug
</Location>
A little show.php page is prepared to show all the OIDC variables injected (it should be copied inside the location /var/www/html/mod-auth-openidc):
<html>
<body>
    <h1>OIDC Variables</h1>
    <ul>
<?php
    foreach($_SERVER as $key => $value) {
        if (strlen($key) > 4 && substr($key, 0, 5) === "OIDC_") {
            echo "<li><strong>" . $key . "</strong>: " . $value . "</li>";
        }
    }
?>
    </ul>
    <p><a href="oauth2callback?logout=https%3A%2F%2Fdebian.sample.com">logout</a>
    <iframe title='empty' style='visibility: hidden;' width='0' height='0' tabindex='-1'
            id='openidc-op' src='oauth2callback?session=iframe_op' >
    </iframe>
    <iframe title='empty' style='visibility: hidden;' width='0' height='0'
            tabindex='-1' id='openidc-rp' src='oauth2callback?session=iframe_rp&poll=5000'>
    </iframe></p>
</body>
</html>
The /mod-auth-openidc location will be protected using OIDC and the configuration is prepared to use the same settings than in keycloak (same timeouts). With this configuration the module redirects the user to the keycloak login page and, once it is logged in, the code-to-token flow finishes the process. The apache module injects a lot of variables that are shown in the PHP page. Besides the session management is configured with the keycloak iframe. This way if we log to another application (for example the account keycloak page) ane performs a logout, the iframe automatically detects the change in the cookie and the user is logged out (the browser is redirected to the default apache index page, because it was configured as the OIDCDefaultLoggedOutURL). The following video shows the module working.
In my tests the only problem I have seen is that the mod-auth-openidc, although it is configured to refresh the token before expiration (OIDCRefreshAccessTokenBeforeExpiry is set to 10 seconds, so the access token is automatically refreshed when it is near to the expiration), if the refresh fails the session is maintained. In keycloak the session can be deleted (for example removed by an admin or just because it has reached its max life) and in the apache module it would be not detected. In my tests only the timeout (OIDCSessionInactivityTimeout set to 30 minutes) detects this, the local session in the apache is removed because of inactivity and this performs a new redirect/code-to-token flow that fails, and the user should log again into the system.
The mod-auth-openidc can be configured to also use plain OAUTH 2.0. This is the typical configuration for REST endpoints which just consume a bearer token and a full OIDC (code-to-token) is not needed. The module just checks the bearer token sent in the authentication and returns a OK (200) or an unauthorized error (401). In my configuration I decided to use the keycloak introspection endpoint to validate the token (it can also be configured locally, but this way is simpler).
OIDCOAuthClientID mod-auth-oauth20
OIDCOAuthClientSecret a78de633-5eb2-4ba9-abc2-ec33b86afe83
OIDCOAuthIntrospectionEndpoint "https://debian.sample.com:8443/auth/realms/master/protocol/openid-connect/token/introspect"
OIDCOAuthRemoteUserClaim preferred_username

<Location /mod-auth-oauth20>
    AuthType oauth20
    Require valid-user
    LogLevel debug
</Location>
So another location /mod-auth-oauth20 is used to setup an oauth20 application. Here a simple hello world file is added, hello-world.php inside directory /var/www/html/mod-auth-oauth20:
<?php
header("Content-Type: text/plain");
echo "Hello " . $_SERVER["REMOTE_USER"] . "!";
?>
Finally the idea is that the first location (which is using OIDC and has access to an access token that is refreshed automatically by the module 10 seconds before its expiration) can call to the bearer-only application. The call.php does exactly that and is located again in the first location /var/www/html/mod-auth-openidc:
<?php
// Get CURL resource
$curl = curl_init();
curl_setopt_array($curl, [
    CURLOPT_RETURNTRANSFER => 1,
    CURLOPT_URL => 'https://debian.sample.com/mod-auth-oauth20/hello-world.php',
    CURLOPT_HTTPHEADER => array('Authorization: Bearer ' . $_SERVER['OIDC_access_token'])
]);
// Send the request & save response to $resp
$resp = curl_exec($curl);
// Close request to clear up some resources
curl_close($curl);

header("Content-Type: text/plain");
echo $resp;
?>
And this works, the following video shows that the endpoint returns a 401 error if called directly, but if we login into the OIDC location and access to the call page the hello world application is executed correctly. So everything is working as expected.
In this case, the only problem is that the token in keycloak is very big (around 1KB) and it's not saved in the default cache (it seems there is a key limit of 512B), so the introspection call is performed always. In a real production scenario I would try to do a local validation or even using another cache. But it works OK for my testing setup.
And that is all. My idea was showing that the mod-auth-openidc and keycloak can work together quite nicely. My only particular snag is that the refresh of the token does not logout on error. If the access token is configured to automatically perform a refresh, if the refresh fails the session in the apache keeps maintained OK and used. That will bring issues for sure (for example the call to the hello-world endpoint will fail, because the token is expired) and I think it would be nice if the module can be configured to logout on a refresh error. I am trying to improve this so I asked into the google groups list, let's see if this goes to something fruitful.
Best regards!
Sunday, November 4. 2018
MS-SFU kerberos extensions and cross-realm support
The last month I have been working in a enhancement to make SFU kerberos extensions in Java to work in multi-realm environments. The MS-SFU (Microsoft Service for User) are two kerberos extensions created by Microsoft to provide delegation and impersonation features to the kerberos standard. Delegation is managed by the S4U2proxy extension, a server can request a kerberos ticket on behalf of a user to access a subsequent server. For that with the server's own ticket and the user's ticket the server requests to the KDC (Kerberos Domain Controller) another ticket to connect to a backend server. The ticket is issued and the access to the backend server is performed as it was done by the initial user that connected to the intermediate server. The impersonation moves delegation one step forward, performed by the S4U2self extension, the frontend server in this case is a legacy server (as Microsoft calls it) which does not support kerberos, therefore there is no ticket for the user (the final user logged in using another method, for example common username and password), and this intermediate server performs a full impersonation with its own ticket to access the final backend on behalf of the user. Obviously this features should be configured, the frontend server should be granted with rights to do both operations, and Microsoft currently gives several ways of granting those privileges.
In general the SFU extensions are old and supported by Java since Java 8 but with windows 2012R2 Microsoft added support to cross-realm access. Previously the three roles (final user, frontend server and backend server) should be in the same realm/domain but a new concept, called resource-based constrained delegation, was incorporated to expanse SFU for multi-realm. The JDK never supported the new feature as stated in this JDK bug.
In theory the documentation for MS-SFU is available in the first link at the beginning of this entry but, in my humble opinion, the explanation of how to call both extensions leaves much to be desired. To my surprise, after a lot of tests and tries, when my two demos (delegation and impersonation) started to work, the procedure was not so difficult as it seems to be. Therefore I decided to write how cross-realm for SFU works for me in windows, in an easier way than official documentation.
S4U2self:
In the self (impersonation) extension the idea is simple, there are two roles, the user to impersonate and the server that impersonates. First the server should know in which realm the user is located (that part is out of the scope of this explanation). Once you know the realm where the user resides, you get a TGT (ticket) to that realm and perform a S4U2self against the KDC of the user's realm. The KDC returns a proper ticket with the information for that user (PAC extensions with roles and everything is included in the credentials) because, in the end, this is the KDC for the user, the one that knows the account information. After that, the ticket received is updated back to the server realm and a final S4U2self is executed against the local realm. This time the user information is there and the impersonation in the local realm can be completed. So, in summary, two S4U2self calls are needed, first in the user's realm (this one obtains the user information) and then another one in the server's realm. Moving from one realm to another requires to obtain TGTs and jumping from realm to realm following authentication paths (capaths).
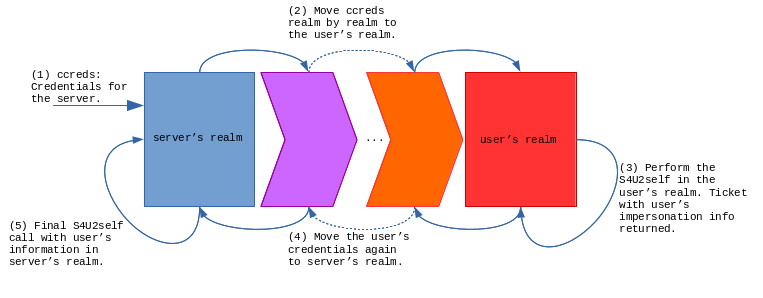
S4U2proxy:
In the proxy call (delegation) the idea is similar, but not the same, because now we have a third role, the backend service we are delegating the user to, and two tickets, the user's ticket and our own server's ticket. In this case I finally made it work doing the following steps. First a S4U2proxy is executed against the local server realm, this way we obtain the user's service ticket we can move to the backend's realm. Then both credentials can be moved realm by realm until we reach where the backend server is located. We have to move both tickets (user's and server's service ticket). There a new S4U2proxy is executed that finally returns all the proper grants to call the backend server.

For a complete view, the needed configuration to the involved accounts should be described. In this case we need to setup the resource-based constraints delegation using power-shell commands. For the delegation/S4U2proxy the frontend account should be obtained from the domain and assigned as a valid user to be delegated to the backend server (in this example the accounts are called frontend and backend respectively):
$frontend = Get-ADUser -Identity frontend -server FRONTEND.DOMAIN.COM
Set-ADUser -Identity backend -server BACKEND.DOMAIN.COM -PrincipalsAllowedToDelegateToAccount $frontend
Get-ADUser -Identity backend -server BACKEND.DOMAIN.COM -Properties PrincipalsAllowedToDelegateToAccount
The commands use the server option to read the accounts from the needed realm, this way the accounts can be in different AD domains.
In order to perform impersonation the frontend user should be allowed to do so:
Set-ADAccountControl $frontend -TrustedToAuthForDelegation $true
This sets up the delegation for any authenticated protocol in the frontend user, the associated user in AD presents the following configuration.
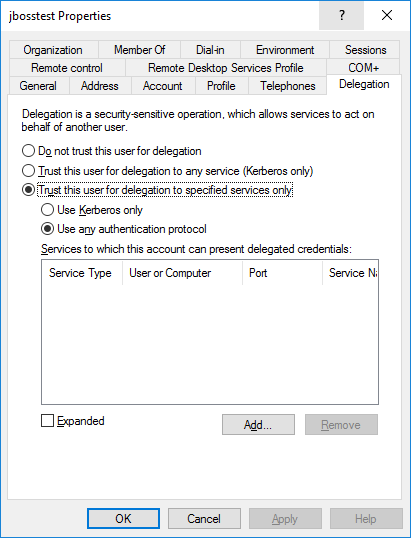
It seems that S4U2proxy uses the PrincipalsAllowedToDelegateToAccount, users from different domains can be configured as allowed to delegate to the backend account. But in the case of S4U2self the user should have the account control that allows the account to impersonate, TrustedToAuthForDelegation (which is shown as use any authenticated protocol in the user delegation tab).
And that is all. Today's entry is just the explanation of how I think SFU extensions work when different realms are involved. We are trying to add cross-realm to SFU and support for resource-based constraint delegations inside the JDK implementation, my demos are working now but I suppose the process is going to be long so I prefer to, for the moment, not anticipate any event in the blog. I will add more details if I see something moves forward.
Best regards!
Saturday, September 15. 2018
Using custom URLs to perform SSO in an android application

Today's entry presents a keycloak integration for an android application. Keycloak is an open-source project that offers Single Sign-On and access management for modern applications and services, and it has been used before in the blog. It is based on standards (like OpenID Connect and SAML) and provides some adapters for different programming languages and application platforms. Previously any integration between a mobile application and keycloak used an embedded browser to perform the login, but now that solution is a no-go. Google started to avoid this technique and recommend custom URLs long time ago. I have almost zero experience in mobile development (sorry for that) but I wanted to test this solution by myself anyway.
The idea is simple, as a mobile program is a client-side application I decided to use a public profile (similar situation to the one in browser-side JavaScript). I think that having a password in the client is almost the same than using none, it gives no extra security. The application is going to be a java one (it is just a PoC, so using kotlin was an extra effort for me).
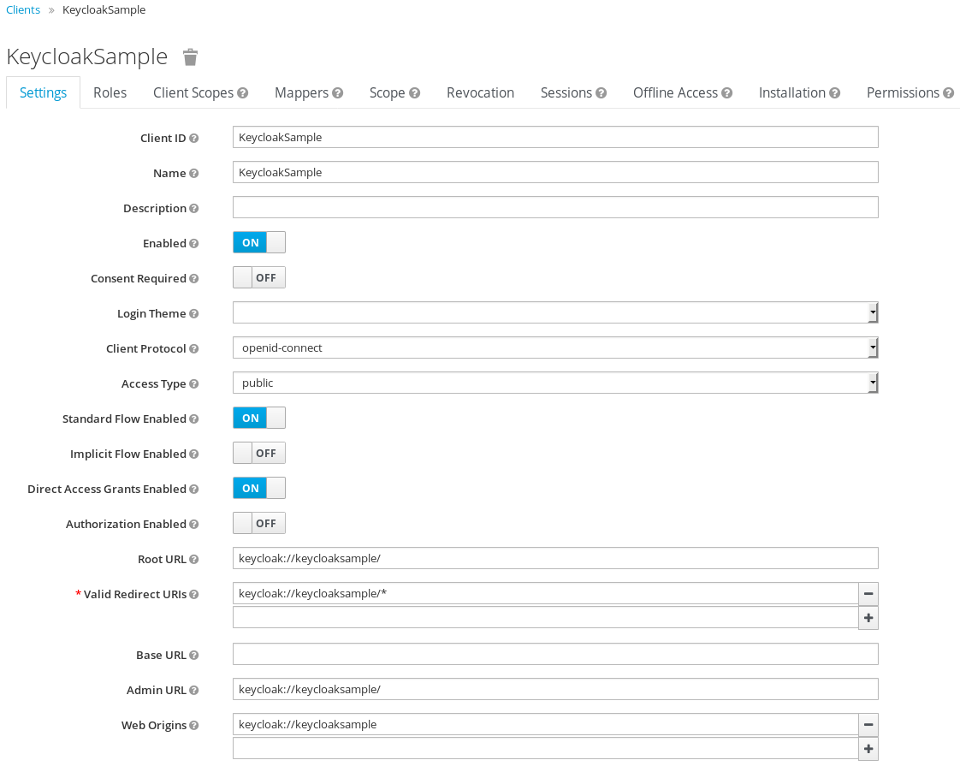
First creating the public keycloak client for the application is needed. The application will use a weird URL keycloak://keycloaksample/.
Starting with the android application, the custom URL should be defined in the AndroidManifest.xml, in my case for the .MainActivity.
<activity android:name=".MainActivity">
    <intent-filter>
        <action android:name="android.intent.action.MAIN" />
        <action android:name="android.intent.action.VIEW" />
        <category android:name="android.intent.category.LAUNCHER" />
        <category android:name="android.intent.category.DEFAULT" />
        <category android:name="android.intent.category.BROWSABLE" />
        <data android:scheme="keycloak"
            android:host="keycloaksample"
            android:pathPrefix="/"/>
    </intent-filter>
</activity>
With this configuration the .MainActivity will be called when the browser receives the keycloak://keycloaksample/ URL from the SSO server. That feature will be used to use the external browser to do the login and the logout. So a button will initiate the browser which will go to the authentication URL.
    public void login(View view) {
        // "http://192.168.100.1:8080/auth/realms/master/protocol/openid-connect/auth?client_id=KeycloakSample&scope=openid&response_type=code&redirect_uri=app%3A%2F%2Fkeycloaksample%2F";
        Uri uri = new Uri.Builder().scheme(configuration.getProperty("keycloak.scheme"))
                .encodedAuthority(configuration.getProperty("keycloak.authority"))
                .appendEncodedPath("auth/realms")
                .appendPath(configuration.getProperty("keycloak.realm"))
                .appendEncodedPath("protocol/openid-connect/auth")
                .appendQueryParameter("client_id", getString(R.string.app_name))
                .appendQueryParameter("scope", "openid")
                .appendQueryParameter("response_type", "code")
                .appendQueryParameter("redirect_uri", configuration.getProperty("app.url"))
                .build();
        Intent intent = new Intent(Intent.ACTION_VIEW, uri);
        startActivity(intent);
    }
If you see, the URL is created with the application URL as the redirect_uri. The idea is the login button starts the default browser with the keycloak authentication URL (android starts the app associated to an http(s) scheme), the user performs the login with it, and after that the server redirects the browser to the application URL, which starts the activity inside our app.
Now it's the time to follow the OIDC specification an get the code returned from the server and, with it, obtain the access and refresh token. In the onCreate of the activity a LoginTask starts a thread that executes the call to the token endpoint.
    if (Intent.ACTION_VIEW.equals(intent.getAction())) {
            // check if we have to login
            Uri uri = intent.getData();
            if (uri != null) {
                String code = uri.getQueryParameter("code");
                if (code != null) {
                    new LoginTask(this,
                            new Callback() {
                                @Override
                                public void onPostExecute(MainActivity activity, TokenResponse tokenResponse) {
                                    activity.setToken(tokenResponse);
                                }
                            }
                    ).execute(code);
                }
            }
        }
The LoginTask performs the authorization_code call to convert the code into the real tokens (remember this is just plain OIDC standard).
    @Override
    protected TokenResponse doInBackground(String... strings) {
        HttpURLConnection conn = null;
        try {
            String code = strings[0];
            URL keycloak = activity.createTokenURL();
            String urlParameters = activity.createAuthorizationCodePostData(code);
            byte[] postData = urlParameters.getBytes(StandardCharsets.UTF_8);
            conn = (HttpURLConnection) keycloak.openConnection();
            conn.setDoOutput(true);
            conn.setInstanceFollowRedirects(false);
            conn.setRequestMethod("POST");
            conn.setRequestProperty("Content-Type", "application/x-www-form-urlencoded");
            conn.setRequestProperty("charset", "utf-8");
            conn.setRequestProperty("Content-Length", Integer.toString(postData.length));
            conn.setUseCaches(false);
            try (DataOutputStream wr = new DataOutputStream(conn.getOutputStream())) {
                wr.write(postData);
            }
            if (conn.getResponseCode() == 200) {
                return new TokenResponse(conn.getInputStream(), activity.getSignatureKey());
            } else {
                return new TokenResponse(conn.getResponseCode() + ": " + conn.getResponseMessage());
            }
        } catch (IOException|InvalidKeySpecException|NoSuchAlgorithmException e) {
            Log.d(TAG, "Error calling keycloak", e);
            return new TokenResponse(e.getMessage());
        } finally {
            if (conn != null) {
                conn.disconnect();
            }
        }
    }
The createTokenURL and createAuthorizationCodePostData methods assign the URL and the post data that will be sent to the server to obtain the tokens.
    public URL createTokenURL() throws MalformedURLException {
        // "http://192.168.100.1:8080/auth/realms/master/protocol/openid-connect/token"
        return new URL(new Uri.Builder().scheme(configuration.getProperty("keycloak.scheme"))
                .encodedAuthority(configuration.getProperty("keycloak.authority"))
                .appendEncodedPath("auth/realms")
                .appendPath(configuration.getProperty("keycloak.realm"))
                .appendEncodedPath("protocol/openid-connect/token")
                .build().toString());
    }

    public String createAuthorizationCodePostData(String code) {
        // "grant_type=authorization_code&client_id=KeycloakSample&redirect_uri=app%3A%2F%2Fkeycloaksample%2F&code=" + code
        return new Uri.Builder()
                .appendQueryParameter("grant_type", "authorization_code")
                .appendQueryParameter("client_id", getString(R.string.app_name))
                .appendQueryParameter("redirect_uri", configuration.getProperty("app.url"))
                .appendQueryParameter("code", code)
                .build().getEncodedQuery();
    }
And finally, with the JSON data returned by the server, a TokenResponse object is created. For that I used the jjwt project which can parse the different JWT tokens returned by the server. This way the application can obtain the token information and present the user info.
    public TokenResponse(InputStream is, Key key) throws IOException {
        this.creationTime = System.currentTimeMillis() / 1000L;
        this.key = key;
        JsonReader jsonReader = new JsonReader(new InputStreamReader(is, "UTF-8"));
        jsonReader.beginObject();
        while(jsonReader.hasNext()) {
            String name = jsonReader.nextName();
            switch (name) {
                case "expires_in":
                    this.setExpiresIn(jsonReader.nextInt());
                    break;
                case "refresh_expires_in":
                    this.setRefreshExpiresIn(jsonReader.nextInt());
                    break;
                case "access_token":
                    this.setAccessToken(jsonReader.nextString());
                    break;
                case "refresh_token":
                    this.setRefreshToken(jsonReader.nextString());
                    break;
                default:
                    jsonReader.skipValue();
            }
        }
    }

    public Jws getAccessTokenClaims() {
        return accessTokenClaims;
    }

    public String getAccessToken() {
        return accessToken;
    }

    public void setAccessToken(String accessToken) {
        this.accessToken = accessToken;
        this.accessTokenClaims = Jwts.parser()
                .setSigningKey(this.key)
                .parseClaimsJws(accessToken);
    }
To fully understand the code presented, the properties file used in the app is the following (information about keycloak: url, realm key,...).
keycloak.key=MIIBIjANBgkqhkiG9w0BAQEFAAOCAQ8...
keycloak.scheme=http
keycloak.authority=192.168.100.1:8080
keycloak.realm=master
app.url=keycloak://keycloaksample/
Mainly this is the idea about the custom URL technique, android can associate a weird URL with the application and normal browser login is used to perform the SSO login. After that the OIDC calls are used to get the tokens and use them. My application also exemplifies how to do the logout, refresh the token and call another web service (userinfo) using the access token. But that is just development that uses the TokenResponse object initially created in the login.
Here I present a video, first I log into the application, thanks to custom URLs the browser is used to do that. Then the token information is shown and it is used to call the OIDC userinfo endpoint (information of the user). As you see the SSO is in place and I can reach the keycloak console without login again. Then I wait the access token to expire (60 seconds) and I refresh it (refresh_token action in the OIDC token endpoint). Finally I perform the logout which is a global logout too.
And that is all. I wanted to test the custom URL technique in an mobile application and I decided to use android (iOS is a complete unknown for me, but I suppose the same idea can be used for that platform). The application is very simple and just uses the jjwt project out of the default android API. This is just a PoC so it can be extended and/or improved a lot (for example not using fixed URLs and keys, calling the well-known OIDC address and the JWKs certificate endpoints is a better solution). Please also take in mind that I never develop for mobile, so just use the app as an example, surely things can be done much better. The KeycloakSample application can be download from here, hope it helps to someone else.
Regards!
Comments