

Saturday, April 30. 2011
JAX-WS and Multiple Endpoints

These last weeks I have been working in an identity project that deals with Web Services. The customer wants the Identity Solution to integrate several applications via Web Services. Therefore the agreement of a WSDL between all parts was the first issue to work with. The WSDL (Web Services Description Language) is an XML language to describe and model Web Services, using simpler words, it is a way to define what methods to implement and what the data model exchanged is (without any doubt). Finishing the introduction JAX-WS (Java Api for XML Web Services) is the API that deals with Web Services as part of the Java EE platform specification (it gives annotations, WSDL parsing and many other features to simplify the development of Web Services in the Java platform).
It is important to explain that in this case my part (the identity side) would be the client whilst the different applications would be the Web Services server side. This way the Identity Software would invoke the methods of the agreement in order to provision a new account, to change some attributes or to delete a user in the integrated application. If a WSDL is defined previously no compatibility problems are expected, no matter the server software or the implementation language. Besides, as all methods and exchange objects had been deliberately defined generic, only one client would have been needed in the identity side for all applications. In fact the agreement document version 1.0 (with the first version of the WSDL inside too) was sent to customer and to the different application teams some months ago.
But people sometimes do not understand what a WSDL is and, even worse, developers think some methods with similar functionality are more than sufficient (which is basically true but it converts all the previous work in a waste of time and the scheduled timetable in a real bullshit). Of course these little modifications are considered not important enough to even advise the other parts involved. To sum the first application to integrate had developed their way Web Services. Besides the application team used a custom and abominable Web Services framework which did not generate the artifacts, so the XML data had to be manually parsed (oh my gosh!). Another of its features was every operation was bound to a different endpoint (a different URL). Needless to say the WSDL was not automatically generated and it had also to be written manually. So you can image the situation. After some crisis times I decided to tune their WSDL and implement the same file in a modern application server, mainly my idea was testing with a confident implementation and reporting errors to them as fast as I can.
But developing a multi-endpoint web service with JAX-WS was not as easy as I expected and this is the reason for this entry. I decided to use Metro implementation which is the JAX-WS reference and open-source implementation done by Oracle (formerly Sun). Actually metro is the complete Web Services stack for glassfish (and other application servers) and covers many other components like JAX-RS (see my ScatterPlot entry for more information for RESTful Web Services), JAXB, WSIT or SAAJ inside the Java EE. There are more implementations like Apache Axis 2, Apache CXF or Codehouse XFire but I have more experience with this one and I suppose basics are the same for all of them. I spent some time to create the Web Service and I want to save this information here.
For obvious reasons I cannot present the real WSDL file so I created a very simple user CRUD service for a supposed application, here it is the basic-crud.wsdl file. This WSDL is not generic but it is easier and better for learning purposes. The definition has four endpoints with one operation inside each (Create, Read, Update and Delete). If you download the JAX-WS Metro bundle there are some sample applications inside, and one of them explicitly shows how to create a jax-ws service from a given WSDL file (fromwsdl inside samples directory). Following the instructions the wsdl must be imported in order to create the interfaces and exchange objects:
$ wsimport -keep -Xnocompile -verbose -d ../../../src/java/ basic-crud.wsdl
parsing WSDL...

generating code...

sample/user/crud/basic/CreatePort.java
sample/user/crud/basic/CreateRequest.java
sample/user/crud/basic/CreateResponse.java
sample/user/crud/basic/DeletePort.java
sample/user/crud/basic/DeleteRequest.java
sample/user/crud/basic/DeleteResponse.java
sample/user/crud/basic/ObjectFactory.java
sample/user/crud/basic/ReadPort.java
sample/user/crud/basic/ReadRequest.java
sample/user/crud/basic/ReadResponse.java
sample/user/crud/basic/SampleUser.java
sample/user/crud/basic/Status.java
sample/user/crud/basic/StatusCode.java
sample/user/crud/basic/UpdatePort.java
sample/user/crud/basic/UpdateRequest.java
sample/user/crud/basic/UpdateResponse.java
sample/user/crud/basic/WsCRUDUserService.java
sample/user/crud/basic/package-info.java
The wsimport command parses the WSDL file and generates the Java portable artifacts (keep option does not delete the Java files and they are saved inside src directory). With this command all Java classes and the Web Service Interfaces are generated for all the ports. After that the different ports need to be coded and, following the fromwsdl example, the @WebService annotation must only have the endpointInterface property set in each. In my example all the ports just manage the users into memory (a memory example repository). The code for read operation is presented below.
package sample.user.crud.basic.implementation;

import javax.jws.WebService;
import sample.user.crud.basic.ReadRequest;
import sample.user.crud.basic.ReadResponse;
import sample.user.crud.basic.SampleUser;
import sample.user.crud.basic.Status;
import sample.user.crud.basic.StatusCode;

@WebService(endpointInterface = "sample.user.crud.basic.ReadPort")
public class ReadPort {

    private UserMapSingleton map = UserMapSingleton.getSingleton();

    public ReadResponse read(ReadRequest request) {
        ReadResponse response = new ReadResponse();
        Status status = new Status();
        response.setStatus(status);
        try {
            if (request.getId() == null) {
                status.setStatus(StatusCode.ERROR);
                status.setMessage("No ID passed!");
            } else {
                SampleUser user = map.getMap().get(request.getId());
                response.setUser(user);
                status.setStatus(StatusCode.OK);
                if (user == null) {
                    status.setMessage("User '" + request.getId() + "' not found!");
                }
            }
            return response;
        } catch (Throwable t) {
            status.setStatus(StatusCode.ERROR);
            status.setMessage(t.getMessage());
            return response;
        }
    }
}
When the Web Services are created from a defined WSDL all the ports have to be added to the sun-jaxws.xml file manually (as I said previously only the endpointInterface attribute annotation is present in the Java class and all the configuration is defined via the sun-jaxws file). This file contains all the endpoints with the implementation and interface part. You have to think this is exactly the opposite of what is done when the WSDL is not previously defined (everything is annotated and nothing is set in the sun-jaxws.xml). Here it is the file for the four CRUD endpoints.
<endpoints
    xmlns="http://java.sun.com/xml/ns/jax-ws/ri/runtime"
    version="2.0">

    <endpoint
        name="wsCRUDUserServicePortTypeBindingCreate"
        implementation="sample.user.crud.basic.implementation.CreatePort"
        interface="sample.user.crud.basic.CreatePort"
        wsdl="WEB-INF/wsdl/basic-crud.wsdl"
        service="{http://basic.crud.user.sample}wsCRUDUserService"
        port="{http://basic.crud.user.sample}wsCRUDUserServicePortTypeBindingCreate"
        url-pattern="/wsCRUDUserServicePortTypeBindingCreate" />

    <endpoint
        name="wsCRUDUserServicePortTypeBindingRead"
        implementation="sample.user.crud.basic.implementation.ReadPort"
        interface="sample.user.crud.basic.ReadPort"
        wsdl="WEB-INF/wsdl/basic-crud.wsdl"
        service="{http://basic.crud.user.sample}wsCRUDUserService"
        port="{http://basic.crud.user.sample}wsCRUDUserServicePortTypeBindingRead"
        url-pattern="/wsCRUDUserServicePortTypeBindingRead" />

    <endpoint
        name="wsCRUDUserServicePortTypeBindingUpdate"
        implementation="sample.user.crud.basic.implementation.UpdatePort"
        interface="sample.user.crud.basic.UpdatePort"
        wsdl="WEB-INF/wsdl/basic-crud.wsdl"
        service="{http://basic.crud.user.sample}wsCRUDUserService"
        port="{http://basic.crud.user.sample}wsCRUDUserServicePortTypeBindingUpdate"
        url-pattern="/wsCRUDUserServicePortTypeBindingUpdate" />

    <endpoint
        name="wsCRUDUserServicePortTypeBindingDelete"
        implementation="sample.user.crud.basic.implementation.DeletePort"
        interface="sample.user.crud.basic.DeletePort"
        wsdl="WEB-INF/wsdl/basic-crud.wsdl"
        service="{http://basic.crud.user.sample}wsCRUDUserService"
        port="{http://basic.crud.user.sample}wsCRUDUserServicePortTypeBindingDelete"
        url-pattern="/wsCRUDUserServicePortTypeBindingDelete" />

</endpoints>
Finally the web.xml is modified to add JAX-WS listener and servlet and the servlet is mapped against all the URLs specified in the previous file.
<?xml version="1.0" encoding="UTF-8"?>
<web-app version="2.5" xmlns="http://java.sun.com/xml/ns/javaee"
  xmlns:xsi="http://www.w3.org/2001/XMLSchema-instance"
  xsi:schemaLocation="http://java.sun.com/xml/ns/javaee
  http://java.sun.com/xml/ns/javaee/web-app_2_5.xsd">
    <listener>
        <listener-class>
            com.sun.xml.ws.transport.http.servlet.WSServletContextListener
        </listener-class>
    </listener>
    <servlet>
        <display-name>wsCRUDUserService</display-name>
        <servlet-name>wsCRUDUserService</servlet-name>
        <servlet-class>com.sun.xml.ws.transport.http.servlet.WSServlet</servlet-class>
        <load-on-startup>1</load-on-startup>
    </servlet>
    <servlet-mapping>
        <servlet-name>wsCRUDUserService</servlet-name>
        <url-pattern>/wsCRUDUserServicePortTypeBindingCreate</url-pattern>
        <url-pattern>/wsCRUDUserServicePortTypeBindingRead</url-pattern>
        <url-pattern>/wsCRUDUserServicePortTypeBindingUpdate</url-pattern>
        <url-pattern>/wsCRUDUserServicePortTypeBindingDelete</url-pattern>
    </servlet-mapping>
    <session-config>
        <session-timeout>30</session-timeoutv
    </session-config>
    <welcome-file-list>
        <welcome-file>index.jsp</welcome-file>
    </welcome-file-list>
</web-app>
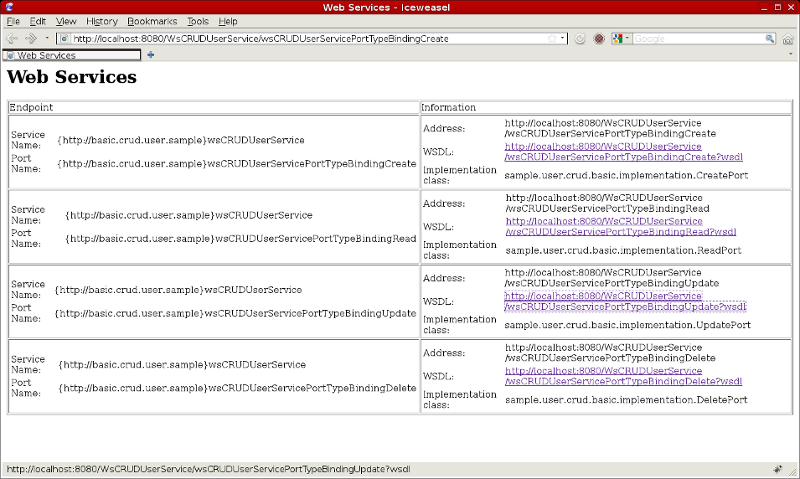
In theory at this point everything is set and the project is ready to be used. I deployed the war file inside a standard glassfish 2.1.1 application server. If you access to any of the four mapped endpoints Metro lists all the endpoints defined in the application (see screenshot below). If the WSDL is requested to any of the four endpoints the same XML file is returned (cos four endpoints are coded from the same WSDL file).
Finally I implemented a quick JUnit test case class which checks the four endpoints work as expected (it creates, updates and deletes a user doing some reads between modify operations to test the functionality).
Today's entry explains how to create a JAX-WS Web Service with several endpoints from a pre-defined WSDL definition file using reference Metro implementation. As you have stated it is not very difficult and you can directly follow fromwsdl sample instructions. But I wanted to summarize the process here to have a quick guide for the next time (I do not usually work with Web Services this way and I spent some time to achieve it). In my defense, it seems incredibly simpler once you have written the full instructions, these things always make me think I am really stupid  . The complete NetBeans project can be download from here.
God is in the detail. Cheerio!
Tuesday, February 2. 2010
OpenSSO Reverse Proxy Extension (Part III)
As I have already commented the OpenSSO proxy implementation uses filters to change the information that is flying from the client to the server. But what I did not talk about is that proxy gives to the developers an API to change everything inside the request (change the submitted form, headers and cookies deletion or addition, uri translation,...). This way when a login form is presented to the user the proxy can fulfill it instead of the user and perform the login transparently. In the proxy versioning system there are some contributed filter samples to do this in front of some legacy applications (SjsmeAuthFilter.java for Sun Java System Messaging Express, SjsceAuthFilter.java for Sun Calendar Server and MediaWikiAuthFilter.java for the popular php MediaWiki).
So I decided to install another web server in the KVM Solaris box and the PmWiki application was deployed inside it. PmWiki is a very simple PHP wiki which does not need any mysql installation (plain files are used instead). The wiki was configured to always present a login form (anonymous access is forbidden) and user information was again in the ldap server (OpenSSO and PmWiki share the same users as in previous examples).
Without proxy extension OpenSSO is unable to give PmWiki its SSO functionality without little code modifications. Installing Web Agents inside the container web server had passed user and group information via headers or cookies, but PHP code inside PmWiki would have been needed to retrieve this information and place them. Another traditional solution had been the PHP OpenSSO SDK but, again, some minor coding would have been needed.
Following the proxy way I extended the previous entry solution developing a new PmWikiAuthFilter.java which performs the silent login when no PHPSESSID is in the request. The idea is very simple:
- PmWiki is a traditional PHP application so, by default, PHPSESSID is used as the tracking session cookie. As PwWiki has been configured to prevent anonymous access the problem can be simplified: if session is in place user is already logged.
- So PmWiki filter is going to check if the PHPSESSID cookie is in the request, if it is nothing is done but if not a new login form is constructed and sent to wiki application.
- The proxy API is used to construct this whole new request.
- Finally the main Servlet replaces the old HttpBasicAuthFilter with the new PmWikiAuthFilter receiving a PostAuthCredentialSource as its credential source (the same source of the previous entry is used, the one which obtains the username and password from OpenSSO session token).
public class BasicAuthProxy extends SimpleProxyServlet{
@Override
public void init() throws ServletException {
init("http", "192.168.122.11", 80);
addFilter(new PmWikiAuthFilter(
new PostAuthCredentialSource("8uDWeq1Mx/c=")));
}
}
An here is the video. If we access the PmWiki at first place the traditional login form is presented. As in the previous example, if we access directly to the tomcat proxy a exception is thrown (the same credential source class is being used and no valid SSO token is in place). But if we log in OpenSSO and then access proxy... Voila! We are in without any login form and, even better, we cannot log out! Tomcat logs show the proxy is relogin me again and again.

In summary, the proxy extension is nowadays only targeted for developers. It has quite a good api to implement other password sources or other authentication login filters as I have proved it, but no configuration (graphical or file) is possible. So it is quite useless at this time. Performance and throughput are another two good questions. But finally this extension is very promising and it is a real shame Oracle acquisition could stop proxy extension and all this project progress.
have fun!
EDIT: Some weird news have come to the OpenSSO user mailing list. A new site called www.forgerock.com has been launched in February 1 which announces OpenSSO express build 9. Has Oracle abandoned OpenSSO and the other sun products advertised on this web?
Sunday, January 31. 2010
OpenSSO Reverse Proxy Extension (Part II)
The strategy to obtain that data is the following:
- The user must be previously logged in OpenSSO.
- The Post Authentication OpenSSO plugin will be needed to store in the SSO token the username and password (encrypted).
- A new class that implements PasswordCredentialSource is necessary to obtain the data stored in the second point. This class needs the integration of OpenSSO Java SDK into the proxy app.
- The BasicAuthProxy servlet must be slightly modified to integrate the new credential source class.
In order to achieve the four items the first step is to install OpenSSO. OpenSSO was installed in the Solaris KVM box and I decided to use the latest build (I wanted to be as close to Express Build 9 as I could). The war installation went perfect following the documentation and, at the end, a working OpenSSO was running inside a container with the user store in a external ldap server.
With the OpenSSO server up and running the next step was the installation of the SDK java example application that goes with OpenSSO bits. The opensso-client-jdk15.war was deployed into my Tomcat container following the installation guide (server runs in the virtualized Solaris and client in my debian laptop). The information I submitted was the following:
| Server Protocol | http |
| Server host | solaris10.demo.kvm |
| Server post | 8080 |
| Server deployment URI | /opensso |
| Debug directory | /home/ricky/logs |
| Application user name | amadmin |
| Application user password | adminadmin |
The client installation did not go as smooth as the server one. After configuration all Access Management Samples did not work at all. In previous experiences with versions 7.x cookie encoding was specially a headache and I decided to start from here. Finally I found this heaven send web page and activating c66Encode property all the samples magically started to work properly. It was quite useful too enabling debug mode. Single Sign On Token Verification Servlet is the example that lets SDK application to retrieve information from the SSO token.
When the SDK sample app was running the Post Authentication plugin had to be configured. OpenSSO is a very flexible piece of software and post auth classes are useful to execute some code after a successful login. This plugin is a standard OpenSSO post authentication class that inserts into the SSO token the username and password just logged. For example this plugin is used in IIS web agent to replay password against some applications like Sharepoint. The code of this class is in OpenSSO project and the documentation to configure it is also public.
At this point the status of my little OpenSSO installation was the following: OpenSSO was running, the post auth plugin was configured and username/password information was accessible inside token and functional client SDK sample app was running in my tomcat. Basic auth web server was also configured to access the same ldap user store of OpenSSO (this way web server and OpenSSO share the same users). So I just added the OpenSSO SDK in the proxy netbeans project (looking at the sample app) and developed the new password credential source which uses the SDK to retrieve the login information from the token. All this stuff is summarize in:
- Adding openssoclientsdk.jar to the project.
- Adding a working AMConfig.properties configuration (copied from the client app) in WEB-INF/classes root directory.
- And finally developing the PostAuthCredentialSource.java class.
Although the complete class is presented I want to comment the code briefly. This credential source gets the SSO token. If the token exists and is valid the username must be in the sharepoint_login_attr_value property (if this property is null the usual userId is used) and the password in sunIdentityUserPassword property. But the password is encrypted (Post Auth plugin does) and the method needs to decrypt it using the previously used key. The DES key configured in the plugin must be used and it is passed to the class via the constructor. The main part of the code is the following:
// Get the SSO token from SSO session
SSOTokenManager manager = SSOTokenManager.getInstance();
SSOToken token = manager.createSSOToken(req);
// check if the token is valid
if (manager.isValidToken(token)) {
// get the user password. PostAuth use sunIdentityUserPassword
// property but this is encrypted using DES. deskeystr has the
// key to decrypt password
String encBase64Password = token.getProperty("sunIdentityUserPassword");
// get the userId. PostAuth use sharepoint_login_attr_value
String userId = token.getProperty("sharepoint_login_attr_value");
if (userId == null) {
// if null use the normal user id
userId = token.getProperty("UserId");
}
// decode password using the key in deskeystr
BASE64Decoder decoder = new BASE64Decoder();
byte[] encPassword = decoder.decodeBuffer(encBase64Password);
byte[] desKey = decoder.decodeBuffer(deskeystr);
SecretKeySpec keySpec = new SecretKeySpec(desKey, "DES");
Cipher cipher = Cipher.getInstance("DES/ECB/NoPadding");
cipher.init(Cipher.DECRYPT_MODE, keySpec);
byte[] password = cipher.doFinal(encPassword);
// set user and password in credentials to be used by the proxy
credentials.username = userId;
credentials.password = new String(password).trim();
System.err.println("Username: " + credentials.username);
System.err.println("Password: " + credentials.password);
}
Finally the BasicAuthProxy servlet is changed to use this brand new class. Now it does not use a hardcoded username/password pair but the real one.
public class BasicAuthProxy extends SimpleProxyServlet{
@Override
public void init() throws ServletException {
init("http", "192.168.122.11", 81);
addFilter(new HttpBasicAuthFilter(
new PostAuthCredentialSource("8uDWeq1Mx/c="),
new TemporaryStorage()));
}
}
If we try to access directly to the tomcat a exception is thrown (cos the user is not logged in OpenSSO). But if we go first to the OpenSSO server, perform a login and then access tomcat, the proxy silently retrieves my login info and logs me in to the basic auth protected web server. The username and password can be shown in the tomcat logs.
As a conclusion, this second part of the proxy extension shows a real OpenSSO use. It is clear that now the extension is not very useful (java developing is needed) but it could be. A third post will come to show a real legacy application instead of the basic auth web server.
cheerio!
Comments