

Friday, August 22. 2014
Cyanogenmod and Owncloud


Another personal entry this time. I have re-newed my old Samsung Galaxy Y Duos and, after a long period of doubts, I decided to buy a Moto G dual SIM (XT1033). It is (I think) the only dual SIM device that is supported by cyanogenmod. I really did not want to carry two phones again, and having a more friendly and trustworthy android was also a must. So this entry has two sections, the first one describes the installation of cyanogenmod in my new device (basically following the cyanogenmod installation instructions), and the second part is the installation of owncloud in my PC server in order to sync contacts, calendar and files against my own server.
Cyanogenmod installation on XT1033
As I commented the installation is easy and I just followed the steps provided by the cyanogenmod procedure. I am going to add some little details of my particular environment (debian laptop, so on and so forth). During this process the device should be connected to the PC using the USB cable.
The installation needs the android tools in order to flash the device. So installing some packages is necessary.
# apt-get install android-tools-adb android-tools-fastboot
USB debugging should be activated in order accept tools commands. First you have to activate developer options, Settings → About Phone, Click several times in Build Number until a popup appears explaining you are now a developer. Then go to the new Developer Options menu and check USB Debugging on. Please see this video for a detailed explanation of the process.
This step should be repeated if the USB debugging comes disabled back again.
When USB debugging is activated, reboot the device to bootloader (in my laptop I had to be root).
# adb reboot bootloader
And now the device should appear under the fastboot.
# fastboot devices
XXXXXXXXXX	fastboot
The XT1033 needs to be unlocked in order to install another Operating System. In this point the unlock data is requested to the phone.
# fastboot oem get_unlock_data
...
(bootloader) XXXXXXXXXXXXXXXX#XXXXXXXXXXXXXX
(bootloader) XXXXXXXXXXXXXXXXXXXXXXXXXX#XXXX
(bootloader) XXXXXXXXXXXXXXXXXXXXXXXXXXXXXXX
(bootloader) XXXXX#XXXXXXXXXXXXXXXXXXXXXXXXX
(bootloader) XXXXXXX
OKAY [  0.158s]
finished. total time: 0.158s
With the unlock data obtained we need to access to the motorola site and request the unlock key for the device. You have to follow the instructions displayed in the page step by step (the information provided by the previous command should be submitted). Finally a key (a string of numbers and characters) is obtained and the device can be finally unlocked with it.
# fastboot oem unlock XXXXXXXXXXXXXXXXXXXX
...
(bootloader) Unlock code = XXXXXXXXXXXXXXXXXXXX

(bootloader) Unlock completed! Wait to reboot

FAILED (status read failed (No such device))
finished. total time: 28.321s
Although the previous command said that it failed, the device booted again and was ready to the installation of the recovery.
Please take in mind that you are unlocking the device. When you do that the startup process show a beautiful warning boot screen noticing this new situation (I suppose the unlocked logo can be changed but I have no problem with it). There are some penalties unlocking your device, among them, your device will not be covered by the motorola warranty anymore (read this entry for a more detailed explanation). But, for me, cyanogenmod is worth the risk.
Download the recovery image for falcon (Moto G codename in cyanogenmod). It seems the last one right now is 6.0.4.7.
# wget http://loki.rombitch.com/Devs/Dhacker29/MotoG/CWM-swipe-6.0.4.7-falcon.img
And again, going to bootloader, flash the recovery image.
# adb reboot bootloader
# fastboot devices
XXXXXXXXXX	fastboot
# fastboot flash recovery CWM-swipe-6.0.4.7-falcon.img
target reported max download size of 536870912 bytes
sending 'recovery' (9954 KB)...
OKAY [  0.336s]
writing 'recovery'...
OKAY [  0.394s]
finished. total time: 0.730s
The phone reboots again and now the recovery menu should be started (hold Volume Down & Power simultaneously at startup). In this menu you move up and down using volume up and down buttons, and power button selects the option.
At this point download the image of cyanogenmod for falcon. I finally decided to install last snapshop M6 (it seems that this device has some problems with audio and data right now and has lost the track of the last stable releases, currently cyanogenmod is at M9 snapshot release).
# wget http://download.cyanogenmod.org/get/jenkins/67673/cm-11-20140504-SNAPSHOT-M6-falcon.zip
Backup your current stock ROM. In the recovery menu select backup and restore and there backup to /sdcard. It generates a backup with the current date and time (format YYYY-MM-DD.hh.mm.ss).
Then go back and select wipe data/factory reset.
I decided to use the sideload option for the flashing. Select Install zip → Install zip from sideload... The device waits for the zip file to be sent. Execute the following adb command to send the cyanogenmod ROM to the device.
# adb sideload cm-11-20140504-SNAPSHOT-M6-falcon.zip
sending: 'cm-11-20140504-SNAPSHOT-M6-falcon.zip'  100%
When the progress bar finishes you can go back and select reboot system now. Finally cyanogenmod 11M6 was installed in my device.
Synchronizing your phone with owncloud
The second part of the entry is about owncloud. This software is a PHP application that handles calDAV (protocol to manage calendar events over HTTP), cardDAV (contacts) and general webDAV (common files) in order to synchronize device data against your own server. I had read a nice entry about this application long time ago and I decided it was the perfect time to start using my own server to store contacts, calendar events, photos,... If you do not know me, until now I simply do not synchronize anything (I just backup things manually from time to time). So this second part of the entry explains how owncloud was configured in my desktop PC (obviously a debian testing box) and which applications were installed in the device to synch my data. For the server part I followed the procedure explained in the sharadchhetri.com blog, although I did a more specific setup.
First it is important that your desktop has a fixed IP address (do not use DHCP). This way the software will be always available in the same IP and your device will contact to the owncloud server with no issues. In my case this step was already done (my server IP is 192.168.1.2 and is named venom.local).
Now the required software is installed (owncloud is a free software so it is available in the debian repositories).
# apt-get install owncloud mysql-server
Owncloud needs a database (I decided to continue using MySQL) and requires a lot of depending software (PHP, Apache,...) which is installed as dependencies.
Now the database and the user for the application are created.
$ mysql -u root -p
...
mysql> create database owncloud;
mysql> create user 'ownclouduser'@'localhost' IDENTIFIED BY 'XXXXXXXX';
mysql> grant all on owncloud.* to 'ownclouduser'@'localhost';
Add your local IP and hostname to the trusted domains configuration (file /etc/owncloud/config.php). In my case the trusted_domain section was like this.
  'trusted_domains' =>
  array (
    0 => 'localhost',
    1 => '192.169.1.2'
    2 => 'venom.local',
  ),
With this modifications the owncloud server is ready to roll. Restart your apache server.
# /etc/init.d/apache2 restart
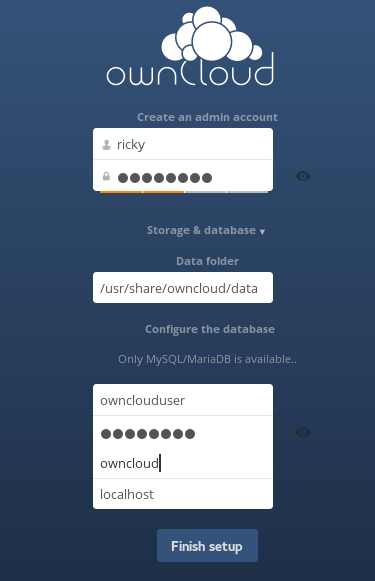
- Now it is time to Access to your owncloud server (URL http://localhost/owncloud/) and configure it. The information needed by the software is almost nothing: administrator account, file system to store files (change it if needed) and the database access information. The following image is the information I entered.
I decided to use owncloud using HTTPS (you will not believe how difficult is this simple task, but not because of the server but because of the android device). After some different tries I finally created a CA certificate and another certificate for the web server (signed by the CA). All the files are going to reside in the /etc/ssl directory of my desktop machine.
Prepare the environment for the CA:
# cd /etc/ssl
# mkdir -p demoCA/newcerts
# touch demoCA/index.txt
# echo 01 > demoCA/crlnumber
# echo 01 > demoCA/serial
Create the real certificate for the CA:
# openssl req -subj "/C=ES/ST=Madrid/O=Home/CN=ca.local" -new -newkey rsa:2048 -keyout private/cakey.pem -out careq.pem
# openssl ca -out cacert.pem -days 10000 -keyfile private/cakey.pem -selfsign -extensions v3_ca -infiles careq.pem
# openssl x509 -in cacert.pem -outform DER -out cacert.der
# openssl pkcs12 -export -out cacert.p12 -in cacert.pem -inkey private/cakey.pem
With the created CA the certificate for my host was generated:
# openssl genrsa -out private/venom.local.pem 2048
# openssl req -subj "/C=ES/ST=Madrid/O=Home/CN=venom.local" -key private/venom.local.pem -new -out venom.local.req
# openssl ca -in venom.local.req -days 9999 -extensions usr_cert -cert cacert.pem -keyfile private/cakey.pem -out venom.local.pem
After that, the HTTPS virtual host should be added in the apache server (a default-ssl is ready to be enabled by default in debian).
# a2enmod ssl
# a2ensite default-ssl
Finally modify the site configuration to properly link to the created key and certificate pair (modify the following properties in the ssl virtual-host file /etc/apache2/sites-enabled/default-ssl.conf).
SSLCertificateFile      /etc/ssl/venom.local.pem
SSLCertificateKeyFile   /etc/ssl/private/venom.local.pem
SSLCertificateChainFile /etc/ssl/cacert.pem
Restart again the web server and check with a browser that owncloud is working with the new HTTPS port and certificate (now access the URL https://localhost/owncloud/, the typical warning message about a non-trusted certificate should be displayed).
Once the software is running the well-known address should be defined. These URLs are just redirections to the proper URL where calDAV and cardDAV protocols are available. In the case of apache just enable the mod_alias module (if it was not enabled before).
# a2enmod alias
And create to permanent redirections, from the well known address to the correct owncloud ones (you have to define these two lines inside the ssl virtual-host configuration too, /etc/apache2/sites-enabled/default-ssl.conf).
Redirect permanent /.well-known/caldav  https://venom.local/owncloud/remote.php/caldav/
Redirect permanent /.well-known/carddav  https://venom.local/owncloud/remote.php/carddav/
Check with any browser that, if you access to any of the well-known address, the browser is redirected to the owncloud services for calDAV and cardDAV respectively.
Finally I installed an extra application to owncloud (a notes application that will be used to synchronize my notes) which does not come with the default debian package. The installation is very easy.
# git clone https://github.com/owncloud/notes.git
# cp -r notes /usr/share/owncloud/apps/
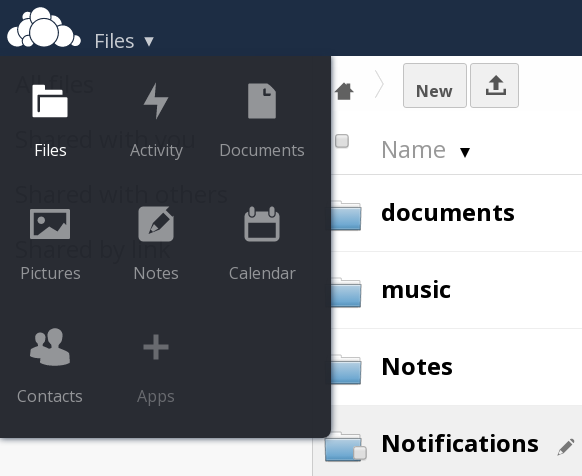
After restarting the server a new notes application is displayed in the left menu.
Now everything is working in the server side (it would have been better to use any other non-admin user, but it is late for that) and you just need to install some applications in your device. All of them are open source and available through FDroid. In my case I decided to use the following apps:
- DAVdroid: An application which provides a synch account for calendar and contacts. It is just managed as any other account in your device. For configuring it, the well-known address are needed.
- MyOwnNotes: A little notes application which also synchronizes them to the extension installed previously in the owncloud server.
- owncloud: The application provided by the server company which let you upload and download files into the server (dropbox style). The application does not synch anything for the moment (it seems that FolderSync application does it, but it is not open source, so it is not in FDroid, so it is not an option for me), but owncloud guys are working in this feature, let's see what happens.
The configuration of the different applications works smoothly but only if you have done two little things previously (I spent a whole morning with these two little issues): the web server hostname (venom.local in my case) must be resolved by the device and the certificate CA should be a trusted one. I am going to try to explain how I did it, but I spent so much time and did so many things that I am not completely sure if the following steps are complete (I must say that android is very, very annoying, this tasks are absolutely simple for any other Operating System).
The first thing is just adding the fixed IP of my PC inside the hosts file (any *nix system uses a hosts file). The problem seems to be that the /system/etc/hosts file is mounted in a read-only file system. after reading this thread the solution was clear. Using the Terminal Emulator application I executed the following (when doing the su command the terminal requests access to root, so you need a rooted device).
$ su
# mount -o rw,remount /system
And now using the File Manager application the damned line is added to the /system/etc/hosts file (rebooting the device the FS is read-only again).
127.0.0.1 localhost
192.168.1.2 venom.local venom
The certificate issue, once you know how to do it, is also an easy task. You can follow one of the several pages that explain the installation of a custom CA certificate in the device (for example this one explained by people of MyOwnNotes). The CA ceriticate in DER mode is needed (cacert.der file created before), please, if you follow the previous procedure, download the CA certificate, not the certificate of the server. Once the process is done, you can check if the CA cert is correctly installed just accessing to your server (the device browser should not show the typical security warning). It worked for me but it has two annoying side-effects: first, in order to import a custom cert you need to establish a screen lock method (password, pattern, pin or whatever, which I do not use); second, a horrible warning is permanently displayed in the phone (your network could be monitored or something similar). Finally I discovered in a forum entry that you can move the imported cert from the user directory to the system default one (it is good to be rooted). So the file under /data/misc/keychain/cacerts-added/ was moved to /system/etc/security/cacerts/ and then the user certificate store cleared (this way the annoying warning disappears too).
With both steps completed all the commented applications were configured smoothly against the owncloud server.
This time the entry is again for my own use. I wanted to respect my privacy (avoiding internet repositories) but not to continue living in the Pleistocene epoch (as I commented, I did not use those features before). So after reading the bytopia post about owncloud I decided that this software could be a perfect local repository for me. The time came when I re-newed my phone device to a new one, that is why this entry has two parts: cyanogenmod installation on Moto G XT1033 and owncloud configuration. Awfully owncloud configuration with a non rooted device is much more difficult and I am not sure if it would be possible without important drawbacks. Using a dynamic dns and maintaining your server constantly running the device could contact and synchronize against your server anytime and anywhere (but I do not recommend it, please do not waste resources uselessly). Obviously a hosted machine, if you have one, is even a better approach. So the summary is that now I have a dual sim phone with cyanogenmod 11 (no google apps, no accounts, no nothing), and my calendar, contacts, notes and files can be synchronized against my own desktop machine as soon as I arrive home and switch it on. Absolutely perfect!
Regards!
Saturday, August 9. 2014
Oracle Driver and Kerberos

Continuing the previous post this entry is going to summarize how the Oracle JDBC and ODBC drivers deal with a Kerberos environment. It is important to keep in mind that the common use-case is using Kerberos only for fat applications (DBAs, PC desktop apps,...), in spite of that, the entry will try to cover all the scenarios. I am not going to describe how the setup of the environment was done (please see this blog entry by Laurent Schneider or this community thread for more information about the installation). The entry is mainly about Java, Kerberos and the Oracle JDBC/ODBC driver. The environment used for the tests was the following: Windows 2008R2 as the KDC server, Oracle 11.2.0.3 as the DDBB server and Instant Client 11.2.0.4 as the client (installed in the same Windows DC machine).
There are going to be four separated cases for the different situations I have been testing. Please do not focus on the code, I know is bad and improvable but the main objective of this entry is giving some examples about Kerberos integration with the driver (it is not an excuse but the Java and PHP code was done using notepad in a windows virtual box). The Java examples are based in the formal documentation provided by Oracle.
The OCI and ODBC driver
The Java OCI driver is the thick one, it uses native libraries, tnsnames.ora, sqlnet.ora and the rest of common configuration files, and it needs a full native Oracle client installed in the machine (in order to use Kerberos the Advance Security option should be selected in the client installation). In theory, with this driver, once you have a working sqlplus for Kerberos all the job is done. This driver uses the same underlying infrastructure that the command manages. This is the simple example for the OCI driver.
import java.sql.*;

public class JdbcOci {
  public static void main(String[] args) throws Exception {
    Connection conn = null;
    PreparedStatement stmt = null;
    ResultSet rs = null;
    try {
      Class.forName("oracle.jdbc.driver.OracleDriver").newInstance();
      conn = DriverManager.getConnection("jdbc:oracle:oci:/@ddbb1");
      stmt = conn.prepareStatement("select user from dual");
      rs = stmt.executeQuery();
      if (rs.next()) {
        System.out.println(rs.getString(1));
      }
    } finally {
      if (rs != null) try {rs.close();} catch (SQLException e) {}
      if (stmt != null) try {stmt.close();} catch (SQLException e) {}
      if (conn != null) try {conn.close();} catch (SQLException e) {}
    }
  }
}
As you see the getConnection method does not receive any user or password, it is supposed that you have already logged in using another way (kinit in UNIX or common windows login with Microsoft) and the OCI driver is going to use the resulting ticket cache to authenticate against the DDBB. Because OCI is being used, no special configuration should be done, Java will use exactly the same configuration as the sqlplus client (tnsnames.ora and sqlnet.ora files). Once the user is logged in his PC, he can access to the application (and in turn the database) with no password.
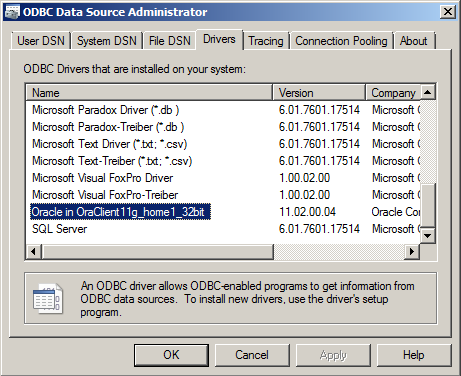
It is remarkable that all the following variations work: getConnection(url), getConnection(url, null, null) and getConnection(url, "", ""). If you are planning to migrate an existing fat client application to Kerberos, it will work just changing some configuration (properties file or similar).In the ODBC counterpart the situation is more or less the same. When the client is installed in the Windows box (with the ODBC option enabled) the Oracle driver appears listed in the drivers tab of the ODBC Data Source Administrator application (Start → Administrative Tools → Data Sources (ODBC)). The name of the driver depends of the installation but it will be very similar to the one assigned in my demo: Oracle in OraClient 11g_home1_32bit.
And it works exactly as it does in Java, I decided to test it with PHP, here it is my little example.
<?php
// connect using the System DS
//$conn = odbc_connect("DSN=ddbb1;", null, null) or die(odbc_errormsg());
// normal connection using driver
$conn = odbc_connect("Driver={Oracle in OraClient11g_home1_32bit};Dbq=ddbb1;", null, null) or die(odbc_errormsg());
$result=odbc_exec($conn, "select user from dual");
if (odbc_fetch_row($result)) {
  echo "Result is " . odbc_result($result, 1);
}
odbc_close($conn);
?>
If you check the code, two options were tested: connecting using normal oracle driver and its string and using a System Data Source string. (A kind of named connection string defined at system level, using it any application can use the DS name avoiding specific connection strings. They are defined in the System DSN tab of the previous application.) As it was commented in Java no matter if null or empty string "" are specified for username and password. It does not matter either if the connection string has empty properties for them or not (Uid=;Pwd=; properties can be passed empty or can be not defined as in the example code).
There is only one Oracle ODBC driver, and it uses the whole native client installation (libraries and configuration files) exactly as the OCI Java driver, so the following parts will only comment about the THIN Java driver.
The THIN driver: already logged
The thin driver on the other hand is a full Java implementation and, therefore, all the configuration should be passed inside the Java code (it cannot use typical database configuration files as in the previous driver). This option needs modifications in the application code (not very deep but the connection retrieval should be slightly changed). The idea of the following example is the same than in the previous case, the user is already logged in and the application is going to re-use the generated ticket cache.
import java.sql.*;
import java.util.Properties;
import java.io.File;
import oracle.jdbc.OracleConnection;
import oracle.jdbc.OracleDriver;

public class JdbcThin {
  public static void main(String[] args) throws Exception {
    Connection conn = null;
    PreparedStatement stmt = null;
    ResultSet rs = null;
    // create the connection properties for Kerberos
    String url = "jdbc:oracle:thin:@//ddbb1.demo.test:1521/ddbb1";
    Properties prop = new Properties();
    String krb5conf = "C:/app/Administrator/product/11.2.0/client_1/network/admin/krb5.conf";
    System.out.println("krb5.conf exists(): " + new File(krb5conf).exists());
    System.setProperty("java.security.krb5.conf", krb5conf);
    prop.setProperty(OracleConnection.CONNECTION_PROPERTY_THIN_NET_AUTHENTICATION_SERVICES, "( KERBEROS5 )");
    prop.setProperty(OracleConnection.CONNECTION_PROPERTY_THIN_NET_AUTHENTICATION_KRB5_MUTUAL, "true");
    // cache not needed, the system cache is read by default in windows
    //String cc = "C:/app/Administrator/product/11.2.0/client_1/network/admin/krbcc";
    //System.out.println("cc exists(): " + new File(cc).exists());
    //prop.setProperty(OracleConnection.CONNECTION_PROPERTY_THIN_NET_AUTHENTICATION_KRB5_CC_NAME, cc);
    try {
      Class.forName("oracle.jdbc.driver.OracleDriver").newInstance();
      conn = DriverManager.getConnection(url, prop);
      stmt = conn.prepareStatement("select user from dual");
      rs = stmt.executeQuery();
      if (rs.next()) {
        System.out.println(rs.getString(1));
      }
    } finally {
      if (rs != null) try {rs.close();} catch (SQLException e) {}
      if (stmt != null) try {stmt.close();} catch (SQLException e) {}
      if (conn != null) try {conn.close();} catch (SQLException e) {}
    }
  }
}
The example is very similar to the OCI one but now all the needed configuration is passed to the connection retrieval using a properties object. Mainly it is specified that the application is going to use Kerberos (as you see the cache file is not specified because in windows the system cache is used by default, the Java implementation manages the Local Security Authority / LSA that windows provides).
EDIT: In order to allow THIN driver to work in Windows (LSA, not file cache) it is necessary to permit Java to access the ticket session key. The following regedit key should be added or modified (by default the entry does not exist):
HKEY_LOCAL_MACHINE\System\CurrentControlSet\Control\Lsa\Kerberos\Parameters
Value Name: AllowTgtSessionKey
Value Type: REG_DWORD
Value: 0x01  (default is 0)
The THIN driver: performing a Java login
The two examples which have been seen until now use the typical scenario, a user is already logged in using Kerberos (in a windows domain it just represents logging into the PC) and the Java application just re-uses the ticket already given to him. The next example is a bit complicated because now the user logs in using the Java Kerberos implementation and then the connection is retrieved with the resulting principal.
import java.sql.*;
import java.io.File;
import java.io.IOException;
import oracle.jdbc.OracleConnection;
import oracle.jdbc.OracleDriver;
import com.sun.security.auth.module.Krb5LoginModule;
import java.util.HashMap;
import java.util.Properties;
import javax.security.auth.Subject;
import javax.security.auth.callback.*;;
import java.security.PrivilegedExceptionAction;

public class JdbcThinLogin {

  public static void main(String[] args) throws Exception {
    // request user and password
    String username = System.console().readLine("User: ");
    final char[] password = System.console().readPassword("Password: ");
    // set the krb5.conf
    String krb5conf = "/oracle/app/oracle/product/11.2.0/dbhome_1/network/admin/krb5.conf";
    System.out.println("krb5.conf exists(): " + new File(krb5conf).exists());
    System.setProperty("java.security.krb5.conf", krb5conf);
    // prepare a login
    Krb5LoginModule krb5Module = new Krb5LoginModule();
    Subject subject = new Subject();
    HashMap state = new HashMap();
    HashMap options = new HashMap();
    options.put("doNotPrompt", "false");
    options.put("useTicketCache", "false");
    options.put("principal", username);
    krb5Module.initialize(subject,
      new CallbackHandler() {
        public void handle(Callback[] callbacks) throws IOException, UnsupportedCallbackException {
          for (int i = 0; i < callbacks.length; i++) {
            if (callbacks[i] instanceof PasswordCallback) {
              PasswordCallback pc = (PasswordCallback) callbacks[i];
              pc.setPassword(password);
            } else {
              throw new UnsupportedCallbackException(callbacks[i], "Unrecognized Callback!");
            }
          }
        }
      },
      state, options);
    boolean login = krb5Module.login();
    krb5Module.commit();
    if (!login) {
      throw new Exception("Cannot login using kerberos!");
    }
    System.out.println("Logged as user: " + subject.getPrincipals());
    // use the login for the thin driver
    Connection conn = null;
    PreparedStatement stmt = null;
    ResultSet rs = null;
    try {
      conn = (Connection) Subject.doAs(subject,
        new PrivilegedExceptionAction() {
          public Object run() {
            Properties prop = new Properties();
            prop.setProperty(OracleConnection.CONNECTION_PROPERTY_THIN_NET_AUTHENTICATION_SERVICES, "( KERBEROS5 )");
            String url = "jdbc:oracle:thin:@//ddbb1.demo.test:1521/ddbb1";
            try {
              Class.forName("oracle.jdbc.driver.OracleDriver").newInstance();
              return DriverManager.getConnection(url, prop);
            } catch(Exception e) {
              e.printStackTrace();
              System.exit(-1);
              return null;
            }
          }
        }
      );
      stmt = conn.prepareStatement("select user from dual");
      rs = stmt.executeQuery();
      if (rs.next()) {
        System.out.println(rs.getString(1));
      }
    } finally {
      if (rs != null) try {rs.close();} catch (SQLException e) {}
      if (stmt != null) try {stmt.close();} catch (SQLException e) {}
      if (conn != null) try {conn.close();} catch (SQLException e) {}
    }
  }
}
The example is a bit longer but I think it is quite clear. The Kerberos module is used to perform a login (please in a real implementation use a LoginModule defined in a login configuration file) and the resulting subject is used to create the connection. In my opinion this option is less useful, the typical scenario is the one presented in the previous cases and I do not imagine a situation where this example was useful. But I have decided to exemplify all possible situations, so here it is.
The THIN driver: performing a Java login but saving a ticket cache
The last use-case is similar to the previous one but now the login is going to write a ticket cache. I do not know why Java implementation cannot be configured to create a cache (exactly the same that kinit command does in UNIX systems). I think that this scenario is the typical one if you are working outside Java (you log in the first time, a ticket cache is created and then all the remaining authentications use the ticket already given). So I simply do not understand why Java does not give another property (createCache for example) to write the ticket if it is needed to re-send a new ticket (the cache is empty, outdated,...). I suppose that the general idea in Java is re-using the principal subject obtained after a Kerberos login (see the previous example).
Finally I developed a working program but it uses a lot of internal classes (so please avoid it). I am going to add it here just for curiosity about what I did. Basically I followed what is done in the Kinit implementation that comes with the Java distribution for Windows platforms.
import sun.security.krb5.KrbAsReqBuilder;
import sun.security.krb5.PrincipalName;
import sun.security.krb5.internal.ccache.CredentialsCache;
import java.io.File;
import java.sql.*;
import java.util.Properties;
import oracle.jdbc.OracleConnection;

public class JdbcThinLogin2 {
  static public void main(String[] args) throws Exception {
    // initialize Kerberos
    String krb5conf = "/oracle/app/oracle/product/11.2.0/dbhome_1/network/admin/krb5.conf";
    System.out.println("krb5.conf exists(): " + new File(krb5conf).exists());
    System.setProperty("java.security.krb5.conf", krb5conf);
    // request username and password
    String username = System.console().readLine("User: ");
    final char[] password = System.console().readPassword("Password: ");
    // get the Credentials and create a CC cache
    PrincipalName principal = new PrincipalName(username, PrincipalName.KRB_NT_PRINCIPAL);
    KrbAsReqBuilder builder = new KrbAsReqBuilder(principal, password);
    builder.action();
    sun.security.krb5.internal.ccache.Credentials credentials = builder.getCCreds();
    builder.destroy();
    CredentialsCache cache = CredentialsCache.create(principal, "krb5cc");
    cache.update(credentials);
    cache.save();
    // now normal working for JDBC
    Connection conn = null;
    PreparedStatement stmt = null;
    ResultSet rs = null;
    String url = "jdbc:oracle:thin:@//ddbb1.demo.test:1521/ddbb1";
    Properties prop = new Properties();
    System.setProperty("java.security.krb5.conf", krb5conf);
    prop.setProperty(OracleConnection.CONNECTION_PROPERTY_THIN_NET_AUTHENTICATION_SERVICES, "( KERBEROS5 )");
    prop.setProperty(OracleConnection.CONNECTION_PROPERTY_THIN_NET_AUTHENTICATION_KRB5_MUTUAL, "true");
    prop.setProperty(OracleConnection.CONNECTION_PROPERTY_THIN_NET_AUTHENTICATION_KRB5_CC_NAME, "krb5cc");
    try {
      Class.forName("oracle.jdbc.driver.OracleDriver").newInstance();
      conn = DriverManager.getConnection(url, prop);
      stmt = conn.prepareStatement("select user from dual");
      rs = stmt.executeQuery();
      if (rs.next()) {
        System.out.println(rs.getString(1));
      }
    } finally {
      if (rs != null) try {rs.close();} catch (SQLException e) {}
      if (stmt != null) try {stmt.close();} catch (SQLException e) {}
      if (conn != null) try {conn.close();} catch (SQLException e) {}
    }
  }
}
The internal KrbAsReqBuilder and CredentialsCache classes are used to perform a login and write the credentials in a ticket cache file. Then that file is used as it was in the first THIN example. Weird program indeed but nice.
So today's entry is not very exciting but summarizes the use of Kerberos with the Oracle JDBC/ODBC driver. Some little examples are shown to understand how the different driver implementations handle with Kerberos. I repeat that the common situation is integrating fat applications (SQLDeveloper or similar applications for DBAs and in house developments) which open a direct connection against the database with a personal user. Those applications can re-use Kerberos tickets and the final solution can be very practical. Obviously your company needs to use Kerberos to authenticate users, but Microsoft forced that long time ago when Windows Active Domain was introduced.
See you next time!
Comments