

Saturday, September 15. 2018
Using custom URLs to perform SSO in an android application


Today's entry presents a keycloak integration for an android application. Keycloak is an open-source project that offers Single Sign-On and access management for modern applications and services, and it has been used before in the blog. It is based on standards (like OpenID Connect and SAML) and provides some adapters for different programming languages and application platforms. Previously any integration between a mobile application and keycloak used an embedded browser to perform the login, but now that solution is a no-go. Google started to avoid this technique and recommend custom URLs long time ago. I have almost zero experience in mobile development (sorry for that) but I wanted to test this solution by myself anyway.
The idea is simple, as a mobile program is a client-side application I decided to use a public profile (similar situation to the one in browser-side JavaScript). I think that having a password in the client is almost the same than using none, it gives no extra security. The application is going to be a java one (it is just a PoC, so using kotlin was an extra effort for me).
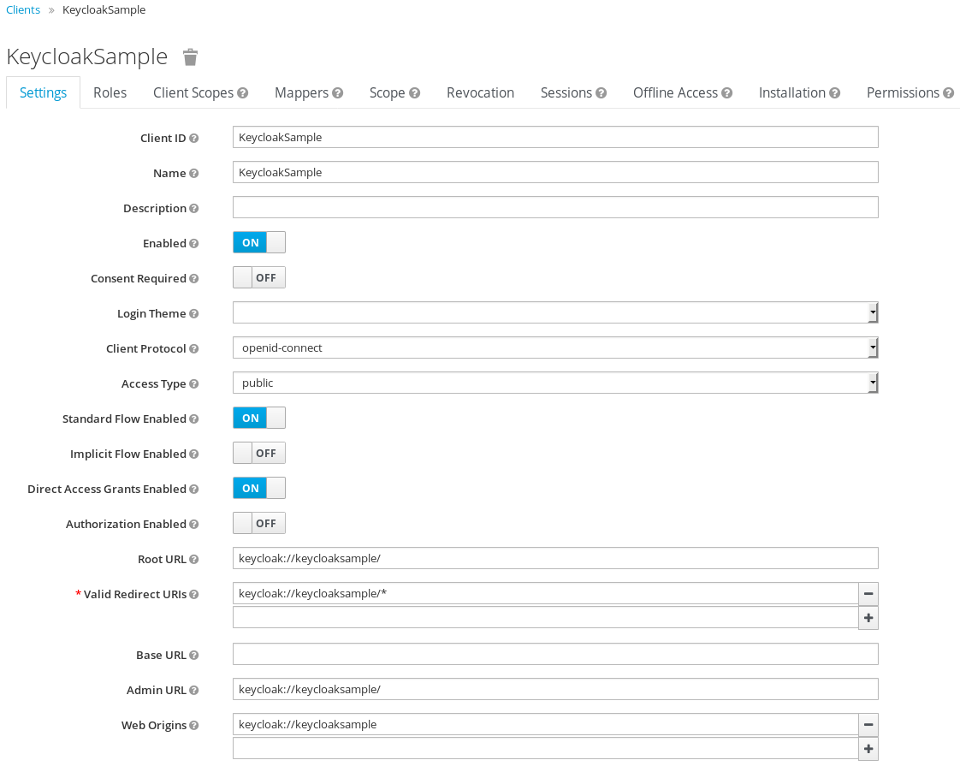
First creating the public keycloak client for the application is needed. The application will use a weird URL keycloak://keycloaksample/.
Starting with the android application, the custom URL should be defined in the AndroidManifest.xml, in my case for the .MainActivity.
<activity android:name=".MainActivity">
    <intent-filter>
        <action android:name="android.intent.action.MAIN" />
        <action android:name="android.intent.action.VIEW" />
        <category android:name="android.intent.category.LAUNCHER" />
        <category android:name="android.intent.category.DEFAULT" />
        <category android:name="android.intent.category.BROWSABLE" />
        <data android:scheme="keycloak"
            android:host="keycloaksample"
            android:pathPrefix="/"/>
    </intent-filter>
</activity>
With this configuration the .MainActivity will be called when the browser receives the keycloak://keycloaksample/ URL from the SSO server. That feature will be used to use the external browser to do the login and the logout. So a button will initiate the browser which will go to the authentication URL.
    public void login(View view) {
        // "http://192.168.100.1:8080/auth/realms/master/protocol/openid-connect/auth?client_id=KeycloakSample&scope=openid&response_type=code&redirect_uri=app%3A%2F%2Fkeycloaksample%2F";
        Uri uri = new Uri.Builder().scheme(configuration.getProperty("keycloak.scheme"))
                .encodedAuthority(configuration.getProperty("keycloak.authority"))
                .appendEncodedPath("auth/realms")
                .appendPath(configuration.getProperty("keycloak.realm"))
                .appendEncodedPath("protocol/openid-connect/auth")
                .appendQueryParameter("client_id", getString(R.string.app_name))
                .appendQueryParameter("scope", "openid")
                .appendQueryParameter("response_type", "code")
                .appendQueryParameter("redirect_uri", configuration.getProperty("app.url"))
                .build();
        Intent intent = new Intent(Intent.ACTION_VIEW, uri);
        startActivity(intent);
    }
If you see, the URL is created with the application URL as the redirect_uri. The idea is the login button starts the default browser with the keycloak authentication URL (android starts the app associated to an http(s) scheme), the user performs the login with it, and after that the server redirects the browser to the application URL, which starts the activity inside our app.
Now it's the time to follow the OIDC specification an get the code returned from the server and, with it, obtain the access and refresh token. In the onCreate of the activity a LoginTask starts a thread that executes the call to the token endpoint.
    if (Intent.ACTION_VIEW.equals(intent.getAction())) {
            // check if we have to login
            Uri uri = intent.getData();
            if (uri != null) {
                String code = uri.getQueryParameter("code");
                if (code != null) {
                    new LoginTask(this,
                            new Callback() {
                                @Override
                                public void onPostExecute(MainActivity activity, TokenResponse tokenResponse) {
                                    activity.setToken(tokenResponse);
                                }
                            }
                    ).execute(code);
                }
            }
        }
The LoginTask performs the authorization_code call to convert the code into the real tokens (remember this is just plain OIDC standard).
    @Override
    protected TokenResponse doInBackground(String... strings) {
        HttpURLConnection conn = null;
        try {
            String code = strings[0];
            URL keycloak = activity.createTokenURL();
            String urlParameters = activity.createAuthorizationCodePostData(code);
            byte[] postData = urlParameters.getBytes(StandardCharsets.UTF_8);
            conn = (HttpURLConnection) keycloak.openConnection();
            conn.setDoOutput(true);
            conn.setInstanceFollowRedirects(false);
            conn.setRequestMethod("POST");
            conn.setRequestProperty("Content-Type", "application/x-www-form-urlencoded");
            conn.setRequestProperty("charset", "utf-8");
            conn.setRequestProperty("Content-Length", Integer.toString(postData.length));
            conn.setUseCaches(false);
            try (DataOutputStream wr = new DataOutputStream(conn.getOutputStream())) {
                wr.write(postData);
            }
            if (conn.getResponseCode() == 200) {
                return new TokenResponse(conn.getInputStream(), activity.getSignatureKey());
            } else {
                return new TokenResponse(conn.getResponseCode() + ": " + conn.getResponseMessage());
            }
        } catch (IOException|InvalidKeySpecException|NoSuchAlgorithmException e) {
            Log.d(TAG, "Error calling keycloak", e);
            return new TokenResponse(e.getMessage());
        } finally {
            if (conn != null) {
                conn.disconnect();
            }
        }
    }
The createTokenURL and createAuthorizationCodePostData methods assign the URL and the post data that will be sent to the server to obtain the tokens.
    public URL createTokenURL() throws MalformedURLException {
        // "http://192.168.100.1:8080/auth/realms/master/protocol/openid-connect/token"
        return new URL(new Uri.Builder().scheme(configuration.getProperty("keycloak.scheme"))
                .encodedAuthority(configuration.getProperty("keycloak.authority"))
                .appendEncodedPath("auth/realms")
                .appendPath(configuration.getProperty("keycloak.realm"))
                .appendEncodedPath("protocol/openid-connect/token")
                .build().toString());
    }

    public String createAuthorizationCodePostData(String code) {
        // "grant_type=authorization_code&client_id=KeycloakSample&redirect_uri=app%3A%2F%2Fkeycloaksample%2F&code=" + code
        return new Uri.Builder()
                .appendQueryParameter("grant_type", "authorization_code")
                .appendQueryParameter("client_id", getString(R.string.app_name))
                .appendQueryParameter("redirect_uri", configuration.getProperty("app.url"))
                .appendQueryParameter("code", code)
                .build().getEncodedQuery();
    }
And finally, with the JSON data returned by the server, a TokenResponse object is created. For that I used the jjwt project which can parse the different JWT tokens returned by the server. This way the application can obtain the token information and present the user info.
    public TokenResponse(InputStream is, Key key) throws IOException {
        this.creationTime = System.currentTimeMillis() / 1000L;
        this.key = key;
        JsonReader jsonReader = new JsonReader(new InputStreamReader(is, "UTF-8"));
        jsonReader.beginObject();
        while(jsonReader.hasNext()) {
            String name = jsonReader.nextName();
            switch (name) {
                case "expires_in":
                    this.setExpiresIn(jsonReader.nextInt());
                    break;
                case "refresh_expires_in":
                    this.setRefreshExpiresIn(jsonReader.nextInt());
                    break;
                case "access_token":
                    this.setAccessToken(jsonReader.nextString());
                    break;
                case "refresh_token":
                    this.setRefreshToken(jsonReader.nextString());
                    break;
                default:
                    jsonReader.skipValue();
            }
        }
    }

    public Jws getAccessTokenClaims() {
        return accessTokenClaims;
    }

    public String getAccessToken() {
        return accessToken;
    }

    public void setAccessToken(String accessToken) {
        this.accessToken = accessToken;
        this.accessTokenClaims = Jwts.parser()
                .setSigningKey(this.key)
                .parseClaimsJws(accessToken);
    }
To fully understand the code presented, the properties file used in the app is the following (information about keycloak: url, realm key,...).
keycloak.key=MIIBIjANBgkqhkiG9w0BAQEFAAOCAQ8...
keycloak.scheme=http
keycloak.authority=192.168.100.1:8080
keycloak.realm=master
app.url=keycloak://keycloaksample/
Mainly this is the idea about the custom URL technique, android can associate a weird URL with the application and normal browser login is used to perform the SSO login. After that the OIDC calls are used to get the tokens and use them. My application also exemplifies how to do the logout, refresh the token and call another web service (userinfo) using the access token. But that is just development that uses the TokenResponse object initially created in the login.
Here I present a video, first I log into the application, thanks to custom URLs the browser is used to do that. Then the token information is shown and it is used to call the OIDC userinfo endpoint (information of the user). As you see the SSO is in place and I can reach the keycloak console without login again. Then I wait the access token to expire (60 seconds) and I refresh it (refresh_token action in the OIDC token endpoint). Finally I perform the logout which is a global logout too.
And that is all. I wanted to test the custom URL technique in an mobile application and I decided to use android (iOS is a complete unknown for me, but I suppose the same idea can be used for that platform). The application is very simple and just uses the jjwt project out of the default android API. This is just a PoC so it can be extended and/or improved a lot (for example not using fixed URLs and keys, calling the well-known OIDC address and the JWKs certificate endpoints is a better solution). Please also take in mind that I never develop for mobile, so just use the app as an example, surely things can be done much better. The KeycloakSample application can be download from here, hope it helps to someone else.
Regards!
Thursday, September 21. 2017
Adding a custom CA to your android phone

Another simple post this time. I updated my phone again with LineageOS (I was waiting if any release other than nightly was to be available, but the blueborne exploit convinced me to move now) and, again, I spent some time trying to install a custom certificate in the phone. The procedure is explained in this article in detail and it works like a charm for me.
To install your CA certificate you need to obtain a hash of the certificate because android expects the file to be called using this hash (this point was crucial and I had no idea about it before). So first you obtain your PEM and get the hash with the following command:
openssl x509 -inform PEM -subject_hash_old -in calocal.crt | head -1
xxxxxxxx
Once you have the certificate and the hash you just need to install it with the following name /system/etc/security/cacerts/xxxxxxxx.0 and the same permissions than the other CAs. Remember that the /system file system is read-only by default and you need su to do the complete process. So you have to go to Settings → Developer Options → Root Access and include ADB to it.
$ adb shell
 daemon not running. starting it now on port 5037
 daemon started successfully
$ su
# mount -o remount,rw /system
# cp /sdcard/Downloads/calocal.crt /system/etc/security/cacerts/xxxxxxxx.0
# chmod 644 /system/etc/security/cacerts/xxxxxxxx.0
# mount -o remount,ro /system
And reboot your phone. You can check that your local CA now should be listed in Settings → Security → Trusted Credentials in the System tab.
Following the procedure all my synchronizations started to work again against my personal nextcloud and runalyze servers. It's incredible that such an old phone is still maintained by lineage and now running android 7.1.2 with the September security patches from google. I have to say that my requirements for the phone are very slight.
Good job lineage team!
Sunday, September 11. 2016
OpenWeatherMapProvider for cyanogenmod 13
Today a very quick entry is presented. I have just upgraded my old Moto G (1st generation) to the quite recent cyanogenmod 13 version (based on Android 6.0.1). (As a personal comment I want to say that projects like this give a much better support than any vendor, hardware or telco. And I think exactly the same for any other hardware device, I mean, OpenWRT for routers, Debian or any other linux distro for PCs, and so on. I consider preferable to choose a device due to the correct support of cyanogenmod -or any of the commented projects- than due to pure technical specs.) My phone is now at marshmallow level and I see no drawbacks for the moment.
The only little snag is that I usually configure the weather forecast in the clock widget and it seems that the new version has changed how the weather widget works. Now the weather information is retrieved from plug&play providers that can use different on-line services (Yahoo!, OpenWeatherMap,...). But, by default, there is no provider installed in cyanogenmod 13, the list is empty. Two providers can be installed using Google Play (Yahoo! and one provided by the cyanogenmod itself, although the latter is not available in Spain). Nevertheless this is meaningless, I do not have or use Google Play, and, besides, I always configure OpenWeatherMap in my desktop and laptop, so I prefer that provider. Browsing some time, I finally found a github project in the cyanogenmod repository which seemed promising. The code was almost complete and functional (at least for me), so I decided to try. And it surprisingly works.
Today's entry is just the summary of the steps to compile the project (just in case I see newer commits).
Clone the repo locally and jump into it.
git clone https://github.com/CyanogenMod/android_packages_apps_OpenWeatherMapProvider.git
cd android_packages_apps_OpenWeatherMapProvider
Prepare the environment.
First an environmental variable is used to specify where the android SDK is installed in my laptop.
export ANDROID_HOME=/home/ricky/android-sdk-linuxThen I needed to update the SDK to install build-tools 23.0.2 (the project is configured to use that version). Execute android update and select that bundle to be installed.
${ANDROID_HOME}/tools/android update sdkFinally I had some problems with two libraries (Invalid package reference in library XXXX) and I needed to explicitly ignore the problem (I saw the solution in other project).
diff --git a/app/build.gradle b/app/build.gradle
index 73b7b87..31ea494 100644
--- a/app/build.gradle
+++ b/app/build.gradle
@@ -21,6 +21,10 @@ android {
         exclude 'META-INF/LICENSE.txt'
         exclude 'META-INF/NOTICE.txt'
     }
+
+    lintOptions {
+      ignore 'InvalidPackage'
+    }
 }
Compile your own gradle for the project and build it.
./gradlew
./gradlew build
Finally an APK file is generated in app/build/outputs/apk/app-debug.apk you can install into your phone.
That's all. Now I have a OpenWeatherMap provider in my new and bright cyanogenmod 13 and the widget seems perfectly OK. The provider is easy to configure (you just need the OpenWeatherMap key) and then the weather widget works exactly like in the previous versions (same options). Finally my phone is feature complete with the new cyanogenmod.
Regards!
Comments