

Saturday, July 21. 2018
WS-AT interoperability between wildfly XTS and .NET (windows side)

This is the second entry about the interoperability between wildlfy and .NET using the WS-AT (Web Service Atomic Transactions). In the previous post I explained that there was an issue between both platforms which has been addressed in wildfly during the past months (mainly a different interpretation of the standard in which both sides think they are right and the other part is wrong). The wildfly XTS setup was also done using the new asynchronous implementation. In this new entry the windows side is going to be configured. I don't like to take screenshots so I will try to minimize the use of them but, this is windows, some images are going to be necessary.
As I commented before, I am not a specialist in Microsoft (better said, I am a complete disaster with it), so please take this information as a starting point or example. The steps to configure the WS-AT in windows 2016 are the following.
In the previous entry some certificates were created (ca, wildfly and win2016). Now those certs are going to be installed in the windows system. Copy the ca.crt, wildfly.crt and the win2016.p12 to the windows machine. And install them using the Certificate snap-in (follow this blog post to start the application). Import the three certificates in the following locations:
- Select Trusted Root Certification Authorities → Certificates. Right click → All Tasks → Import... And select the ca.crt.
- Select Personal → Certificates. Right click → All Tasks → Import... And select the wildfly.crt
- Select Personal → Certificates. Right click → All Tasks → Import... And select the win2016.p12 (the password is requested).
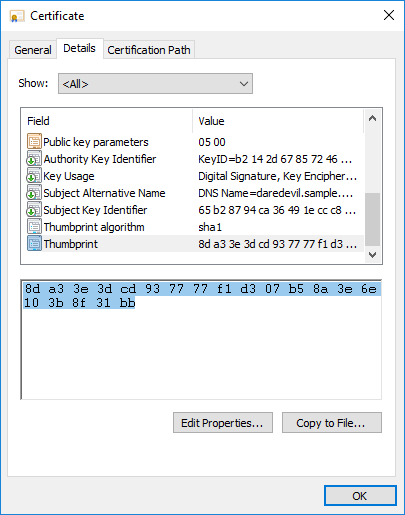
Once the certificates are installed the thumbprints for the last two will be needed (the certificates for each server). So please select the certificate and double click on it. In the second tab details you have the property Thumbprint with the number for each one (in my case wildfly cert is 8DA33E3DCD937777F1D307B58A3E6E103B8F31BB and win2016 is 1c54bd1932207b4e183e732a7e42ea757b471335).
The next step is installing the visual studio 2017 community edition. I selected the option .NET desktop development (Build WPF, Windows Forms and console applications using C#, Visual Basic and F#.)
With visual studio installed (which contains the developer framework) WS-AT transactions are available. For that the Microsoft Distributed Transaction Coordinator (MSDTC) should be configured.
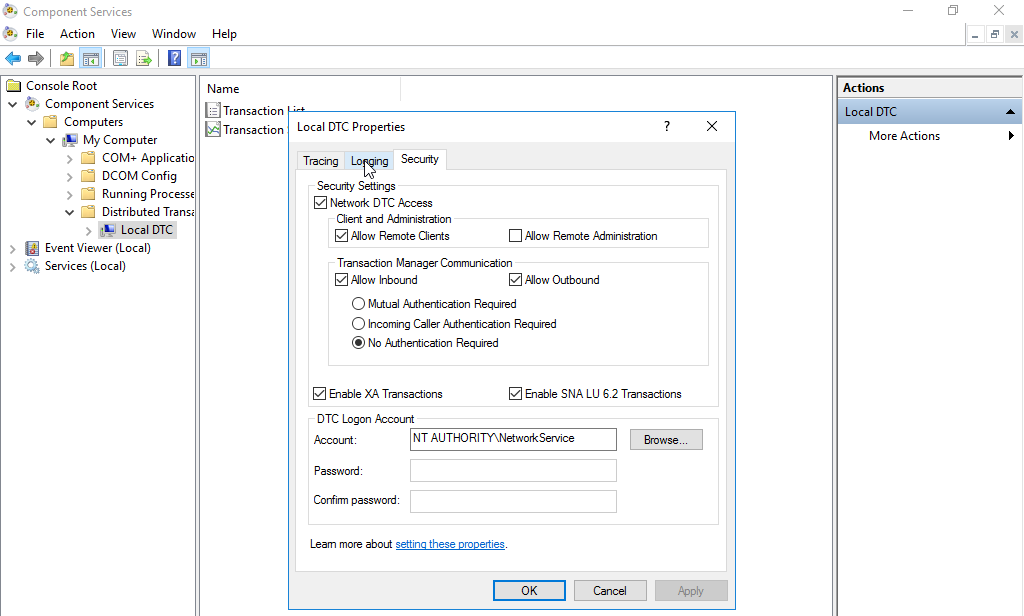
Execute dcomcnfg and in Componment Services → Computers → My Computer → Distributed Transactions → Local DTC, click on the right Local → more actions and select Properties.
In the Security tab, tick Network DTC Access, Allow Remote Clients, All Inbound, Allow Outbound, No Authentication Required, and Enable XA Transactions.
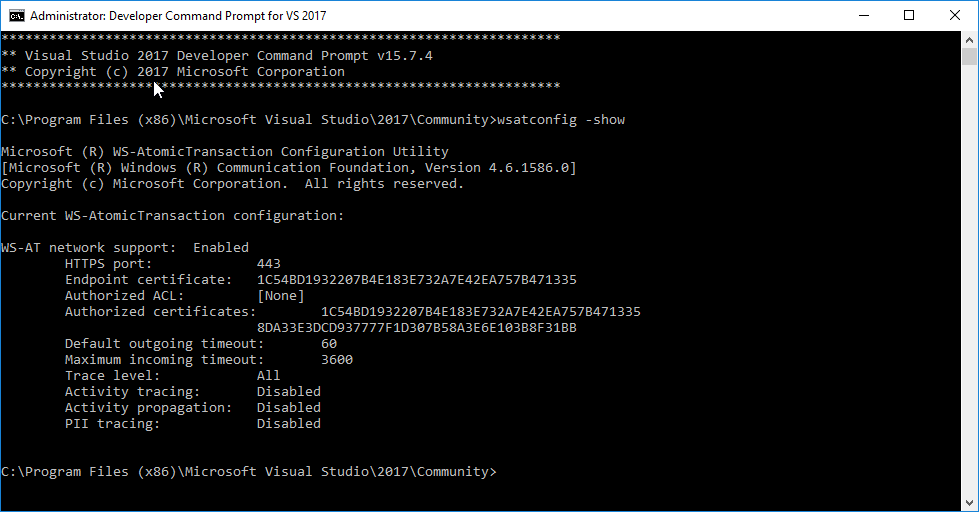
Now it's the time to configure the WS-AT endpoint. This is done with the wsatconfig utility. Start the Developer Command Prompt for VS 2017 console (the wsatconfig is not exposed in a normal cmd console). And execute the following command:
wsatconfig -network:enable -port:443 -accounts: -endpointcert:1c54bd1932207b4e183e732a7e42ea757b471335 -accountsCerts:1c54bd1932207b4e183e732a7e42ea757b471335,8DA33E3DCD937777F1D307B58A3E6E103B8F31BB -traceLevel:ALL -restartThis command enables network access for WS-AT on port 443 and configures the previous certificates (remember the thumbprints) to be used and admitted to communicate with the endpoint. In my case the final configuration is the following.
Finally a console application is needed to use the wildfly endpoint and the transactions. Open Visual Studio 2017 and File → New Project → Select Console App (.NET Framework). My application name is wsat-simple-client and can be download from here.
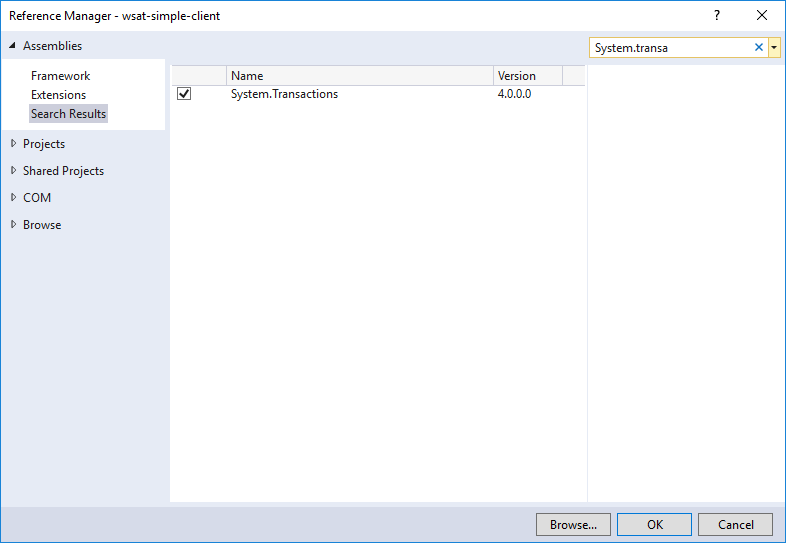
Add a reference to System.Transactions (to be able to use WS-AT in the application).
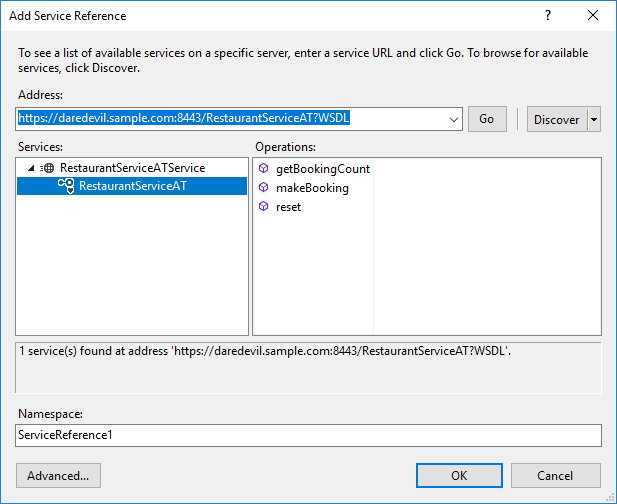
Then import the wsdl using the add service reference and selecting the WSDL of the wsat-simple application deployed in wildfly. This will create the artifacts to call the remote endpoint.
Now there are two tricky steps needed (both are required to start a WS-AT transaction when calling the wildfly endpoint). The App.config should be modified to add the following stanza inside the imported binding RestaurantServiceATServiceSoapBinding (meaning that this binding requires WS-AT):
<transactionFlow transactionProtocol="WSAtomicTransaction11"/>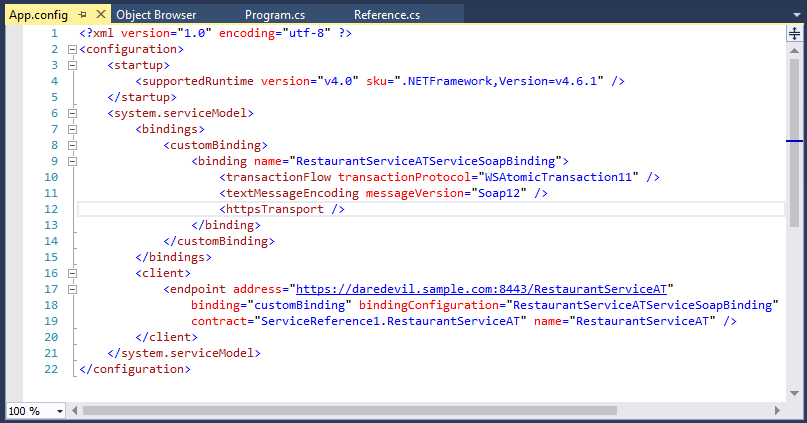
And the auto-generated Reference.cs of the service should also be modified, to add that the makeBooking() method needs transaction level as a mandatory requirement:
   [TransactionFlow(TransactionFlowOption.Mandatory)]
   void makeBooking();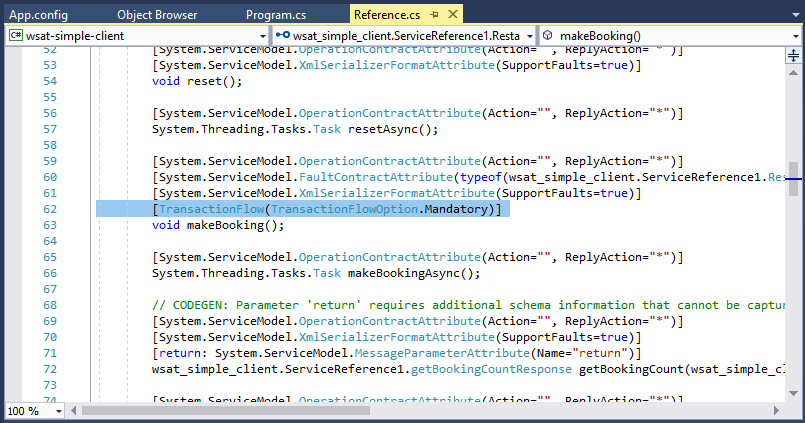
Finally the application Program.cs developed is as simple as the following.
using System;
using System.Collections.Generic;
using System.Linq;
using System.Text;
using System.Threading.Tasks;
using System.Net;
using System.Transactions;

namespace wsat_simple_client
{
    class Program
    {
        static void Main(string[] args)
        {
            ServicePointManager.SecurityProtocol = SecurityProtocolType.Tls |
                SecurityProtocolType.Tls11 |
                SecurityProtocolType.Tls12;

            using (ServiceReference1.RestaurantServiceATClient client = new ServiceReference1.RestaurantServiceATClient())
            {
                using (TransactionScope scope = new TransactionScope())
                {
                    Console.WriteLine("[Client] Invoking makeBooking() on WS");
                    client.makeBooking();
                    scope.Complete();
                }
            }

            Console.WriteLine("[Client] Transaction completed OK. Click any key to finish...");
            Console.ReadKey();
        }
    }
}
And everything is ready. This is the video executing the application. It calls to the wildfly endpoint but, before that, the program knows that a transaction is needed for that method and it starts a WS-AT transaction. When wildfly receives the request it registers (now asynchronously) to the transaction as a new parted and the full flow is completed. Everything works as expected and the full transaction is completed successfully performing all the calls between both sides without any issues.
The summary is that now there is a initial support for interaction between wildfly and .NET using WS-AT. Previously any try to execute a transaction starting it at the windows side (wildfly needed to register to the MSDTC endpoint) failed because one side executed the registration synchronously and the other part expected an asynchronous call. Now wildfly has added the asynchronous endpoints to receive the windows responses and implemented a simple logic to handle the flow. All of this will be on the next release of wildfly 14. I do not think that a lot of people is using or wanting this but I know that it was a headache for a few people in the last year. Let's see if now it starts working.
Asynchronous regards!
Friday, January 6. 2012
Compiling mod_proxy_html in Linux and Windows


These weeks I am finishing a long project which uses Apache (more precisely OHS / Oracle HTTP Server) in a reverse proxy configuration. Usually default apache mod_proxy modules are more than enough to configure a good reverse proxy but, sometimes, a special module called mod_proxy_html is necessary. When the pages served by the backend server manage absolute links (the ones that start by / or by the complete protocol://host:port uri) typical mod_proxy configuration falls short, because those mods never parse or change the HTML code (just the headers). Obviously mod_proxy_html does exactly that, parsing and replacing the conflicting links in the html page. It is important to remark that this behavior is not recommended, take in mind that the cost of parsing every HTML is not small.
My initial idea was only using the module in those applications which were problematic, there were no other solution (like specific application server plugin or a smart proxy uri that fits with the final backend server location) and the customer did not want to modify. But the problem is that mod_proxy_html is not distributed with the default Apache source bundle (it seems that it will be integrated in forthcoming Apache 2.4 cos it was donated by its creator to the foundation but currently it should be installed separately). All linux distros distribute the module as a separate package (because, as I explained, it is quite important in some reverse proxy configurations) but this is not the case of OHS. So my only chance was compiling the module by myself.
Although custom modules are not supported, OHS provides the apxs command to add them to the server at customers own risk and I desperately needed a plan B just in case an app was problematic. But the other painful point was that my OHS server is running in a Windows 2008 host. Cos I have no experience at all compiling in Windows I decided to start smoothly: compiling mod_html_proxy in an Apache/debian installation, then in a Linux OHS and finally in a Windows OHS. I compiled 3.0.1 version of the module and not current 3.1.2 for several reasons: new version uses two modules (I did not want to compile two times), my first try with 3.1.2 did not work as expected (I spent short time with the problem) and it is the current version in debian (you already know my total confidence in this distribution).
Adding mod_proxy_html to Debian/Apache
Although debian has a libapache2-mod-proxy-html package I compiled it by myself downloading the debian source package (remember I was training to compile it in OHS later). In order to do that I needed first some development packages: apache and libxml (this module uses libxml to parse the HTML pages and perform the replacements):
# apt-get install apache2-prefork-dev libxml2-dev
Then the module was compiled and installed:
# apxs2 -c -I /usr/include/libxml2 -I . -i mod_proxy_html.c
/usr/share/apr-1.0/build/libtool --silent --mode=compile --tag=disable-static x86_64-linux-gnu-gcc -prefer-pic -DLINUX=2 -D_FORTIFY_SOURCE=2 -D_GNU_SOURCE -D_REENTRANT -I/usr/include/apr-1.0 -I/usr/include/openssl -I/usr/include/xmltok -pthread     -I/usr/include/apache2  -I/usr/include/apr-1.0   -I/usr/include/apr-1.0  -I/usr/include/libxml2 -I.  -c -o mod_proxy_html.lo mod_proxy_html.c && touch mod_proxy_html.slo
/usr/share/apr-1.0/build/libtool --silent --mode=link --tag=disable-static x86_64-linux-gnu-gcc -o mod_proxy_html.la  -rpath /usr/lib/apache2/modules -module -avoid-version    mod_proxy_html.lo
/usr/share/apache2/build/instdso.sh SH_LIBTOOL='/usr/share/apr-1.0/build/libtool' mod_proxy_html.la /usr/lib/apache2/modules
/usr/share/apr-1.0/build/libtool --mode=install cp mod_proxy_html.la /usr/lib/apache2/modules/
libtool: install: cp .libs/mod_proxy_html.so /usr/lib/apache2/modules/mod_proxy_html.so
libtool: install: cp .libs/mod_proxy_html.lai /usr/lib/apache2/modules/mod_proxy_html.la
libtool: finish: PATH="/usr/local/sbin:/usr/local/bin:/usr/sbin:/usr/bin:/sbin:/bin:/sbin" ldconfig -n /usr/lib/apache2/modules
----------------------------------------------------------------------
Libraries have been installed in:
   /usr/lib/apache2/modules

If you ever happen to want to link against installed libraries
in a given directory, LIBDIR, you must either use libtool, and
specify the full pathname of the library, or use the `-LLIBDIR'
flag during linking and do at least one of the following:
   - add LIBDIR to the `LD_LIBRARY_PATH' environment variable
     during execution
   - add LIBDIR to the `LD_RUN_PATH' environment variable
     during linking
   - use the `-Wl,-rpath -Wl,LIBDIR' linker flag
   - have your system administrator add LIBDIR to `/etc/ld.so.conf'

See any operating system documentation about shared libraries for
more information, such as the ld(1) and ld.so(8) manual pages.
----------------------------------------------------------------------
chmod 644 /usr/lib/apache2/modules/mod_proxy_html.so
Some configuration files were created to include the custom module in a2enmod/a2dismod debian commands. So I included the /etc/apache2/mods-available/proxy_html.load and /etc/apache2/mods-available/proxy_html.conf (load the module and default configuration). Once the module was integrated in debian scripts I enabled all the needed ones to perform reverse proxying:
# a2enmod proxy proxy_connect proxy_http proxy_ftp proxy_html
Finally I setup a Location directive which performed a reverse proxy from /proxy-test/ to a Tomcat running in my laptop (I added it to the default site, /etc/apache2/sites-enabled/000-default).
<Location /proxy-test/>
    ProxyPass http://magneto:8080/
    ProxyPassReverse http://magneto:8080/
    SetOutputFilter proxy-html
    ProxyHTMLURLMap http://magneto:8080/ /proxy-test/
    ProxyHTMLURLMap / /proxy-test/
</Location>
The location proxifies (pass and reverse) all requests from the /proxy-test/ uri to my tomcat installation but with a filter, the proxy-html one. This filter searches and replaces the two annoying absolute links with our location uri (this is the goal of the ProxyHTMLURLMap directive). If you need more examples about the configuration please check this page.
And that was all! The Apache worked as a reverse proxy perfectly. I also prepared a simple html test page with some conflicting links to test.
Adding mod_proxy_html to Linux/OHS
The second step was doing the same but with OHS in a Linux box. I installed a new Linux KVM virtual box, OHS 11.1.1.5.0 binaries and perform the same actions. This time oracle system user is used for compiling and installing, and some parameters are different (take into account that I am using the libxml provided by OHS and not the system one):
$ export ORACLE_HOME=/opt/oracle/middleware/Oracle_WT1
$ export ORACLE_INSTANCE=$ORACLE_HOME/instances/instance1
$ export CONFIG_FILE_PATH=$ORACLE_INSTANCE/config/OHS/ohs1
$ export LD_LIBRARY_PATH=$ORACLE_HOME/lib:$ORACLE_HOME/ohs/lib:$LD_LIBRARY_PATH

$ /opt/oracle/middleware/Oracle_WT1/ohs/bin/apxs -I /usr/include/libxml2  -I . -L/opt/oracle/middleware/Oracle_WT1/ohs/lib -lxml2 -c -o mod_proxy_html.so -i mod_proxy_html.c
/opt/oracle/middleware/Oracle_WT1/ohs/build/libtool --tag=CC --mode=compile cc -O    -DNO_RC2 -DNO_RC5 -DNO_IDEA -DBSAFE -fPIC  -DLINUX=260 -DMOD_SSL=206104 -DMOD_PERL -DUSE_PERL_SSI -I/include -DEAPI  -D_LARGEFILE64_SOURCE -DUSE_EXPAT -I../lib/expat-lite -I/opt/oracle/middleware/Oracle_WT1/ohs/include  -I/opt/oracle/middleware/Oracle_WT1/ohs/include   -I/opt/oracle/middleware/Oracle_WT1/ohs/include  -I/usr/include/libxml2 -I.  -c -o mod_proxy_html.lo mod_proxy_html.c && touch mod_proxy_html.slo
 cc -O -DNO_RC2 -DNO_RC5 -DNO_IDEA -DBSAFE -fPIC -DLINUX=260 -DMOD_SSL=206104 -DMOD_PERL -DUSE_PERL_SSI -I/include -DEAPI -D_LARGEFILE64_SOURCE -DUSE_EXPAT -I../lib/expat-lite -I/opt/oracle/middleware/Oracle_WT1/ohs/include -I/opt/oracle/middleware/Oracle_WT1/ohs/include -I/opt/oracle/middleware/Oracle_WT1/ohs/include -I/usr/include/libxml2 -I. -c mod_proxy_html.c  -fPIC -DPIC -o .libs/mod_proxy_html.o
 cc -O -DNO_RC2 -DNO_RC5 -DNO_IDEA -DBSAFE -fPIC -DLINUX=260 -DMOD_SSL=206104 -DMOD_PERL -DUSE_PERL_SSI -I/include -DEAPI -D_LARGEFILE64_SOURCE -DUSE_EXPAT -I../lib/expat-lite -I/opt/oracle/middleware/Oracle_WT1/ohs/include -I/opt/oracle/middleware/Oracle_WT1/ohs/include -I/opt/oracle/middleware/Oracle_WT1/ohs/include -I/usr/include/libxml2 -I. -c mod_proxy_html.c -o mod_proxy_html.o >/dev/null 2>&1
/opt/oracle/middleware/Oracle_WT1/ohs/build/libtool --tag=CC --mode=link cc -O    -DNO_RC2 -DNO_RC5 -DNO_IDEA -DBSAFE -fPIC  -o mod_proxy_html.la  -L/opt/oracle/middleware/Oracle_WT1/ohs/lib -lxml2 -rpath /opt/oracle/middleware/Oracle_WT1/ohs/modules -module -avoid-version    mod_proxy_html.lo
rm -fr  .libs/mod_proxy_html.a .libs/mod_proxy_html.la .libs/mod_proxy_html.lai .libs/mod_proxy_html.so
/usr/bin/gcc -shared  .libs/mod_proxy_html.o  -L/opt/oracle/middleware/Oracle_WT1/ohs/lib -lxml2  -Wl,-soname -Wl,mod_proxy_html.so -o .libs/mod_proxy_html.so
ar cru .libs/mod_proxy_html.a  mod_proxy_html.o
ranlib .libs/mod_proxy_html.a
creating mod_proxy_html.la
(cd .libs && rm -f mod_proxy_html.la && ln -s ../mod_proxy_html.la mod_proxy_html.la)
/opt/oracle/middleware/Oracle_WT1/ohs/build/instdso.sh SH_LIBTOOL='/opt/oracle/middleware/Oracle_WT1/ohs/build/libtool' mod_proxy_html.la /opt/oracle/middleware/Oracle_WT1/ohs/modules
/opt/oracle/middleware/Oracle_WT1/ohs/build/libtool --mode=install cp -f mod_proxy_html.la /opt/oracle/middleware/Oracle_WT1/ohs/modules/
cp -f .libs/mod_proxy_html.so /opt/oracle/middleware/Oracle_WT1/ohs/modules/mod_proxy_html.so
cp -f .libs/mod_proxy_html.lai /opt/oracle/middleware/Oracle_WT1/ohs/modules/mod_proxy_html.la
cp -f .libs/mod_proxy_html.a /opt/oracle/middleware/Oracle_WT1/ohs/modules/mod_proxy_html.a
ranlib /opt/oracle/middleware/Oracle_WT1/ohs/modules/mod_proxy_html.a
chmod 644 /opt/oracle/middleware/Oracle_WT1/ohs/modules/mod_proxy_html.a
PATH="$PATH:/sbin" ldconfig -n /opt/oracle/middleware/Oracle_WT1/ohs/modules
----------------------------------------------------------------------
Libraries have been installed in:
   /opt/oracle/middleware/Oracle_WT1/ohs/modules

If you ever happen to want to link against installed libraries
in a given directory, LIBDIR, you must either use libtool, and
specify the full pathname of the library, or use the `-LLIBDIR'
flag during linking and do at least one of the following:
   - add LIBDIR to the `LD_LIBRARY_PATH' environment variable
     during execution
   - add LIBDIR to the `LD_RUN_PATH' environment variable
     during linking
   - use the `-Wl,--rpath -Wl,LIBDIR' linker flag
   - have your system administrator add LIBDIR to `/etc/ld.so.conf'

See any operating system documentation about shared libraries for
more information, such as the ld(1) and ld.so(8) manual pages.
----------------------------------------------------------------------
chmod 755 /opt/oracle/middleware/Oracle_WT1/ohs/modules/mod_proxy_html.so
OHS provides the includes for Apache but not for libxml (they are not part of the distribution). I checked with this simple test.c that the version is a 2.7.x so I just compiled against system headers which were of the same version.
OHS does not have the beautiful organization of the configuration files that debian uses, so I added the lines directly in the httpd.conf. They are exactly the same changes I presented before but in raw mode  .
.
And it worked again! So this step was done very quickly.
Adding mod_proxy_html to Windows/OHS
This was my final goal but I was sure it was going to be painfully done. I will try to explain all the steps I did but maybe I forget any of them (I did so many things that I am not sure which were necessary and which were useless).
The first point was installing a 2008r2 (evaluation licensed) and the OHS 11.1.1.5.0 (64 bit installation). This was the easy part
 .
.Then the compiler suite was needed. For that I installed the Visual C++ 2008 Express Edition with SP1.
The problem with that is this edition only works for win32 compilations (and not for the win64 which I needed). But I read this great forum post about this issue and I successfully installed Windows SDK for Windows Server 2008 and .NET Framework 3.5 and performed the changes explained in the forum.
I created a new project (Win32 Project / DLL) and I included the mod_proxy_html.cpp which is exactly the same used in Linux but with the following include at the beginning (it adds to the project all the needed windows headers):
#include "stdafx.h"
Starting the compilation of the mod_proxy_html 3.0.1 file I understood that libraries work different in Windows. DLL files are not enough and you need a LIB file which (I think) define all the symbols of the external library (functions, vars,...). The mod_proxy_html depends on four external libraries: libxml, libapr-1, libaprutil-1 and libhttpd (libxml is used to parse HTML pages and the other are typical Apache libraries used in modules). OHS provides all of them but only as DLL files (in %ORACLE_HOME%\ohs\bin). I suppose that this situation is quite common with third-party software (but do not trust in me, I am not a Windows specialist). Luckily this blog explains how to create a LIB file from the DLL and this forum entry how to add external libraries to a project (includes for compiling and libs for linking).
As OHS does not provide the libxml headers (same issue than in Linux) I added an additional directory with my Linux headers. With them the compilation complained about iconv, as libiconv.dll is not part of the OHS distribution I supposed that the libxml provided for Windows is not compiled with iconv support (quite normal in Windows I guess) so I changed xmlversion.h header to disable iconv support (I changed the 1 in the #if for a 0):
#if 0
#define LIBXML_ICONV_ENABLED
#endif
One particular problem was that sockaddr_in6 structure was not found (Apache uses IPV6 and IPV4) at compiling time. After a lot of reading I found that this structure is defined in ws2tcpip.h and I needed to change the windows.h provided by the SDK. I commented in the file C:\Program Files\Microsoft SDKs\Windows\v6.0A\Include\Windows.h the following include:
#include <winsock.h>
and replaced it by this one:
#include <ws2tcpip.h>
I suppose that the first one is IPV4 only and the second one is for both (but I really do not know). Besides I commented these lines in project header stdafx.h (I think these defines hide some include which I needed):
//#define WIN32_LEAN_AND_MEAN  // Exclude rarely-used stuff from Windows headers
//#define _WINSOCKAPI_
With all the previous steps done the module compilation still gave a lot of errors. All those errors were only casts and I fixed all of them one by one
 . Finally the module compiled and linked, a beautiful DLL was generated. But it did not work. When the web server was started it gave the following error:
Syntax error on line 248 of C:\\Oracle\\Middleware\\Oracle_WT1\\instances\\instance1\\config\\OHS\\ohs1/httpd.conf: Can't locate API module structure `proxy_html_module' in file C:/Oracle/Middleware/Oracle_WT1/ohs/modules/mod_proxy_html.dll: No error
The Apache server did not find the variable of the module cos the DLL was not generated like the server wanted (the DLL did not expose the module variable). After a lot of time I realized that all my problems commented in this point (cast errors and the module variable) were generated by wrong compiling and linking options. I changed a lot of them and I am not sure which of them are the important ones. For this reason all my changes and the complete command line for compiling and linking are going to be presented (the following table shows all modified -non default- options of the project and the commands, besides here it is the Visual project file):
C/C++ General: Additional Directories: C:\Oracle\Middleware\Oracle_WT1\ohs\include
C:\User\Administrator\Documents\Visual Studio 2008\Projects\Project1\mod_proxy_html\libxml2Debug Information Format: Disabled Warning Level: Level 3 (/W3) Optimization: Optimization: Maximize Speed (/O2) Code Generation: Enable Minimal Rebuild: Yes (/Gm) Smaller Type Check: No Basic Runtime Checks: Default Runtime Library: Multi-threaded Debug DLL (/MDd) Precompiled Headers: Create/Use Precompiled Header: Use Precompiled Header (/Yu) Advanced: Compile As: Compile as C Code (TC) Show Includes: Yes (/showIncludes) Command Line: /O2 /I "C:\Oracle\Middleware\Oracle_WT1\ohs\include" /I "C:\Users\Administrator\Documents\Visual Studio 2008\Projects\Project1\test\libxml2" /D "WIN32" /D "_DEBUG" /D "_WINDOWS" /D "_USRDLL" /D "MOD_PROXY_HTML_EXPORTS" /D "_WINDLL" /D "_UNICODE" /D "UNICODE" /Gm /EHsc /MDd /Yu"stdafx.h" /Fp"Debug\mod_proxy_html.pch" /Fo"Debug\\" /Fd"Debug\vc90.pdb" /W3 /nologo /c /TC /showIncludes /errorReport:prompt Linker: General: Enable Incremental Linking: No (/INCREMENTAL:NO) Additional Library Directories: C:\Oracle\Middleware\Oracle_WT1\ohs\bin Input: Additional Dependencies: libxml2.lib libapr-1.lib libaprutil-1.lib libhttpd.lib Debugging: Generate Debug Info: Yes (/DEBUG) System: SubSystem: WINDOWS (/SUBSYSTEM:WINDOWS) Optimization: References: Eliminate Unreferenced Data (/OPT:REF) Advanced: Randomized Base Address: Disable Image Randomization (/DYNAMICBASE:NO) Fixed Base Address: Image must be loaded at a fixed address (/FIXED) Target Machine: MachineX64 (/MACHINE:X64) Command Line: /OUT:"C:\Users\Administrator\Documents\Visual Studio 2008\Projects\Project1\mod_proxy_html\Debug\mod_proxy_html.dll" /INCREMENTAL:NO /NOLOGO /LIBPATH:"C:\Oracle\Middleware\Oracle_WT1\ohs\bin" /DLL /MANIFEST /MANIFESTFILE:"Debug\mod_proxy_html.dll.intermediate.manifest" /MANIFESTUAC:"level='asInvoker' uiAccess='false'" /DEBUG /PDB:"c:\Users\Administrator\Documents\Visual Studio 2008\Projects\Project1\mod_proxy_html\Debug\mod_proxy_html.pdb" /SUBSYSTEM:WINDOWS /OPT:REF /DYNAMICBASE:NO /FIXED /NXCOMPAT /MACHINE:X64 /ERRORREPORT:PROMPT libxml2.lib libapr-1.lib libaprutil-1.lib libhttpd.lib kernel32.lib user32.lib gdi32.lib winspool.lib comdlg32.lib advapi32.lib shell32.lib ole32.lib oleaut32.lib uuid.lib odbc32.lib odbccp32.lib
After all that hell I finally got a mod_proxy_html.dll valid for OHS 11.1.1.5.0 (win64) on Windows 2008r2. Again I did the same modifications in the httpd.conf file and the reverse proxy worked fine. Now a video is presented in which I first access directly to my tomcat installation and request the test page. There it is clear that some links are absolute. Then I change to my windows virtual box using the proxy location. Same tomcat page is shown and now the test HTML have the links modified to point to the correct URI (mod_proxy_html is in action!). Finally I request the server info page, the Apache is a OHS Windows X64 with my mod_proxy_html.cpp perfectly loaded.
This entry summarizes how to add mod_proxy_html (a proxy module that modifies the links inside the HTML sent by the backend in order to fix them) to Apache and OHS. The entry shows how to compile the module in Debian/Apache, Linux/OHS and Windows/OHS. My final goal was adding the module to an OHS (64 bits bundle) running in a Windows 2008r2. I usually never work with Windows and I spent so much time doing that that I wanted to preserve the information here. The next time someone tells me how easy Windows is I am going to ask him to compile something, an Apache module for example. 
May the force be with you!
Comments