

Saturday, January 21. 2012
Simple but Full Glassfish HA Using Debian


During the past months I has been working in a project of which environment is mainly Windows (that is the reason of the previous entry about windows mod_proxy_html compilation  ). Talking with the customer I realized that Windows 2008 provides a simple and out of the box Load Balancing / High Availability mechanism for TCP/IP client/server infrastructures called Network Load Balancing Services (NLBS). The customer complained about the lack of a similar solution in Linux (remember this customer is pro-windows). During my working life I have always used hardware load balancers in those situations, so I have never investigated how to implement a simple LB/HA solution which only deals with the OS. If you remember I presented an entry about HA in application servers and using an in-memory repository for session management some months ago. Today entry is less ambitious and more practical, I just want to setup a full Glassfish HA setup using only Debian (full means with no single point of failure).
The solution
Looking for information about the problem in the internet, I found lots of LB/HA sample solutions for TCP/IP enviroments in Linux, most of the times they involve two products (see for example this entry):
keepalived. This package provides a VRRP (Virtual Router Redundancy Protocol) implementation stack and a versatile health checking system. So this software can commute a virtual IP between two or more hosts, the health checking system is used to test the servers and decide which one is the master and which one is the backup server. In short keepalived provides High Availability for an IP. In linux there are other more complicated HA techniques to get a full and typical cluster (shared storage, typical virtual -eth0:1 style- IPs,...) but I really do not know much about it.
haproxy. A TCP/HTTP software load balancer that, obviously, adds the Load Balancing part to the solution. In internet examples haproxy is commonly used cos it is generic (it can distribute the load for any TCP/IP protocol: LDAP, HTTP, SMTP, IMAP,...).
But in this entry a particular case is shown, a Java Application Server (Glassfish), and it is clear that there are better techniques for load balancing two Java Servers. For this reason my solution will use two other packages instead of haproxy:
mod_jk. Finally I decided to use the Apache Tomcat Connector as my software load balancer. Glassfish is a very nice piece of software and it has several connectors that can be added to an Apache server to perform this function:
mod_proxy_http: General HTTP reverse proxy module for Apache which supports load balancing.
mod_proxy_ajp: Similar to mod_proxy_http but it manages Apache JServ Protocol version 1.3 (AJP13) to talk with the App Server (Glassfish supports AJP13).
mod_jk: The chosen module also uses AJP13 to connect Apache and the App Server but while mod_proxy_ajp is developed by the httpd group mod_jk is developed by tomcat guys. Usually it is more configurable and better in terms of failure detection.
HTTP Glassfish Load Balancer Plug-in. This plugin is the official Oracle Glassfish load balancer module which is not available in the Open Source Edition. For this reason it was not selected for the demo.
Apache. The famous HTTP web server which is necessary to install mod_jk inside it.
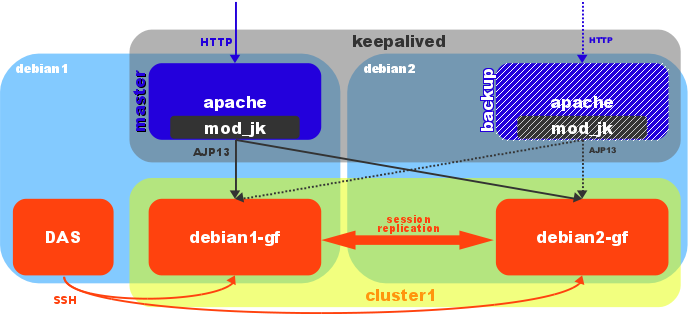
So the solution is quite clear now. First of all keepalived gives a virtual IP which commutes between two Apache/mod_jk boxes (only one httpd server works actively, the other one acts as a backup). The package uses scripts to check if the web server is working fine. The httpd box which has the active IP receives the requests and apache/mod_jk pair redistributes them between two Glassfish servers. So the first layer provides only HA and the second layer LB/HA (take into account that the work in the first layer is lighter, the hard process is performed by the App Server).
My demo environment is the simplest one. Two debian wheezy boxes were virtualized (KVM) inside my laptop: debian1 (192.168.122.21) and debian2 (192.168.122.22). The Linux distribution was installed with the minimal number of packages. Each box will have an Apache/mod_jk and a Glassfish server. Cos the Glassfish 3.1.1 is configured as a cluster debian1 runs the Domain Administrator Server (DAS) too. Replicated session is used (session is sent from one instance to the other when it is changed) but mod_jk uses sticky distribution (the first request is distributed but all the rest from the same source are sent to the same Glassfish server). The keepalived software manages a virtual IP (192.168.122.23) which is assigned to the master host (host with the highest priority). I present a little diagram of my demo solution.
OpenJDK Installation
A Debian solution deserves OpenJDK (the open source JVM):
# apt-get install openjdk-6-jdk
Glassfish version 3.1.1 is going to be used and it is known that there are problems with old versions of JavaSE6. That was the reason to choose wheezy (OpenJDK 6b24) instead of squezze (6b18). JDK was installed in both machines.
Glassfish Installation
The Glassfish installation, although it is not very complicated, requires several steps (I have followed this guide).
I prefer to run glassfish with its own user. So first of all a system user and group were created.
# groupadd glassfish
# useradd -c "Glassfish User" -d /opt/glassfish -g glassfish -m -s /bin/bash glassfish
# passwd glassfish
This step was done in both machines.
First the linux distribution for Glassfish OpenSource Edition 3.1.1 was downloaded and installed.
$ wget http://download.java.net/glassfish/3.1.1/release/glassfish-3.1.1-unix.sh
$ bash glassfish-3.1.1-unix.sh
Please choose to only install the software (do not configure it). I do not like to put installation screens (I am sure that all of you are intelligent enough to install it). I remark only two questions, where to install it (/opt/glassfish/glassfish3.1.1) and what java to use (/usr/lib/jvm/java-6-openjdk-amd64). I completed the installation in both machines.
A domain (domain1) was then created in debian1 (all asadmin commands were launch from /opt/glassfish/glassfish3.1.1/bin).
$ ./asadmin create-domain --savemasterpassword=true --savelogin=true domain1
Enter admin user name [Enter to accept default "admin" / no password]> admin
Enter the admin password [Enter to accept default of no password]>
Enter the admin password again>
Enter the master password [Enter to accept default password "changeit"]>
Enter the master password again>
Using default port 4848 for Admin.
Using default port 8080 for HTTP Instance.
Using default port 7676 for JMS.
Using default port 3700 for IIOP.
Using default port 8181 for HTTP_SSL.
Using default port 3820 for IIOP_SSL.
Using default port 3920 for IIOP_MUTUALAUTH.
Using default port 8686 for JMX_ADMIN.
Using default port 6666 for OSGI_SHELL.
Using default port 9009 for JAVA_DEBUGGER.
Distinguished Name of the self-signed X.509 Server Certificate is:
[CN=debian1.demo.kvm,OU=GlassFish,O=Oracle Corporation,L=Santa Clara,ST=California,C=US]
Distinguished Name of the self-signed X.509 Server Certificate is:
[CN=debian1.demo.kvm-instance,OU=GlassFish,O=Oracle Corporation,L=Santa Clara,ST=California,C=US]
No domain initializers found, bypassing customization step
Domain domain1 created.
Domain domain1 admin port is 4848.
Domain domain1 admin user is "admin".
Login information relevant to admin user name [admin]
for this domain [domain1] stored at
[/opt/glassfish/.asadminpass] successfully.
Make sure that this file remains protected.
Information stored in this file will be used by
asadmin commands to manage this domain.
Command create-domain executed successfully.
In v3 there are no profile types, all domains are equal. After creation domain1 was secured (console uses https instead of plain communication).
$ ./asadmin enable-secure-admin
Command enable-secure-admin executed successfully.
As Glassfish is going to use two working instances inside a cluster I usually delete listeners and servers which are not used by the web console.
$ ./asadmin delete-http-listener http-listener-1
Command delete-http-listener executed successfully.

$ ./asadmin delete-http-listener http-listener-2
Command delete-http-listener executed successfully.

$ ./asadmin delete-virtual-server server
Command delete-virtual-server executed successfully.
Now Glassfish v3 uses SSH to communicate with remote instances. So debian2 has to be added to the domain (public key is exchanged for future commands):
$ ./asadmin setup-ssh --generatekey=true debian2.demo.kvm
Enter SSH password for glassfish@debian2.demo.kvm>
Created directory /opt/glassfish/.ssh
/usr/bin/ssh-keygen successfully generated the identification /opt/glassfish/.ssh/id_rsa
Copied keyfile /opt/glassfish/.ssh/id_rsa.pub to glassfish@debian2.demo.kvm
Successfully connected to glassfish@debian2.demo.kvm using keyfile /opt/glassfish/.ssh/id_rsa
Command setup-ssh executed successfully.
And the new node (debian2) was installed:
$ ./asadmin install-node debian2.demo.kvm
Created installation zip /opt/glassfish/glassfish3.1.1/bin/glassfish298897142999171245.zip
Successfully connected to glassfish@debian2.demo.kvm using keyfile /opt/glassfish/.ssh/id_rsa
GlassFish is already installed on debian2.demo.kvm under /opt/glassfish/glassfish3.1.1.
Command install-node executed successfully.
Cos glassfish was installed in both machines this command does nothing.
As I said the remote instances are managed via SSH, for this reason there is a new concept called SSH node. These nodes are very different from previous node-agents, they are not a Java daemon at all, they are just remote hosts which run instances of the domain (so they are a concept and not a real daemon or process). Two nodes, called debian1-ssh and debian2-ssh, were created.
$ ./asadmin create-node-ssh --nodehost localhost debian1-ssh
Command create-node-ssh executed successfully.

$ ./asadmin create-node-ssh --nodehost debian2.demo.kvm debian2-ssh
Command create-node-ssh executed successfully.
Then the cluster (cluster1) and the two instances (debian1-gf and debian2-gf) were also created (each instance was registered in the previous nodes and inside the cluster):
$ ./asadmin create-cluster --systemproperties HTTP_SSL_LISTENER_PORT=8181:HTTP_LISTENER_PORT=8080 cluster1
Command create-cluster executed successfully.

$ ./asadmin create-instance --cluster cluster1 --node debian1-ssh debian1-gf
Command _create-instance-filesystem executed successfully.
Port Assignments for server instance debian1-gf:
JMX_SYSTEM_CONNECTOR_PORT=18686
JMS_PROVIDER_PORT=17676
ASADMIN_LISTENER_PORT=14848
HTTP_LISTENER_PORT=8080
JAVA_DEBUGGER_PORT=19009
IIOP_SSL_LISTENER_PORT=13820
IIOP_LISTENER_PORT=13700
OSGI_SHELL_TELNET_PORT=16666
HTTP_SSL_LISTENER_PORT=8181
IIOP_SSL_MUTUALAUTH_PORT=13920
The instance, debian1-gf, was created on host localhost
Command create-instance executed successfully.

$ ./asadmin create-instance --cluster cluster1 --node debian2-ssh debian2-gf
Command _create-instance-filesystem executed successfully.
Port Assignments for server instance debian2-gf:
JMX_SYSTEM_CONNECTOR_PORT=18686
JMS_PROVIDER_PORT=17676
ASADMIN_LISTENER_PORT=14848
HTTP_LISTENER_PORT=8080
JAVA_DEBUGGER_PORT=19009
IIOP_SSL_LISTENER_PORT=13820
IIOP_LISTENER_PORT=13700
OSGI_SHELL_TELNET_PORT=16666
HTTP_SSL_LISTENER_PORT=8181
IIOP_SSL_MUTUALAUTH_PORT=13920
The instance, debian2-gf, was created on host debian2.demo.kvm
Command create-instance executed successfully.
Once the instances were running (start-local-instance executed in each node), a new http-listener was registered to listen for the AJP13 protocol (this port will be used later inside mod_jk workers configuration). More details about this configuration in this link:
$ ./asadmin create-http-listener --listenerport 8009 --listeneraddress 0.0.0.0 --defaultvs server --target cluster1 jk-connector
Command create-http-listener executed successfully.

$ ./asadmin set configs.config.cluster1-config.network-config.network-listeners.network-listener.jk-connector.jk-enabled=true
debian1-gf:
configs.config.cluster1-config.network-config.network-listeners.network-listener.jk-connector.jk-enabled=true

debian2-gf:
configs.config.cluster1-config.network-config.network-listeners.network-listener.jk-connector.jk-enabled=true

configs.config.cluster1-config.network-config.network-listeners.network-listener.jk-connector.jk-enabled=true
Command set executed successfully.
In order to set the jvmRoute some java and system properties were added (mod_jk uses this property to perform sticky load balancing, in the first request the value of the jvmRoute is appended to the JSESSIONID cookie and the module will use this value to redirect the following requests to the same server).
$ ./asadmin create-jvm-options --target cluster1 "-DjvmRoute=\${AJP_INSTANCE_NAME}"
debian1-gf:
Created 1 option(s)

debian2-gf:
Created 1 option(s)

Created 1 option(s)
Command create-jvm-options executed successfully.

$ ./asadmin create-system-properties --target debian1-gf AJP_INSTANCE_NAME=debian1
Command create-system-properties executed successfully.

$ ./asadmin create-system-properties --target debian2-gf AJP_INSTANCE_NAME=debian2
Command create-system-properties executed successfully.
In glassfish all instances under a cluster share the same configuration, for this reason different values cannot be set to the same java property in each instance. So the trick is to set a different system property (these props can be defined by instance) and assign the java property referencing the system prop.
Finally the famous clusterjsp was deloyed with high availability enabled (by default glassfish uses session replication). It seems that clusterjsp application is not part of the glassfish 3.1.1 distribution (at least in the linux no multi-language bundle I used), so I created this simple clusterjsp.war (from a previous ear I have from v2 bundle).
$ ./asadmin deploy --availabilityenabled=true --target cluster1 ~/clusterjsp.war
Application deployed with name clusterjsp.
At that time both instances could only be managed with *-local-instance commands (launching the commands from its own host). I realized that that was because the master password (password for JKS keystores) was not locally saved (although I swear that I had added savemasterpassword in the domain creation command). To solve that I changed the password in both hosts (I put the same old password cos I just wanted it to be saved in the ~/.asadmintruststore file):
$ ./asadmin change-master-password --savemasterpassword true debian1-ssh
Enter the old master password>
Enter the new master password>
Enter the new master password again>
Command change-master-password executed successfully.

$ ./asadmin change-master-password --savemasterpassword true debian2-ssh
Enter the old master password>
Enter the new master password>
Enter the new master password again>
Command change-master-password executed successfully.
Finally to not use any password in commands at debian2 machine I saved the user and password information as well in this second host (the user and password is saved in ~/.asadminpass file):
$ ./asadmin --host debian1.demo.kvm --port 4848 login
Enter admin user name [default: admin]> admin
Enter admin password>
Login information relevant to admin user name [admin]
for host [debian1.demo.kvm] and admin port [4848] stored at
[/opt/glassfish/.asadminpass] successfully.
Make sure that this file remains protected.
Information stored in this file will be used by
asadmin commands to manage the associated domain.
Command login executed successfully.
Finally I created a simple startup script which needs to be placed in /etc/init.d/glassfish-inst. This script launches a single instance (DAS instance is not needed to be started at boot time, so only the cluster instance will be started in each machine) and it needs asadmin command to not prompt for anything (see the previous step to save the passwords). After the file is correctly placed and the needed variables changed it must be registered in debian.
# chmod 755 /etc/init.d/glassfish-inst
# update-rc.d glassfish-inst defaults
update-rc.d: using dependency based boot sequencing
So now we have a clustered (session replicated) application. Besides each cluster instance listens for AJP13 protocol in port 8009. Everything is ready for Apache/mod_jk configuration. In this demo I chose Glassfish but the main concepts (maybe changing some pieces) are the same for any application server. And as a final comment for this part, you already know that I personally recommend not to replicate sessions, this process has a big impact if the sessions are too many, too big and/or too volatile (but also be aware that in that case a server lost means a session lost).
Apache/mod_jk Installation
Both packages are part of the main Debian repository, so installing them is just a command like this:
# apt-get install apache2 libapache2-mod-jk
Configuration for JK module is placed in /etc/apache2/mods-available/jk.conf. I just used the debian default but commenting /jk-status and /jk-manager locations (I decided to define them inside the site). This config file points to /etc/libapache2-mod-jk/workers.properties as the workers configuration file. The important lines in the second file are the following:
worker.list=loadbalancer,jk-status
worker.debian1.port=8009
worker.debian1.host=debian1.demo.kvm
worker.debian1.type=ajp13
worker.debian1.lbfactor=1
worker.debian2.port=8009
worker.debian2.host=debian2.demo.kvm
worker.debian2.type=ajp13
worker.debian2.lbfactor=1
worker.loadbalancer.type=lb
worker.loadbalancer.balance_workers=debian1,debian2
worker.loadbalancer.sticky_session=1
worker.jk-status.type=status
There are two workers defined, debian1 and debian2 (the name of the worker has to be the same defined in the jvmRoute property), using AJP13 protocol on both virtual hosts with port 8009. Another worker loadbalancer is used to distribute requests between the two previously defined workers. The distribution is configured sticky. Finally the status worker (a page that informs about worker status) is defined with the name jk-status. No special tuning (timeouts and more) was done.
Once mod_jk is configured the default site defined in /etc/apache2/sites-available/default adds two new locations to proxy the clusterjsp app and the status worker:
    <Location /jk-status>
        # Inside Location we can omit the URL in JkMount
        JkMount jk-status
        #Order deny,allow
        #Deny from all
        #Allow from 127.0.0.1
    </Location>

    # mount clusterjsp
    JkMount /clusterjsp loadbalancer
    JkMount /clusterjsp/* loadbalancer
Finally the mod_jk is enabled and apache2 restarted:
# a2enmod jk
# /etc/init.d/apache2 restart
These steps have to be done in both hosts (debian1 and debian2). And, at this moment, both Apache servers are balancing the two glassfish clustered instances. As mod_jk detects application server failures the LB/HA of glassfish layer is achieved.
Keepalived Installation
The final package, keepalived, is installed following the debian way:
# apt-get install keepalived
This software has just a little configuration located in /etc/keepalived/keepalived.conf. This file just contains the following:
vrrp_script chk_http_port {   # Requires keepalived-1.1.13
  script "wget -q -T 1.0 -t 2 --delete-after -O /tmp/test.wget http://localhost:80/index.html"
  interval 5            # check every 5 seconds
  weight 2              # add 2 points of prio if OK
}

vrrp_instance VI_1 {
  interface eth0
  state MASTER          # MASTER debian1, BACKUP debian2
  virtual_router_id 51  # same id in both hosts
  priority 101          # 101 on master, 100 on backup
  virtual_ipaddress {
    192.168.122.23      # virtual IP
  }
  track_script {
    chk_http_port
  }
}
A VRRP instance is defined in eth0 interface. This instance manages the IP 192.168.122.23. Host debian1 is declared MASTER with an initial priority of 101, debian2 is the backup instance with a priority of 100. A script chk_http_port is executed in both hosts and it assigns two points more. This way if debian1 Apache fails it only has 101 points while debian2 has 102 (100 + 2 added by the check) and the backup server is transitioned to master (the virtual IP moves from debian1 to debian2). As soon as debian1 Apache runs again (103 points are now assigned to debian1) this host become the master again. If whole debian1 fails (a hardware failure for example), the multicast packets, which are supposed to be sent by the master server, stop being received by the backup server and therefore its status will be risen to master (check VRRP protocol specification in RFC 2338). Take in mind that keepalived does not use typical virtual IPs (eth0:1 and so on), it does HA using VRRP which manages multicast and ARP. VRRP only works inside the same network (both machines have to be inside the same net). With keepalived the first layer is configured in HA (only one apache is working, the other is just awaiting as a backup server).
The checking script is very simple, using wget a test page from the Apache is retrieved (timeout of one second but with two tries). If wget returns 0, the page was got successfully, in case of any other return code, the page was not returned and the check fails. Never test a glassfish page (doing that you are mixing layers and the results can be very weird). Here you have master configuration for debian1 and backup for debian2.
Conclusion
As a conclusion I am going to present a video that shows my demo installation. By default debian1 is the master vrrp server and if clusterjsp page is requested, its apache/mod_jk redirects to any of the glassfish servers (debian1 in the video). Cos the module is configured sticky I can set some attributes in the session and debian1 is always my working glassfish. Now debian1-gf glassfish instance is stopped and clusterjsp is redirected to debian2 (now debian1 apache and debian2 glassfish are working). But then debian1 apache is stopped, debian2 transitions to master state (a tail for /var/log/messages displays keepalived information) and application is still working (now debian2 is doing all the job, apache and glassfish). After restarting debian1 Apache, this host becomes again the master. Finally the virtual machine of debian1 is suddenly stopped, debian2 transitions again to master. Because clusterjsp application was deployed with session replication the session is never lost in the video.
For me it is clear that linux has also a good and simple LB/HA mechanism, keepalived is usually more than enough in typical TCP/IP client/server solutions. With this configuration a virtual IP that commutes between nodes is setup (only HA at the first layer). This layer consists in a software load balancer and, as I commented, usually generic haproxy is used. Nevertheless apache/mod_jk is a much proper solution for AJP13 capable Java Application Servers. The second layer (glassfish in this case) has LB/HA features, cos the load balancer (mod_jk) distributes the load between the two instances at the same time it checks the server status. So the second layer processes requests in parallel. The problem for my customer was that their linux boxes were RedHat6 and keepalived is not distributed by default in the distro (it seems that cluster extra software is needed in order to get this package).
That's why Debian rules! 
Comments